Visitor Management
Resources for Back-to-School Success
- Emergency Management
- Campus360
- Connect360
- PBIS Rewards
- Hall Pass
- Preparation & Response Training
- Behavioral Case Manager
- Visitor Management
-
Compass
Training Workshops Getting Started On-Demand Data & User Management Compass Curriculum for Students, Staff, & Families Compass Behavior Intervention Compass Mental Health + Prevention Compass for Florida - Character Ed, Resiliency, & Prevention Compass for Texas - Character Ed Analytics & Reporting Release Notes & Updates Additional Resources
- School Check In
- ALICE Training Institute
- Detect
- Anonymous Tip Reporting
- Resources
- Back-to-School
Back-to-School Refresher Training
Review our robust library of on-demand training content to ensure both new and returning administrators are equipped for the upcoming school year.
Our comprehensive resources are designed to help your team confidently navigate the tools and strategies essential for a safe and successful start. Whether you're returning or just getting started, these trainings provide the knowledge and support needed to effectively implement your Navigate360 solutions from day one.
To register for a webinar, click on the subject heading to select a topic of interest. Review at your own pace.
Visitor Management Admin Training: Customizing Visitor Management
Visitor Management Admin Training: Customizing Visitor Management
On-Demand Resources to setup and customize your Visitor Management solution.
Navigate360's Visitor Management solution enables campuses to seamlessly integrates into your school’s safety protocols, facilitating a smooth transition for visitor check-ins, staff check-ins/outs, and student late check-ins/early check-outs.
Audience: District Administrator, Building Administrator
Scope of Training: This training session will guide District and Building Administrators through the process of customizing and managing Navigate360’s Visitor Management system. Key areas covered included:
- User Management and Permissions
- Visitor Check-In Settings and Badge Printing
- Attendance and Visit Time Configurations
- Auto-checkout and Security Notifications
- Mobile Application and Self-Service Kiosk Setup
Additional Resources:
Accessing Visitor Management Portal
- Open a web browser (Google Chrome/Edge) on your dedicated Visitor Management Laptop.
- Navigate to www.navigate360vm.com.
- Log In with Visitor Management credentials.
- You will now have access to the Visitor, Student and Faculty check in-out pannels.
VM Expert Tip: Clicking on the Star icon  in either Chrome or Edge will allow you to save this bookmark for quicker access.
Editing School Information
How to Add/Edit School Information
- Log into Visitor Management as a District Admin or Building Admin
- Navigate to the Admin Settings by clicking the key icon on the side navigation menu
- Navigate to the School Info tab
- Add or edit the below details:
- School Name
- Phone
- Address
- City
- State
- Zip
- Start Time (Time that the school day in the building starts)
- End Time (Time that the school day in the building ends)
- Timezone
SSO (Single Sign-On) Setup
SSO (Single Sign-On) Set Up
This article will detail the needed steps by a School District to set up SSO for Navigate360 Visitor Management. Each section must be followed in order, first by the school district in Section A, then by Navigate360 in Section B, and then finally by the school district in Section C.
A. Azure Setup - Completed by District
To fill in the basic information section for the connection between Auth0 and Microsoft Azure AD, you'll need to gather and send specific details (Client ID, Client Secret Value, and Azure AD Domain) from your Azure AD portal. Please follow the below steps to complete this task.
- Log in to the Azure Portal: Open the Azure Portal and log in with your account.
- Navigate to Azure AD (Active Directory): From the left-hand navigation pane, select “Azure Active Directory.”
- Go to App Registrations: Select "App registrations" from the menu.
- Create or Select an Application: If you have an existing application that you want to use, click on its name. Otherwise, click "New Registration" to create a new application.
-
Add the Redirect URI: In the “Overview” or “Authentication” section, add the below callback address as a Redirect URI:
- Type: Web
- Redirect URI: https://alice-dev.auth0.com/login/callback
- Copy the Client ID: In the "Overview" section, you'll find the Application (client) ID. Copy this value.
-
Create a Client Secret: Go to the "Certificates & secrets" section, then click on "New client secret." Enter a description and select an expiration period, then click "Add." Copy the value of the client secret as it won't be visible again after you leave this page.
- Important: The Client Secret will have a Client Secret ID and a Client Secret Value. Please ensure that you are sharing the Client Secret Value, as this is the field needed to connect Auth0 and your Microsoft Azure AD.
- It will typically be in the format “xxxxx~xxxxxxx-xxx…”.
-
Find Your Azure AD Domain: Go back to the "Azure Active Directory" overview page. You should see your primary domain listed under the "Custom domain names" section.
- It will typically be in the format “mydomain.onmicrosoft.com”.
- Send the Client ID, Client Secret Value, and Azure AD Domain to your Navigate360 Implementation Consultant.
B. Auth0 Setup - Completed by Navigate360
Once you provide the Client ID, Client Secret Value, and Azure AD Domain to your Navigate360 Implementation Consultant (Section A), the Navigate360 team will create the connection in Auth0.
The Implementation Specialist will inform you once this has been completed, so you can finish the VM Configuration (Section C) steps below.
C. VM Configuration - Completed by District
Now that both Azure and Auth0 setup is complete, Please follow the below steps to complete the configuration and confirm SSO access.
Configure the group name to the permission level
- Find the group names within your Azure AD. You’ll link the group names created in Azure to the SSO Permission Mapping page in VM.
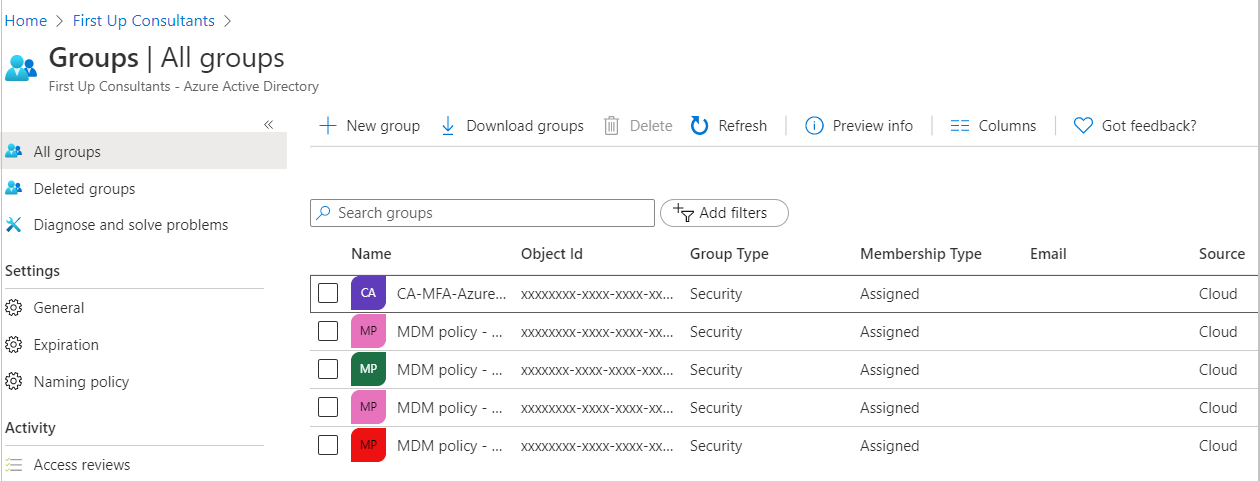
- Log into Visitor Management as a District Admin.
- Navigate to the Admin menu and select SSO Permission Mapping.

- Click on Add Groups → Add Groups Manually.

- Enter a Group Name and press Enter on your keyboard. You can add multiple Group Names for a single Permission Level prior to saving.
- Note: Please ensure that the Group Name is entered exactly how it is listed in Azure AD.

- Ensure you've selected the Permission Level and Building(s) if necessary, for the entered Group(s). Then click Save Changes.

- The saved permission mapping for the added Group(s) will now be displayed on the SSO Permission Mapping table.

- Repeat steps 4-6, as needed, for any remaining Azure AD Groups.
Testing the SSO Functionality
- Open the Login page for Visitor Management and click Sign in with SSO.
- In the popup window, enter the email address for an Azure AD user account that you have access to.
- Note that the email address being used for testing will need to have access to an Azure AD Group that has been configured in VM (Section C).
- You will see a message “SINGLE SIGN-ON ENABLED.”
- Click Log In to be redirected to your Microsoft Account for authentication.
- Once authenticated, the popup will close and the system will log you into VM.
Troubleshooting
- Ensure all steps outlined have been completed.
- Check that pop-up blockers or cross-site limiters are not preventing the communication between VM and Azure AD.
Visitor Check-in Settings
Visitor Check-in Settings
Visitor Management allows District and Building Admins to configure how the visitor check-in process works. They can select which information must be provided by a visitor before completing their check-in and entering the building, as well as set how to handle potential duplicate visitors. See below for details on how to perform both actions:
- Log into Visitor Management as a District Admin or Building Admin
- Navigate to the Admin Settings by clicking the key icon on the side navigation menu
- Navigate to the Visitor Check-in Settings tab
Visitor Check-in Fields
- Users can toggle between the Mandatory and Optional buttons for each of the visit details below, to ensure the necessary information is provided by a visitor before completing their check-in:
- Visitor Type - always set to mandatory by default
- Reason for Visit - always set to mandatory by default
- Destination
- Who are you Visiting
- Mobile Number
-
District Admins can save and apply these settings to all schools in the district
- District Admins can also toggle on the Prevent School Overrides option to ensure that these settings are not changed by a Building Admin at a later date
- If Prevent School Overrides is disabled, Building Admins will have the ability to update and save the preferred settings for their school
Duplicate Profile Check Process
- Users can toggle between All Duplicates and High-risk Duplicates Only to determine how potential duplicate visitor profiles should be handled during the check-in process
- If the All Duplicates setting is enabled (default):
- All visitors that are flagged as being a potential duplicate of an existing profile during the check-in workflow will need to reviewed and resolved prior to completing their check-in
- If the High-risk Duplicates Only setting is enabled:
- Only potential duplicates that are tied to a security-related flag (Sex Offender Match, Blocklist, Custody Instructions, or High Importance Note) will need to be reviewed and resolved prior to completing their check-in
- All other potential duplicates will be allowed to complete their check-in without interruption. A VM User will then be able to review and resolve the potential duplicate profiles at a later time from the Visitor's Profile. To learn more about how to resolve a potential duplicate outside of the check-in process, click here.
- If the All Duplicates setting is enabled (default):
-
District Admins can save and apply these settings to all schools in the district
- District Admins can also toggle on the Prevent School Overrides option to ensure that these settings are not changed by a Building Admin at a later date
- If Prevent School Overrides is disabled, Building Admins will have the ability to update and save the preferred settings for their school
Note: The settings saved on this page will apply to all visitor check-ins completed on Self-Serve and Staff-Assisted stations.
Customizing the Restricted Persons Policy
Restricted Persons Policy
Restricted Persons Policy
- Log into Visitor Management as a District Admin or Building Admin
- Navigate to the Admin Settings by clicking the key icon on the side navigation menu
- By default, the user is now on the Users tab
- Under Visitor Management Settings, navigate to the Restricted Persons Policy Page
- Enter the school district's policy in the Policy field
- Click on Save & Apply This Setting for All Schools
Prevent School Overrides - District Admin only
Toggle the Prevent School Overrides option to prevent Building Admins from making changes at their specific sites.
Setting up Self-Serve Kiosk
Self-Serve Setup
Visitor Management offers a Self-Serve workflow for students, staff, visitors and volunteers to check themselves into the building. Users have the ability to create unique Self-Serve Kiosks to their buildings' needs. See below for details on how to set up all needed Self-Serve kiosks for the building.
- Log into Visitor Management as a District Admin or Building Admin
- Navigate to the Admin Settings by clicking the key icon on the side navigation menu
- Navigate to the Self Serve Setup tab
- Toggle on the Self-Serve Page option
- Add a School Logo to display on the Self-Serve page
- Note: Supported format JPEG, PNG. Maximum file size 1 MB. Please ensure that the image has the same height and width.
Self-Serve Kiosk Actions
Default Kiosk
The initial kiosk setting will display as “[School Building Name] (default)”. The name and any settings for this kiosk can be edited and saved as needed.
Add a New Kiosk
- Click on + Add Kiosk
- Enter a Kiosk Name
- Click the Save button
- Toggle on the needed personas - See the Self-Serve Settings tab in this article for more details.
- User can set the needed Check-in and Check-out instructions for each kiosk - See the Instructions After Check-in and Instructions After Check-in tabs in this article for more details
Edit a Kiosk Name
- Click on the Pencil icon
- Enter a new Kiosk Name
- Click the Save button
Disable/Enable a Kiosk
- Toggle the Enabled/Disabled option
- Note: A kiosk's settings will persist if disabled and then enabled.
Delete a Kiosk
- Click on the Trash Can icon
- Note: A kiosk can only be deleted if there are at least two (2) other enabled kiosks. Once deleted, the action cannot be undone. If a kiosk may be needed in the future, it is recommended to disable the kiosk instead.
Self-Serve Settings
- Toggle on the below personas to allow them to check in or check out via the Self-Serve kiosk:
-
Student
- Enter Name or ID # - Users can set this option to allow students to use their name or student ID # to search for their profile to check in late or check-out early.
-
Scan School ID - Users can set this option if students will use school IDs with a Barcode/RFID or QR code to check in late or check out early. Click here to learn how to set up School ID scanning for students.
- Users can set the default School ID scanning method between Barcode/RFID and QR Code. (Note: If both Student and Staff School ID scanning is enabled on the same kiosk, both must be set to the same option of Barcode/RFID or QR Code.)
- Staff
- Scan QR Code from mobile app - Users can set this option to allow staff to use the QR code generated from the mobile app to check in and out of the building.
- Enter Staff ID # - Users can set this option to allow staff to use their staff ID # to search for their profile to check in and out of the building.
-
Scan School ID - Users can set this option if staff will use school IDs with a Barcode/RFID or QR code to check in and out of the building. Click here to learn how to set up School ID scanning for staff.
- Users can set the default School ID scanning method between Barcode/RFID and QR Code. (Note: If both Student and Staff School ID scanning is enabled on the same kiosk, both must be set to the same option of Barcode/RFID or QR Code.)
-
Scan Driver's License - Users can set this option to allow staff to use their driver's license to check in and out of the building.
- Users can set the default ID scanning method between Camera and 2D Scanner. (Please note that 2D scanners are only compatible with US driver's licenses.)
-
Visitor
- Scan QR Code from Mobile App - Users can set this option to allow visitors to use the QR code generated from the mobile app to check in for a scheduled visit.
-
Scan Government-issued ID - Users can set this option to allow for visitors to scan their government issued ID to check in and out for their visit.
- Users can set the default ID scanning method between Camera and 2D Scanner (Please note that 2D scanners are only compatible with US driver's licenses.)
-
First Visit Options - Users can set this option to prevent visitors from checking in on Self-Serve for their first visit to the building.
- First-time visitors will be prompted to see the front desk and continue their check-in on the Staff-Assisted station.
-
Guardian
- Scan QR Code from Mobile App - Users can set this option to allow guardians to schedule student late check-ins/early check-outs and scan the generated QR code at the Self-Serve kiosk.
-
Scan Government-issued ID - Users can set this option to allow for guardians to scan their government issued ID to initiate a student late check-in/early check-out.
- Users can set the default ID scanning method between Camera and 2D Scanner (Please note that 2D scanners are only compatible with US driver's licenses.)
-
Volunteer (Note: Can only be toggled on if Volunteer Management has been purchased)
- Scan QR Code from Event Registration - Users can set this option to allow volunteers to use the QR code sent in the email for the event they registered for prior to their visit.
- Enter Email Address - Users can set this option to allow volunteers to enter the email address used to sign up as a volunteer to check in for an event in the building.
-
Scan Driver's License - Users can set this option to allow volunteers to use their driver's license to check in and out of the building.
- Users can set the default ID scanning method between Camera and 2D Scanner. (Please note that 2D scanners are only compatible with US driver's licenses.)
-
Student
- Click Save to save all persona configurations
- Click Open Self-Serve Kiosk Link on the bottom of the page to open the Self-Serve page in another tab in the browser
- Click Copy Self-Serve Kiosk Link on the bottom of the page to copy the Self-Serve kiosk link for use in anther computer or browser.
Instructions After Check-in
- Enter instructions for Visitors after they check in.
- Click Save Instructions
Google Translate
Visitors whose first language is not English can choose their preferred language using Google Translate on any screen during the check-in process, including the Instructions after Check-in.
Instructions After Check-out
Instructions Shown After Visitor Check-out
- Enter instructions for Visitors after they check out
- Click Save Instructions
Visitor Check-out Mobile App Message
- Users can enable this option to display the VM Mobile App Message, with a QR code to download the mobile app, when a visitor checks out using the Self-Serve kiosk.
- Toggle the feature on or off
- Note: This setting is toggled on by default
Google Translate
Visitors whose first language is not English can choose their preferred language using Google Translate on any screen during the check-out process, including the Instructions after Check-out.
PowerSchool Writeback Integration
PowerSchool Setup
Note: PowerSchool Writeback functionality and the Navigate360 Attendance Access Plugin requires a paid subscription. To learn more about this functionality and/or receive your Attendance Access Plugin download, please reach out to your Navigate360 Account Manager.
Functionality Overview
Visitor Management's PowerSchool Writeback functionality enables each school to transfer Student Check-in and Check-out events back to their PowerSchool instance. Once configured and enabled, any time a student event occurs in Visitor Management (VM), the event is instantly transferred to PowerSchool without any additional work needed from the school.
PowerSchool Setup Page
The PowerSchool Setup page allows Admin Users to form the connection between VM and PowerSchool, enable the functionality for all or individual schools in the district, and monitor the status of student events being transferred to PowerSchool.
Admin Users can access the PowerSchool Setup page by following the steps below:
- Log into Visitor Management as a District Admin or Building Admin
- Navigate to the Admin Settings by clicking the key icon on the side navigation menu
- Select the PowerSchool Setup tab under General Settings
Configuring Writebacks & Viewing Logs
The PowerSchool Setup page is split into the below three tabs. To learn how each tab is used to configure and monitor the PowerSchool Writeback functionality in Visitor Management, see below:
Settings
After installing the Navigate360 Attendance Access Plugin in your PowerSchool instance, District Admins can follow the below steps to connect VM to their district's PowerSchool instance before continuing to the School Building Setup tab:
- Enter the PowerSchool URL for the school district.
- This should match the base URL used to log into the PowerSchool Admin Portal.
- Please exclude any trailing forward-slashes from the end the URL.
- Example:
- Correct: "https://sample-district.powerschool.com"
- Incorrect: "https://sample-district.powerschool.com/"
- Incorrect: "https://sample-district.powerschool.com/admin"
- Enter the Client ID and Client Secret.
- These details can be found by opening the Navigate360 Attendance Access Plugin in PowerSchool and viewing the Data Provider Configuration section.
- Set the Visible Student ID that you would like to be displayed in Visitor Management:
- SIS ID
-
Student Number
- Note: This is a cosmetic setting for customers that are syncing their SIS data into Visitor Management via Clever. Allowing the preferred Student ID to be used for searching, scanning, etc.
- For more information on setting up the SIS Sync for PowerSchool Writebacks, click here.
- Click Save and Apply to All Schools.
Once the above settings have been saved, District Admins and Building Admins will have access to the School Building Setup and Writeback Logs tabs.
School Building Setup
The School Building Setup tab allows District Admins and Building Admins to quickly select the needed Attendance Mode for individual schools. As well as disable the writeback functionality for any schools that don't want to utilize this feature.
- District Admins will see a list of all schools from their district that have been added to VM and have the ability to view/edit the writeback settings for each school.
- Building Admins will only be able to view/edit the writeback settings for the school(s) assigned to them, based on the permissions applied to their User Profile.
Admins will be able to apply the below writeback settings for each school listed on the page:
- Status - (enabled by default)
- When enabled:
- An Attendance Mode must be selected in order to save the writeback settings.
- VM will attempt to transfer all Student Late Check-ins and Early Check-outs back to this school's PowerSchool instance.
- The school's PowerSchool Attendance Codes will need to be imported and mapped as Late Check-in and/or Early Check-out Reasons on the Student Tracking page.
- For more information on importing your PowerSchool Attendance Codes, click here.
- When disabled:
- VM will not attempt to transfer Student Late Check-ins and Early Check-outs back to this school's PowerSchool instance.
- The school will have access to VM's default Late Check-in and Early Check-out Reasons, as well as the ability to add Custom Reasons on the Student Tracking page.
- For more information on the Late Check-in and Early Check-out Reasons, click here.
- Users will need to manually enter any Student Late Check-ins and Early Check-outs in the school's PowerSchool instance.
- When enabled:
- Attendance Mode
- Daily
- Time
-
Meeting
- Note: The Attendance Mode selected on this page must match the Attendance Mode selected in the school's PowerSchool instance.
- Note: Each school in the district can select a different Attendance Mode, but only one Attendance Mode can be selected per school.
Admins can click the Save button to apply all updated writeback settings for the list of schools.
Prevent School Overrides
If all schools need to be enabled and have the Attendance mode set by the District Admin only, then the Prevent School Overrides setting needs to be toggled on. If individual schools either need to opt out or set their own Attendance mode, then the Prevent School Overrides setting needs to be toggled off. Toggling this setting off allows Building Admins to opt out the needed school building or set the needed Attendance mode specific to their building.
Writeback Logs
The Writeback Logs tab allows District Admins and Building Admins to quickly view the status of all Student Events that VM has attempted to transfer back to their PowerSchool instance.
Admins will see the logs listed in the Writeback Events table, with the below values for each event:
-
Type
- Late Check-in
- Early Check-out
-
Student Name
- Name of the student that was checked in or out.
-
Student PS ID
- The student's unique ID number returned from PowerSchool's STUDENTS table.
-
Date/Time
- The date and time that the event occurred in VM
- VM is set to instantly transfer Student Events immediately after the Check-in and Check-out process.
- The date and time that the event occurred in VM
-
Grade
- Grade of the student that was checked in or out.
-
Reason
- The Reason/Attendance Code that was selected during the Check-in or Check-out process.
-
Status
- Successful
- Failed
Admins will be able to filter the list of events using the below filters:
-
Status
- All
- Successful
- Failed
- Student Name Search
-
Building
- User will only see the buildings that they have access to.
- Date Range
When reviewing a failed Writeback Event, Admins can click on the ∨ (chevron) in the Status column to view the error message that was received from PowerSchool. For assistance troubleshooting common error messages, click here.
Visitor Management Admin Training: Front Office Staff, Check-In/Out Workflows
Visitor Management Training: Front Office Staff, Check-In/Out Workflows
On-Demand Resources for Front Office Staff to learn how to use Visitor Management for Visitor, Student, and Staff check-in/out procedures.
Navigate360's Visitor Management solution enables campuses to seamlessly integrates into your school’s safety protocols, facilitating a smooth transition for visitor check-ins, staff check-ins/outs, and student late check-ins/early check-outs.
Audience: Front Office Staff (Staff User), Building Administrator, District Administrator
Duration: 40-minutes
Scope of Training: This training session walks through the Front Office experience using Visitor Management for Visitor, Student, and Staff Check-In/Out. Key areas covered include:
- Accessing Visitor Management and User Profiles
- Configuring Device Settings (Printer, Camera, ID Scanner)
- Visitor Check-In Methods (Manual, Self-Serve, Mobile App)
- Handling Sex Offender matches and blocklists
- Generating reports and viewing Visit History
Additional Resources:
Accessing Visitor Management Portal
- Open a web browser (Google Chrome/Edge) on your dedicated Visitor Management Laptop.
- Navigate to www.navigate360vm.com.
- Log In with Visitor Management credentials.
- You will now have access to the Visitor, Student and Faculty check in-out pannels.
VM Expert Tip: Clicking on the Star icon in either Chrome or Edge will allow you to save this bookmark for quicker access.
Check-In/Out Methods
Visitor Management allows for different check-in methods to support various Front Office setups and workflows:
-
Staff Assisted: Visitor, Student, Staff and/or Registered Volunteer interact with the front office staff. The entirety of the check-in/out is done by the front office staff.
-
Self Service: Visitor, Student, Staff and/or Registered Volunteer interact with a standalone desktop, laptop, or iPad. The majority of the check-in/out is done by the Visitor, Student, Staff and/or Registered Volunteer. Compared to the Hybrid configuration, the Staff-Assisted system is mainly leveraged to hand off badges, confirm Student transactions, and/or as a secondary support point. Secondary support including Sex Offender Hits, Manual Entries, and/or issues checking in on Self Service machine.
- Hybrid: Visitor, Student, Staff and/or Registered Volunteer interact with a standalone desktop, laptop, iPad, and/or directly with the front office staff. The Staff-Assisted system is leveraged to hand off badges, confirm Student transactions, and/or as a secondary support point. Secondary support including Sex Offender Hits, Manual Entries, and/or issues checking in on Self Service machine.
Staff Assisted
Check-in a Visitor
Check-in a Visitor: Staff-Assisted
Please select from the scanning options below to learn how to check in a visitor on your Staff-Assisted Visitor Management station
To learn more about the scanning hardware supported by Visitor Management, check out our article on supported hardware.
Camera
Check-In a Visitor: Camera
Note: We recommend using the Logitech C925e for an optimal camera scanning experience in Visitor Management. You will need to allow camera access for “https://navigate360vm.com” in your browser settings. We also recommend Google Chrome, Microsoft Edge, or Safari when using the Camera Scanning Method.
Please follow the below steps to check in a visitor on a Staff-Assisted station, with the default ID Scanning Method set to Camera Only:
- Log into Visitor Management and navigate to the Visitors page
- Click on the Check-in Visitor button
- Users will be directed to the Capture Visitor ID page.
- Users will be prompted to position the visitor's ID in front of the camera, so that it is in the center of the viewfinder on screen.
- Users will also be able to switch between the below scanning methods:
- QR Code Scan
- Manual Check-in
- After retrieving the ID data from the camera, Visitor Management will check the visitor's First Name, Last Name, and Date of Birth for any potential matches on the national sex offender database.
- If a match is found, users will be prompted with a Possible Sex Offender Match pop-up displaying the info from the visitor's ID and the info from the potential match on the database. Users can then compare the info to decide if it is a True Match and deny entry, or decide it is a False Positive and remove the match from their Visitor Profile.
- Once the system is finished processing the scan, users will see the Visit Details page.
- If the school requires a new picture to be taken for all visitors checking in, users can take a new photo of the visitor by clicking on the visitor's current picture on the Visit Details page.
- Enter the below mandatory or optional information required for the visit, depending on the settings saved by an Admin user:
- Visitor Type - Always mandatory
- Reason for Visit - Always mandatory
- Destination
-
Who are you visiting?
- Visitors can choose from either a Student or a Staff member
- Student - Users can select from already-associated students to their profile or search for another student. To search for a student, the user can click on Other to search by student name and select them for the visit.
- Staff - Visitors can search for and select a staff member from the current building.
- Visitors can choose from either a Student or a Staff member
- Mobile Number
- Click Allow Entry & Print Badge to finish the check-in process.
- If multiple printers are connected, the user can select another printer from the default set on the Printer Set-up page in the Check-in Badge Printer dropdown. They can also select Do Not Print if a badge does not need to be printed for the visitor.
If both Navigate360 Visitor Management and Navigate360 Emergency Management have been purchased:
Visitor's with a Mobile Number saved to their Profile will receive a text/SMS notification after checking into a building, informing them that their visit details have been passed to Emergency Management, in case an emergency occurs during their visit.
2D Scanner
Check-In a Visitor: 2D Scanner
Note: There are currently two 2D Scanners supported by Visitor Management. The Zebra DS9308-DL and the Zebra DS457. A camera will also need to be connected to your computer in order to capture the visitor's photo after scanning their Driver's License.
Please follow the below steps to check in a visitor on a Staff-Assisted station, with the default ID Scanning Method set to 2D Scanner:
- Log into Visitor Management and navigate to the Visitors page
- Click on the Check-in Visitor button
- Users will be directed to the Scan Visitor ID page
- Users will be prompted to scan the barcode on the back of the visitor's Driver's License with the 2D Scanner.
- If this is their first time visiting the building, users will need to take a photo of the visitor before continuing with the check-in process.
- Users will also be able to switch between the below scanning methods to account for visitors that do not have a Driver's License with them:
- QR Code Scan
- Webcam
- Manual Check-in
- After retrieving the license data from the scanner, Visitor Management will check the visitor's First Name, Last Name, and Date of Birth for any potential matches on the national sex offender database.
- If a match is found, users will be prompted with a Possible Sex Offender Match pop-up displaying the info from the visitor's ID and the info from the potential match on the database. Users can then compare the info to decide if it is a True Match and deny entry, or decide it is a False Positive and remove the match from their Visitor Profile.
- Once the system is finished processing the scan, users will see the Visit Details page.
- If the school requires a new picture to be taken for all visitors checking in, users can take a new photo of the visitor by clicking on the visitor's current picture on the Visit Details page.
- Enter the below mandatory or optional information required for the visit, depending on the settings saved by an Admin user:
- Visitor Type - Always mandatory
- Reason for Visit - Always mandatory
- Destination
-
Who are you visiting?
- Visitors can choose from either a Student or a Staff member.
- Student - Users can select from already-associated students to their profile or search for another student. To search for a student, the user can click on Other to search by student name and select them for the visit.
- Staff - Visitors can search for and select a staff member from the current building.
- Visitors can choose from either a Student or a Staff member.
- Mobile Number
- Click Allow Entry & Print Badge to finish the check-in process.
- If multiple printers are connected, the user can select another printer from the default set on the Printer Set-up page in the Check-in Badge Printer dropdown. They can also select Do Not Print if a badge does not need to be printed for the visitor.
If both Navigate360 Visitor Management and Navigate360 Emergency Management have been purchased:
Visitor's with a Mobile Number saved to their Profile will receive a text/SMS notification after checking into a building, informing them that their visit details have been passed to Emergency Management, in case an emergency occurs during their visit.
ID Scanner
Check-In a Visitor: ID Scanner
Note: This check-in method requires an ID Card Scanner, such as the Acuant ID-150. You will also need AssureID Sentinel, ID-AIDD, and the Navigate360 ID Scanner App installed on your computer. Currently, this software is only compatible with Windows. If you are using a MacOS device, please see the steps outlined in the Camera and 2D Scanner tabs on this article.
Please follow the below steps to check in a visitor on a Staff-Assisted station, with the default ID Scanning Method set to ID Scanner:
- Log into Visitor Management and navigate to the Visitors page
- Click on the Check-in Visitor button
- Users will be directed to the Scan Visitor ID page
- Users will be prompted to insert the visitor's Driver's License into the ID Scanner.
- Users will also be able to switch between the below scanning methods to account for visitors that do not have a Driver's License with them:
- QR Code Scan
- Webcam
- Manual Check-in
- After retrieving the license data from the scanner, Visitor Management will check the visitor's First Name, Last Name, and Date of Birth for any potential matches on the national sex offender database.
- If a match is found, users will be prompted with a Possible Sex Offender Match pop-up displaying the info from the visitor's ID and the info from the potential match on the database. Users can then compare the info to decide if it is a True Match and deny entry, or decide it is a False Positive and remove the match from their Visitor Profile.
- Once the system is finished processing the scan, users will see the Visit Details page.
- If the school requires a new picture to be taken for all visitors checking in, users can take a new photo of the visitor by clicking on the visitor's current picture on the Visit Details page.
- Enter the below mandatory or optional information required for the visit, depending on the settings saved by an Admin user:
- Visitor Type - Always mandatory
- Reason for Visit - Always mandatory
- Destination
-
Who are you visiting?
- Visitors can choose from either a Student or a Staff member.
- Student - Users can select from already-associated students to their profile or search for another student. To search for a student, the user can click on Other to search by student name and select them for the visit.
- Staff - Visitors can search for and select a staff member from the current building.
- Visitors can choose from either a Student or a Staff member.
- Mobile Number
- Click Allow Entry & Print Badge to finish the check-in process.
- If multiple printers are connected, the user can select another printer from the default set on the Printer Set-up page in the Check-in Badge Printer dropdown. They can also select Do Not Print if a badge does not need to be printed for the visitor.
If both Navigate360 Visitor Management and Navigate360 Emergency Management have been purchased:
Visitor's with a Mobile Number saved to their Profile will receive a text/SMS notification after checking into a building, informing them that their visit details have been passed to Emergency Management, in case an emergency occurs during their visit.
QR Code Scan
Check-In a Visitor: QR Code Scan
Note: This check-in option requires the visitor to provide their QR Code after scheduling a visit from the Visitor Check-in Mobile App.
Please follow the below steps to check in a visitor, using the QR Code Scan option on a Staff-Assisted station:
- Log into Visitor Management and navigate to the Visitors page
- Click on the Check-in Visitor button
- Users will be directed to the Scan/Capture Visitor ID page depending on their default scanning method
- Click the QR Code Scan button to scan a visitor's QR Code from the mobile app.
- Users will be prompted to position the QR Code in front of the camera, so that it is in the center of the viewfinder on screen.
- Once the system is finished processing the scan, the Visit Details provided by the visitor on the mobile app will be applied to the check-in and their badge will be printed.
If both Navigate360 Visitor Management and Navigate360 Emergency Management have been purchased:
Visitor's with a Mobile Number saved to their Profile will receive a text/SMS notification after checking into a building, informing them that their visit details have been passed to Emergency Management, in case an emergency occurs during their visit.
Manual Check-in
Check-In a Visitor: Manual Check-in
Note: If you are experiencing any issues scanning the visitor's ID card using the other scanning methods outlined in this article, you can also access the Manual Check-in option directly from the Visitor Check-in page.
Please follow the below steps to check in a visitor, using the Manual Check-in option on a Staff-Assisted station:
- Log into Visitor Management and navigate to the Visitors page
- Click on the Check-in Visitor button
- Users will be directed to the Scan/Capture Visitor ID page depending on their default scanning method.
- Users can click the Manual Check-in button to manually enter the visitor's information.
- Users will click Add Photo to take a picture of the visitor and then fill in the below information from the visitor's ID:
- First Name
- Last Name
- Date of Birth
- Click Screen Visitor
- Visitor Management will check the visitor's First Name, Last Name, and Date of Birth for any potential matches on the national sex offender database.
- If a match is found, users will be prompted with a Possible Sex Offender Match pop-up displaying the info from the visitor's ID and the info from the potential match on the database. Users can then compare the info to decide if it is a True Match and deny entry, or decide it is a False Positive and remove the match from their Visitor Profile.
- Once the system is finished processing the information, users will see the Visit Details page.
- Enter the below mandatory or optional information required for the visit, depending on the settings saved by an Admin user:
- Visitor Type - Always mandatory
- Reason for Visit - Always mandatory
- Destination
-
Who are you visiting?
- Visitors can choose from either a Student or a Staff member
- Student - Users can select from already-associated students to their profile or search for another student. To search for a student, the user can click on Other to search by student name and select them for the visit.
- Staff - Visitors can search for and select a staff member from the current building.
- Visitors can choose from either a Student or a Staff member
- Mobile Number
- Click Allow Entry & Print Badge to finish the check-in process.
- If multiple printers are connected, the user can select another printer from the default set on the Printer Set-up page in the Check-in Badge Printer dropdown. They can also select Do Not Print if a badge does not need to be printed for the visitor.
If both Navigate360 Visitor Management and Navigate360 Emergency Management have been purchased:
Visitor's with a Mobile Number saved to their Profile will receive a text/SMS notification after checking into a building, informing them that their visit details have been passed to Emergency Management, in case an emergency occurs during their visit.
Returning Visitors - Individual Check-in
Please follow the below steps to check in a returning visitor for the Current Date:
- Log into Visitor Management and navigate to the Visitors page
- Visitor Search options:
- District-wide search - Click on the Magnifying Glass icon field to search for a returning visitor that has previously visited any building in the school district.
- All Visitors tab - Card View - Find the returning visitor card by clicking through the pages.
- All Visitors tab - List View - Click on the List View icon on the top right of the Visitors screen and search for a returning visitor that has previously visited the current building.
- Once the visitor is found, click on Check-in Visitor
- Visitor Management will check the visitor's First Name, Last Name, and Date of Birth for any potential matches on the national sex offender database.
- If a match is found, users will be prompted with a Possible Sex Offender Match pop-up displaying the info from the visitor's ID and the info from the potential match on the database. Users can then compare the info to decide if it is a True Match and deny entry, or decide it is a False Positive and remove the match from their Visitor Profile.
- Once the system is finished processing the information, users will see the Visit Details page.
- Confirm/select the below information required for the visit:
- Visit Date - Defaulted to the current date
- Visitor Type - Pre-selected with the option selected from the returning visitor's prior visit
- Reason for Visit - Pre-selected with the option selected from the returning visitor's prior visit
- Destination - Can be set as mandatory or optional
-
Who are you visiting? - Can be set as mandatory or optional
- Visitors can choose from either a Student or a Staff member
- Student - Users can select from already-associated students to their profile or search for another student. To search for a student, the user can click on Other to search by student name and select them for the visit.
- Staff - Visitors can search for and select a staff member from the current building.
- Visitors can choose from either a Student or a Staff member
- Mobile Number (can be set as mandatory or optional)
- Click Allow Entry & Print Badge to finish the check-in process.
- If multiple printers are connected, the user can select another printer from the default set on the Printer Set-up page in the Check-in Badge Printer dropdown. They can also select Do Not Print if a badge does not need to be printed for the visitor.
Please follow the below steps to check in a returning visitor for a Future Date:
- Log into Visitor Management and navigate to the Visitors page
- Visitor Search options:
- District-wide search - Click on the Magnifying Glass icon field to search for a returning visitor that has previously visited any building in the school district.
- All Visitors tab - Card View - Find the returning visitor card by clicking through the pages.
- All Visitors tab - List View - Click on the List View icon on the top right of the Visitors screen and search for a returning visitor that has previously visited the current building.
- Once the visitor is found, click on Check-in Visitor
- Note: Currently visiting visitors cannot have a future visit scheduled until they are checked out.
- Visitor Management will check the visitor's First Name, Last Name, and Date of Birth for any potential matches on the national sex offender database.
- If a match is found, users will be prompted with a Possible Sex Offender Match pop-up displaying the info from the visitor's ID and the info from the potential match on the database. Users can then compare the info to decide if it is a True Match and deny entry, or decide it is a False Positive and remove the match from their Visitor Profile.
- Once the system is finished processing the information, users will see the Visit Details page.
- Confirm/select the below information required for the visit:
- Visit Date - Defaulted to the current date - update the date to a future date
- Visitor Type - Pre-selected with the option selected from the returning visitor's prior visit
- Reason for Visit - Pre-selected with the option selected from the returning visitor's prior visit
- Destination - Can be set as mandatory or optional
-
Who are you visiting? - Can be set as mandatory or optional
- Visitors can choose from either a Student or a Staff member
- Student - Users can select from already-associated students to their profile or search for another student. To search for a student, the user can click on Other to search by student name and select them for the visit.
- Staff - Visitors can search for and select a staff member from the current building.
- Visitors can choose from either a Student or a Staff member
- Mobile Number (can be set as mandatory or optional)
- Click Schedule Check-in to schedule the future visit.
- User will see a message confirming the scheduled future visit and be redirected to the Scheduled Visits → Staff-Assisted tab
- On the date of the future visit, the user will find the scheduled future visit and click on the Actions ellipsis → Allow Entry & Print Badges button to complete the visitor check-in.
If both Navigate360 Visitor Management and Navigate360 Emergency Management have been purchased:
Visitor's with a Mobile Number saved to their Profile will receive a text/SMS notification after checking into a building, informing them that their visit details have been passed to Emergency Management, in case an emergency occurs during their visit.
Returning Visitors - Bulk Check-in
Please follow the below steps to bulk check in returning visitors for the Current Date:
- Log into Visitor Management and navigate to the Visitors page
- Visitor Search:
- All Visitors tab - List View - Click on the List View icon on the top right of the Visitors screen and search for all needed returning visitors that have previously visited the current building.
- Select all needed visitors
- Select all visitors to be checked in
- Note: Currently visiting visitors cannot have a future visit scheduled until they are checked out.
- Click on + Bulk Actions → Bulk Check-in Visitors
- Set the below information required for the visit for all included returning visitors:
- Visit Date - Defaulted to the current date
- Visitor Type - Always mandatory
- Reason for Visit - Always mandatory
- Destination - Can be set as mandatory or optional
-
Who are you visiting? - Can be set as mandatory or optional
- Visitors can choose from either a Student or a Staff member
- Student - Users can select from already-associated students to their profile or search for another student. To search for a student, the user can click on Other to search by student name and select them for the visit.
- Staff - Visitors can search for and select a staff member from the current building.
- Visitors can choose from either a Student or a Staff member
- Click Allow Entry & Print Badge to finish the check-in process.
- If multiple printers are connected, the user can select another printer from the default set on the Printer Set-up page in the Check-in Badge Printer dropdown. They can also select Do Not Print if badges do not need to be printed for the visitors.
Please follow the below steps to bulk check in returning visitors for a Future Date:
- Log into Visitor Management and navigate to the Visitors page
- Visitor Search:
- All Visitors tab - List View - Click on the List View icon on the top right of the Visitors screen and search for all needed returning visitors that have previously visited the current building.
- Select all needed visitors
- Select all visitors to be checked in
- Click on + Bulk Actions → Bulk Check-in Visitors
- Set the below information required for the visit for all included returning visitors:
- Visit Date - Defaulted to the current date - update the date to a future date
- Visitor Type - Always mandatory
- Reason for Visit - Always mandatory
- Destination - Can be set as mandatory or optional
-
Who are you visiting? - Can be set as mandatory or optional
- Visitors can choose from either a Student or a Staff member
- Student - Users can select from already-associated students to their profile or search for another student. To search for a student, the user can click on Other to search by student name and select them for the visit.
- Staff - Visitors can search for and select a staff member from the current building.
- Visitors can choose from either a Student or a Staff member
- Click Schedule Check-in to schedule to future visit.
- User will see a message confirming the scheduled future visit and be redirected to the Scheduled Visits → Staff-Assisted tab
- On the date of the future visit, the user will find the scheduled future visit and click on the Actions ellipsis → Allow Entry & Print Badges button to complete the visitor check-ins.
If both Navigate360 Visitor Management and Navigate360 Emergency Management have been purchased:
Visitor's with a Mobile Number saved to their Profile will receive a text/SMS notification after checking into a building, informing them that their visit details have been passed to Emergency Management, in case an emergency occurs during their visit.
Check-out a Visitor
Check-Out a Visitor - Staff Assisted
Please select from the scanning options below to learn how to check in a visitor on your Staff-Assisted Visitor Management station.
Individual Visitor Check-out
- Log into Visitor Management as a District Admin, Building Admin or Staff User
- Navigate to the In Building panel, which is displayed from every page within Visitor Management
- Locate the visitor to be checked out and click Check-Out Visitor
- When prompted to confirm the check-out, again click Check-Out Visitor
- Once the check-out is confirmed, the visitor will be removed from the In Building panel
Bulk Visitor Check-out
- Log into Visitor Management as a District Admin, Building Admin or Staff User
- Navigate to the All Visitors page with the List view selected (as opposed to the default Card view)
- Enable the Currently Visiting Only option toggle to view all checked-in visitors
- Select all visitors to be checked out
- Click on + Bulk Actions → Bulk Check-out Visitors
- On the Check Out Visitors modal, click the Check-out Visitors button to confirm and check out all selected visitors
Self Service
Check-in a Visitor
Check-in a Visitor: Self-Serve
Please select from the scanning options below to learn how visitors can check-in on your Self-Serve kiosk.
To learn more about the scanning hardware supported by Visitor Management, click here.
To learn more about the Self-Serve Setup page and how to select the Self-Serve scanning method, click here.
Camera
Visitor Check-in: Camera
Note: We recommend using the Logitech C925e for an optimal camera scanning experience in Visitor Management. You will need to allow camera access for “https://vm.navigate360.com” in your browser settings. We also recommend Google Chrome, Microsoft Edge, or Safari when using the Camera Scanning Method.
Visitors will follow the below steps to check in on a Self-Serve kiosk, with the Scanning Method set to Camera:
- Visitors will select the Visitor button on the Self-Serve landing page, and then select Scan Government-issued ID
- Visitors will be directed to the Capture Government-Issued ID page
- Visitors will be prompted to position their ID in front of the camera, so that it is in the center of the viewfinder on screen
- A digital ID can also be scanned with the web camera.
- After retrieving the ID data from the camera, Visitor Management will check the visitor's First Name, Last Name, and Date of Birth for any potential matches on the national sex offender database.
-
If a match is found, visitors will see a popup asking them to see the front desk to continue
- Staff-Assisted users will see a notification banner on their station, to verify the check-in attempt from Self-Serve
- After clicking the visitor's name in the banner, users will be prompted with a Possible Sex Offender Match pop-up displaying the info from the visitor's ID and the info from the potential match on the database. Users can then compare the info to decide if it is a True Match and deny entry, or decide it is a False Positive and remove the match from their Visitor Profile and continue the check-in process
- If an Admin has set the option to require a new picture to be taken for all visitors checking in:
- Visitors will see a popup asking them to take a new photo before continuing to the Visit Details page
- If an Admin has set the option to prevent first-time visitors from using Self-Serve:
- Visitors will see a popup asking them to see the front desk to continue
- Staff-Assisted users will see a notification banner on their station, to confirm the new visitor check-in attempt from Self-Serve
- After clicking the visitor's name in the banner, users will be able to continue the check-in process with the information from the ID scanned on Self-Serve
- If the visitor already has a Visitor Profile with either Custody Instructions or a High Importance note attached:
- Visitors will see a popup asking them to see the front desk to continue
- Staff-Assisted users will see a notification banner on their station, to confirm the visitor check-in attempt from Self-Serve
- After clicking the visitor's name in the banner, users will be able to continue the check-in process with the information from the ID scanned on Self-Serve
-
If a match is found, visitors will see a popup asking them to see the front desk to continue
- Once the system is finished processing the scan, visitors will see the Visit Details page
- Visitors will enter the below mandatory or optional information for their visit, depending on the settings saved by an Admin user:
- Visitor Type - Always mandatory
- Reason for Visit - Always mandatory
- Destination
-
Who are you visiting?
- Visitors can choose from either a Student or a Staff member
- Student - Visitors can only select from already-associated students to their profile. If this a first-time visitor or if there are no students linked to their existing Visitor Profile, then the student option will be disabled.
- Staff - Visitors can search for and select a staff member from the current building.
- Visitors can choose from either a Student or a Staff member
- Mobile Number
- Visitors can then select Confirm & Continue to finish the check-in process and collect their badge.
If both Navigate360 Visitor Management and Navigate360 Emergency Management have been purchased:
Visitor's with a Mobile Number saved to their Profile will receive a text/SMS notification after checking into a building, informing them that their visit details have been passed to Emergency Management, in case an emergency occurs during their visit.
2D Scanner
Visitor Check-in: 2D Scanner
Note: There are currently two 2D Scanners supported by Visitor Management. The Zebra DS9308-DL and the Zebra DS457. A camera will also need to be connected to your computer in order to capture the visitor's photo after scanning their Driver's License.
Visitors will follow the below steps to check in on a Self-Serve station, with the Scanning Method set to 2D Scanner:
- Visitors will select the Visitor button on the Self-Serve landing page, and then select Scan Government-issued ID
- Visitors will be directed to the Scan or Capture Government-Issued ID page
- Visitors will be prompted to scan the barcode on the back of their Driver's License with the 2D Scanner
- A digital ID can also be scanned with the 2D Scanner, as long as the barcode on the back of the ID is available digitally.
- Visitors will also be able to switch to the below scanning method if they do not have a Driver's License with them:
- Other Issued IDs - Webcam
- After retrieving the license data from the scanner, Visitor Management will check the visitor's First Name, Last Name, and Date of Birth for any potential matches on the national sex offender database.
-
If a match is found, visitors will see a popup asking them to see the front desk to continue
- Staff-Assisted users will see a notification banner on their station, to verify the check-in attempt from Self-Serve
- After clicking the visitor's name in the banner, users will be prompted with a Possible Sex Offender Match pop-up displaying the info from the visitor's ID and the info from the potential match on the database. Users can then compare the info to decide if it is a True Match and deny entry, or decide it is a False Positive and remove the match from their Visitor Profile and continue the check-in process
- If an Admin has set the option to require a new picture to be taken for all visitors checking in:
- Visitors will see a popup asking them to take a new photo before continuing to the Visit Details page
- If an Admin has set the option to prevent first-time visitors from using Self-Serve:
- Visitors will see a popup asking them to see the front desk to continue
- Staff-Assisted users will see a notification banner on their station, to confirm the new visitor check-in attempt from Self-Serve
- After clicking the visitor's name in the banner, users will be able to continue the check-in process with the information from the ID scanned on Self-Serve
- If the visitor already has a Visitor Profile with either Custody Instructions or a High Importance note attached:
- Visitors will see a popup asking them to see the front desk to continue
- Staff-Assisted users will see a notification banner on their station, to confirm the visitor check-in attempt from Self-Serve
- After clicking the visitor's name in the banner, users will be able to continue the check-in process with the information from the ID scanned on Self-Serve
-
If a match is found, visitors will see a popup asking them to see the front desk to continue
- Once the system is finished processing the scan, visitors will see the Visit Details page
- Visitors will enter the below mandatory or optional information for their visit, depending on the settings saved by an Admin user:
- Visitor Type - Always mandatory
- Reason for Visit - Always mandatory
- Destination
-
Who are you visiting?
- Visitors can choose from either a Student or a Staff member
- Student - Visitors can only select from already-associated students to their profile. If this a first-time visitor or if there are no students linked to their existing Visitor Profile, then the student option will be disabled.
- Staff - Visitors can search for and select a staff member from the current building.
- Visitors can choose from either a Student or a Staff member
- Mobile Number
- Visitors can then select Confirm & Continue to finish the check-in process and collect their badge.
If both Navigate360 Visitor Management and Navigate360 Emergency Management have been purchased:
Visitor's with a Mobile Number saved to their Profile will receive a text/SMS notification after checking into a building, informing them that their visit details have been passed to Emergency Management, in case an emergency occurs during their visit.
QR Code Scan
Visitor Check-in: QR Code Scan
Note: This check-in option requires the visitor to have been invited to the Visitor Check-in Mobile App by a staff user and schedule their visit before arriving at the school.
Visitors will follow the below steps to check in on a Self-Serve station, using the QR Code Scan option:
- Visitors will select the Visitor button on the Self-Serve landing page, and then select Scan QR Code from Mobile App
- Visitors will be prompted to position their QR Code in front of the camera, so that it is in the center of the viewfinder on screen
- Once the system is finished processing the scan, visitors will see the Confirm Your Information page with the Visit Details they entered while scheduling their visit on the mobile app
- If an Admin has set the option to require a new picture to be taken for all visitors checking in:
- Visitors will see a popup asking them to take a new photo before continuing
- If the visitor has either Custody Instructions or a High Importance note attached to their Visitor Profile:
- Visitors will see a popup asking them to see the front desk to continue
- Staff-Assisted users will see a notification banner on their station, to confirm the visitor check-in attempt from Self-Serve
- After clicking the visitor's name in the banner, users will be able to continue the check-in process with the information from the ID scanned on Self-Serve
- If an Admin has set the option to require a new picture to be taken for all visitors checking in:
- Visitors can then select Confirm & Continue to finish the check-in process and collect their badge.
If both Navigate360 Visitor Management and Navigate360 Emergency Management have been purchased:
Visitor's with a Mobile Number saved to their Profile will receive a text/SMS notification after checking into a building, informing them that their visit details have been passed to Emergency Management, in case an emergency occurs during their visit.
Google Translate
Google Translate is available to assist non-English-speaking students or guardians checking a student out early. To use this feature, students or guardians can click Select Language at the bottom of the Self-Serve main page. Once they choose their preferred language, the page will refresh and they can complete the needed steps to check out early of the building.
In the Self-Serve check-in/out experience, it is the Visitor's responsibility to complete check-out at the self-serve kiosk.
Viewing the “Visitors” Page
Visitors Page
District Admins, Building Admins and Staff Users can interact with the Visitors page to view All Visitors, Scheduled Visits, Frequent Visitors, Blocklisted Visitors and Visit History. To access the Visitors page, follow the below steps:
- Log into Visitor Management as a District Admin, Building Admin or Staff User
- Navigate to the Visitors Page by clicking the person icon on the side navigation menu
All Visitors
On this tab, users can see and use the below functionality:
- View all visitors to the current building
- Users will be able to toggle between a Card View or List View of Visitors and set their Default View by clicking the
 on the current displayed view. This view will then display for all future sessions.
 - Search for visitors throughout the district, including those that did and did not visit the current building
-
Check in and out any visitors -
- Click here for more details on Staff-Assisted Visitor Check-in functionality
- Click here for more details on Staff-Assisted Visitor Check-out functionality
-
Delete a Visitor (District Admins only) -
- From the card view of the page – click on the ellipsis on the bottom right of the needed Visitor card and select Delete Visitor
- From the table view of the page – click on the ellipsis on the right column of the row for the needed visitor and select Delete Visitor
- Note: Once a visitor is deleted, their profile will no longer display, but their visitor history will remain accessible and can be shown in any needed reports.
- Note: Once a visitor is deleted, their profile will no longer display, but their visitor history will remain accessible and can be shown in any needed reports.
- From the card view of the page – click on the ellipsis on the bottom right of the needed Visitor card and select Delete Visitor
-
Bulk Actions (available on the Table view only) -
- Users are able to search for and select multiple visitors in the current building to Send a Mobile App Invitation
- Search for and select the needed visitors by checking the checkbox to the left of the Visitor Name column
- Once at least two visitors are selected, the Bulk Actions button on the top right of the table will enable
- Once all visitors are selected, click on Bulk Actions → Send Mobile App Invitation
- Mobile App invitations can only be sent to visitors with an existing Visitor Profile and a mobile number added to their profile. To confirm that a mobile number has been added to the Visitor Profile, confirm that Added is displayed in the Mobile Number column on the table.
- Users are able to search for and select multiple visitors in the current building to Send a Mobile App Invitation
Scheduled Visits
On this tab, users will see a table with the below toggle views:
- Mobile App - default view
- Staff-Assisted
Users will be able to toggle between the below tables to view and interact with scheduled visits:
Mobile App
Users will be able to view all upcoming visits that have been scheduled from the Visitor Check-in mobile app and will see an in-app notification on the left navigation Visitor option, as well as on the Visitors → Scheduled Visits tab to inform users of an upcoming visit scheduled in the mobile app. Users will be able to view the below information for each scheduled visit:
- Visitor Name
- Date and time of upcoming visit
- Who they are visiting (if the visitor selected a Staff member or Student when scheduling their visit.)
- Visit Reason
- Building
Web Notification in Visitor Management for Mobile App Scheduled Visits
Users will see an in-app notification in Visitor Management when a visitor schedules a visit in the mobile app. This notification will display a dot on the Visitors option in the left-navigation menu and on the Visitors→ Scheduled Visits tab. The notification will disappear when at least one user navigates to the Scheduled Visits tab to view the scheduled visit details.
Staff-Assisted
Users will be able to view and interact with all upcoming Bulk and Individual visits that have been scheduled from the Staff-Assisted station. Users will be able to view the below information for each scheduled visit/group:
- Visitor Count
- Date
- Visitor Type
- Visit Reason
- Destination (if the Staff user entered a destination when scheduling the visit.)
- Who they are visiting (if the Staff user selected a Staff member or Student when scheduling the visit.)
When Visitors arrive on the scheduled date, users can click the number under the Visitor Count column or Actions → Allow Entry & Print Badge(s) to open the Scheduled Visitor(s) window and perform the below actions:
- Search by Visitor Name
- If more than one visitor was scheduled
- Click the delete icon to cancel the scheduled visit
- Complete the check-in for all needed visitors:
- Select one or more scheduled visitors
- Click Allow Entry & Print Badge(s)
- If multiple printers are connected, the user can open the Check-in Badge Printer dropdown to select a different printer from the default printer that is set on the Printer Set-up page. They can also select Do Not Print if badges do not need to be printed for the visitors.
Frequent Visitors
On this tab, users can see and use the below functionality:
- View all frequent visitors to the current building
- Users will be able to toggle between a Card View or List View of Frequent Visitors and set their Default View by clicking the on the current displayed view. This view will then display for all future sessions.
- Check in and out any visitors -
- Click here for more details on Staff-Assisted Visitor Check-in functionality
- Click here for more details on Staff-Assisted Visitor Check-out functionality
Blocklisted
On this tab, users can see and use the below functionality:
- View all visitors that are blocked from entering the building
- Note: Once a visitor is added to the blocklist, they are blocked from visiting any building in the district.
- Users will be able to toggle between a Card View or List View of Blocklisted Visitors and set their Default View by clicking the on the current displayed view. This view will then display for all future sessions.
- Ability to add a visitor or multiple visitors at a time to the blocklist
- Click here for more details on how to add a visitor to the blocklist
Visit History
On this tab, users can see and use the below functionality:
- View the visit history for all visitors in the current building
- Search for visitors by name
- Set a Start Date and End Date to view a specific date range of visits
- Filter by Reason selected by visitors when they checked in
- Filter by building if the visitor searched for is not in the current building
Viewing the “Students” Page
Students Page
District Admins, Building Admins and Staff Users can interact with the Students page to view All Students, Scheduled check-ins/check-outs, as well as Check-in & Check-out History. To access the Students page, follow the below steps:
- Log into Visitor Management as a District Admin, Building Admin or Staff User
- Navigate to the Students Page by clicking the academic hat icon on the side navigation menu
All Students
On this tab, users can see and use the below functionality:
- View all students that were passed from the SIS as part of the SIS sync
- Search for students by name or student ID number
- Filter the list of students by grade level
- Set up School ID for students - click here for more details on this functionality
- Check in students, individually or in bulk - click here for more details on the Student Late Check-in Process
- Check out students, individually or in bulk - click here for more details on the Student Early Check-out Process
Scheduled
On this tab, users can see and use the below functionality:
- View student check-in and check-out events that were scheduled by a parent/guardian via the Visitor Check-in mobile app
- Search for students by name or student ID number
- Review upcoming student check-in or check-out events
- If needed, delete upcoming student check-in or check-out events
- In the event that a student late check-in or early check-out scheduled from the mobile app needs to be canceled, a user can click on the ellipsis on the row for the student and click Delete. Guardians will then receive a SMS text message notifying them of the cancellation.
Web Notification in Visitor Management for Mobile App Scheduled Student Late Check-ins/Early Check-outs
Users will see an in-app notification in Visitor Management when a guardian schedules a student late check-in/early check-out in the mobile app. This notification will display a dot on the Visitors option in the left-navigation menu and on the Students→ Scheduled tab. The notification will disappear when at least one user navigates to the Scheduled tab to view the scheduled visit details.
Check-in & Check-out History
On this tab, users can see and use the below functionality:
- View the check-in and check-out history for all students
- Search for students by name or student ID number
- Set a Start Date and End Date to view a specific date range of check-in and check-out events
- Filter the list of events by type:
- Late Check-in
- Early Check-out
- Filter the list of events by grade level
- Click on the ellipsis in the Actions column for any student to:
- Edit Event
- Reprint Badge - only available for events from the current day
- Delete Event
Viewing the “Staff” Page
Staff Page
District Admins, Building Admins and Staff Users can interact with the Staff page to view All Staff, View Visit History and Scheduled Substitute Visits. To access the Staff page, follow the below steps:
- Log into Visitor Management as a District Admin, Building Admin or Staff User
- Navigate to the Staff Page by clicking the case icon on the side navigation menu
All Tabs
District-wide Search
District Admins, Building Admins and Staff Users can search for staff members across the district by clicking on the magnifying glass icon on the top of the page. In the District-wide Search field, users can:
- Search for Staff Profiles by name
- View all matching profiles regardless of their home building
- Check staff members in or out of the building as needed
Export List
District Admins, Building Admins and Staff Users can export a list of all staff from the current building by clicking on the Export List button on the top of the page.
- Export a list (XLXS format) of all staff members, including substitutes, in the current building with the below information
- Staff Name
- Staff Type
- Job Title
- Staff ID
- Last Visit
- Status
All Staff
On this tab, users can see and use the below functionality:
- View all staff members that were either passed from the SIS as part of the SIS sync or added manually
- Toggle between viewing Active and Inactive staff members, including substitutes
- Users will be able to toggle between a Card View or List View of Staff and Substitutes and set their Default View by clicking the on the current displayed view. This view will then display for all future sessions.
- Search for staff members, including substitutes, by name for the current building
- Set up School IDs for staff members, including substitutes - click here for more details on this functionality
- Manually invite staff members, including substitutes, to Visitor Management - click here for more details on this functionality
- Check in and out any staff member, including substitutes
Visit History
On this tab, users can see and use the below functionality:
- View the visit history for all staff member visits, including substitutes, for the current building
- Search for staff members, including substitutes, by name
- Set a Start Date and End Date to view a specific date range of visits
- Filter by Building if the profile searched for did not check in to the current building
- Note: requires additional user access for 2 or more buildings
- Click on the ellipsis in the Actions column for any staff member or substitute to:
- Edit Visit
- Delete Visit
Scheduled Substitute Visits
On this tab, users can see and use the below functionality:
- View substitute visits that were scheduled via the mobile app
- Search for substitutes by name
- Approve or deny upcoming substitute visits
Viewing the “Volunteers” Page
Volunteers Page
Note: This functionality is only available if the Volunteer Management module was purchased.
Volunteers
District Admins, District Volunteer Coordinators, Building Admins, Building Volunteer Coordinators, and Staff Users can interact with the Volunteers page to view Approved, Pending, Rejected and Blocklisted Volunteers. To access the Volunteers page, follow the below steps:
- Log into Visitor Management as a District Admin, District Volunteer Coordinator, Building Admin, Building Volunteer Coordinator or Staff User
- Navigate to the Volunteers Page by clicking the hand icon on the side navigation menu
Approved Tab
- By default, users will land on the Approved tab. On this tab, users can:
- Search for Volunteers by name
- Filter displayed Volunteers by Role - by default, All Roles are displayed
- District Volunteer Coordinators and Building Volunteer Coordinators will be able to search for volunteers approved for buildings they have access to, without having to sign into other buildings
- If Minor Volunteers are enabled, users will see a Minor Volunteer tag on the Volunteer Profile card/name for any volunteers that are less than 18 years old as of the current date. (Click here for more information on Minor Volunteers)
- Users will be able to toggle between a Card View or List View of Volunteers and set their Default View by clicking the on the current displayed view. This view will then display for all future sessions:
-
Card View
- Users can check in a volunteer
- Users can click the ellipsis to
- View the Volunteer Profile
- Edit Volunteer Profile
- View Application
- Add the Volunteer to the Blocklist
- Delete the Volunteer (District Admin and District Volunteer Coordinator only)
-
Table View
- Users can see:
- Name
- Approval Date*
- Expiration Date*
- Last Check-in
- Actions - check in a volunteer
- Users can click the ellipsis to
- View the Volunteer Profile
- Edit Volunteer Profile
- View Application
- Add the Volunteer to the Blocklist
- Delete the Volunteer (District Admin and District Volunteer Coordinator only)
- Users can multi-select the needed volunteers and then click the Bulk Actions dropdown button to perform the below actions:
- Send Email
- Send Renewal Applications*
- Delete Volunteers (District Admin and District Volunteer Coordinator only)
- If Minor Volunteers are enabled, users can filter on only minor volunteers (less than 18 year old as of the current date) by clicking the Minor Volunteers Only toggle. (Click here for more information on Minor Volunteers)
- Users can see:
-
Card View
Volunteer Application Expiration Workflow
*This data and functionality is only available if the Application Expiration workflow is enabled by a District Admin on the Admin→Application Approval→Volunteer Application Expiration tab. Please click here to learn more on how to enable this workflow.
Pending Tab
- Users can navigate to the Pending tab. On this tab, users can:
- Search by name
- Search by Criminal History Status (Only if a background check service is enabled)
- Search by Building
- Single and multi-select search for buildings is available without having to sign into other buildings
- View the list of Volunteers with pending application status with the below details:
- Name
- Building(s)
- Date Submitted
- Criminal History
- Click the ellipsis for any of the listed pending volunteers to:
- View Application
- Send Back to Applicant
- User will be able to add a custom message (255 character limit) to the email that will be sent to the Volunteer Applicant for needed application updates. If JDP is enabled, users will also be able to set if a new background check needs to be run after the Volunteer Applicant resubmits their application.
- Approve Application
- Reject Application
- User will be able to add a rejection reason (50 character limit) when rejecting an application. This rejection reason will then be displayed on the Rejected tab.
- Check at least 2 checkboxes to enable to the Bulk Actions functionality to:
- Approve all selected volunteers
- Reject all selected volunteers
- Export all selected volunteers as an XLXS
Web Notifications for Volunteer Application Submissions
Users will see an in-app notification when a potential volunteer submits a volunteer application. This notification will display a dot on the Volunteers option in the left-navigation menu and on the Volunteers→ Pending tab. The notification will disappear when the application has been approved or rejected.
Rejected Tab
- Users can navigate to the Rejected tab. On this tab, users can:
- Search for rejected Volunteers by name
- District Volunteer Coordinators and Building Volunteer Coordinators will be able to search for volunteers rejected for buildings they have access to, without having to sign into other buildings
- View the list of rejected Volunteers with the below details:
- Name
- Date Submitted
- Rejected by
- Date Rejected
- Rejected Reason
- Click the ellipsis for any of the listed rejected volunteers to:
- View Application
- Approve Application
- Update Rejection Reason
- Delete Volunteer (District Admins and District Volunteer Coordinators only)
- Search for rejected Volunteers by name
Blocklisted Tab
- Users can navigate to the Blocklisted tab. On this tab, users can:
- Search for blocklisted Volunteers by name
- View the list of blocklisted Volunteers with the below details:
- Name
- Blocklisting Date
- Reason
- Criminal History
- Click the ellipsis for any of the listed blocklisted volunteers to:
- View Application
- Remove from Blocklist
From all tabs, users can:
Add a Volunteer → Add Volunteer Manually
- Users can manually add a volunteer by entering the needed Personal and Volunteer Information:
- Personal Information
- Identifying Information
- Demographic Information
- If Minor Volunteers are enabled, users will be able to manually add an individual less than 18 years old as of the current date. (Click here for more information on Minor Volunteers)
- Contact Information
- Volunteer Information
- Preferred Volunteer roles
- Preferred School(s) to Volunteer for
- Users can click on Approve and Submit to add the volunteer
- Personal Information
Note: Volunteers that are added manually, either individually or via bulk import, will not go through a background check process
Add a Volunteer → Bulk Import
- On the Bulk Import Volunteers modal - click the “Download this template” hyperlink to download the bulk import template
- Note: Please re-download the template for each new import. This template automatically generates additional columns based on the currently active Volunteer Roles and Buildings.
- Open the Template (xlsx)
- Enter the below information for each Volunteer:
- Personal Information:
- First Name
- Middle Name (optional)
- Last Name
- Date of Birth
- If Minor Volunteers are enabled, users will be able to manually add an individual less than 18 years old as of the current date. (Click here for more information on Minor Volunteers)
- Sex
- Address
- Address Line 2 (optional)
- City
- State
- Zip Code
- Phone Number
- Preferred Roles: (Optional)
- Add an X in any of the Preferred Roles cells, if needed
- Building(s):
- Add an X to the Entire District cell if the Volunteer needs access to all buildings
- Note: if using the Entire District cell, no other Building cells should be selected
- Add an X to 1 or more Building cells that the Volunteer needs access to
- Add an X to the Entire District cell if the Volunteer needs access to all buildings
- Personal Information:
- Save the template in your desired location and close
- On the Bulk Import Volunteers modal - click Upload Completed Template
- Select the template from the stored location and click Open
- On the Bulk Upload Volunteers modal - click Import & Save
Note: Volunteers that are added manually, either individually or via bulk import, will not go through a background check process
Export Volunteer List
- Users can export a list of all approved and rejected volunteers by clicking on the Export List button
- Users will be able to review the list (XLXS format) with the below details:
- Volunteer Full Name
- Volunteer Email
- Volunteer Criminal Record
- Approved/Rejected By
- Last Check-in
ID Scanning Resources
ID Scanning Method
Visitor Management allows users to set the default scanning method they would like to use when scanning a visitor's ID during the Staff-Assisted check-in process. Please follow the below steps to learn how to access the ID Scanning Method page and set the default scanning option for Staff-Assisted check-ins:
- Log into Visitor Management
- Navigate to the Device Settings page by clicking the gear icon on the side navigation menu
- Select the ID Scanning Method tab
- Users can select 1 of the 3 options listed below to set the default scanning method when checking in visitors on the Staff-Assisted station:
Camera
- This option allows users to scan multiple ID types using an external webcam
- U.S. Driver's Licenses
- Government Issued U.S. ID Cards
- U.S. Passports
- U.S. Passport Cards
- This option does not require any additional configuration on this page, however users should specify their default camera on the Camera Setup page
- For more information on the Camera Setup page, click here
2D Scanner
- This option allows users to scan barcodes on the back of U.S. Driver's Licenses using a 2D barcode scanner, and take a photo of the visitor using an external webcam
- U.S. Driver's Licenses only
- This option does not require any additional configuration on this page, however users should specify their default camera on the Camera Setup page
- For more information on the Camera Setup page, click here
ID Scanner
Note: This scanning option requires 3rd party software in order to connect to Visitor Management. This 3rd party software is only available for Windows devices.
- This option allows users to scan U.S. Driver's Licenses by inserting the ID into an ID Card Scanner, such as the ID-150
- U.S. Driver's Licenses only
- Users can add a scanner by filling out the below fields and then clicking Add Scanner:
- Scanner Name - Users can enter any name that they prefer
-
Scanner ID - Users will need to enter the Serial Number listed on the bottom of the scanner
- Note: If a letter is capitalized in the Serial Number of the scanner, it should be capitalized here as well
- This option also requires the below software to be installed on the computer, in order for the ID data to be sent to Visitor Management:
- AssureID Sentinel
- ID-AIDD
- Navigate360 ID Scanner app
- For more information on how to set up an ID Scanner and install the required software, click here
- Users can locate their Building ID and District ID, needed for the Navigate360 ID Scanner app, inside the information box located under line 3 of the installation instructions listed on the page
Click here for additional on-demand webinars for Visitor Management
Back-to-School Checklist
⏹️ Update bookmarks Visitor Management has been updated with the new URL: https://vm.navigate360.com.
We recommend that users update all saved bookmarks or links to include the new URL for Visitor Management. If a user attempts to visit the legacy URL (https://navigate360vm.com), they will be redirected automatically to the correlating new address for the VM dashboard, Self-Serve Kiosk, Volunteer Application, and Volunteer Portal.
Please add the New URL for any whitelisting that you have in place for Visitor Management to ensure uninterrupted access. For more information on whitelisting, click here.
Note: With the updated Visitor Management URL, you may need to re-enable camera access in your browser settings. If prompted when scanning an ID or accessing the webcam, please select “Always Allow”.
⏹️ Check your rosters Navigate360 will resume syncing with your Student Information System the week of July 28. This is for those integrated through Clever or ClassLink. Starting Monday, August 4, please check that your rosters appear correct. If the information is not correct, please verify that your information is correct with your SIS administrator. Then, please contact Navigate360 Tech Support at tech@navigate360.com.
⏹️ Test Hardware Make sure all your hardware is working properly. Test the ID scan and print a badge. Order printer supplies, if needed. Need help? Access our printer and camera troubleshooting guides.
- For DYMO 450 & 550 Printer Set Up, click here
- For DYMO Wireless Printer Set Up, click here
- ID Scanner Drivers & Software Install, click here
- 2D Scanner Set Up, click here
⏹️ Review users and notification settings. Review which users have access (District or Building-level access) and their Alert Notification settings, located in Admin menu, accessible by both District and Building Admins. Ask users to confirm their phone number for text notifications.
- For User Management, click here
- For Notification Management, click here
⏹️ Review your settings to reflect custom policies and options such as restricted persons policy, self-serve messaging, visit length thresholds, and visitor & student types/reasons, all located in “Admin Settings.”
- For information on managing reasons for a visit, click here
- For information on managing reasons and visitor types, click here
⏹️ Run and extract any needed reports from the last school year.
- For information on how to run and extract a report, click here
- For more information on how to schedule email reports, click here
⏹️ Check your email filters. Ensure the navigate360.com domain is allowed in your district email/spam filters to ensure you receive important communications.
⏹️ Review your Self-Serve Kiosk settings to ensure all personas are supported such as Students, Staff, Visitors, Guardians and Volunteers. Visitor Management now allows multiple kiosk locations to be created for a single building. Additionally, each kiosk location can be configured with unique persona settings. Providing more flexibility for schools with multiple entrances or that want separate kiosks for different persona types. The Device Settings menu has been updated to allow users to assign themselves to one or more kiosks that have been created for the building. This ensures that all badges will print directly from the VM user’s computer for the kiosks they are assigned to.
- For information on setting up the needed Self-Serve settings, including on how to create unique Self-Serve kiosks for your building click here
- For information on how to quickly access and assign a user to a Self-Serve kiosk for your building, click here
⏹️ Print out Visitor Check-in posters
- To print out a Visitor Management poster for Visitors, download the option that best meets your needs:
Welcome Poster - Self-Serve Kiosk Check-in and Badge Printing
Welcome Poster - Self-Serve Kiosk Check-in with Front Office Badge Printing
Welcome Poster - Front Office Check-in
⏹️ Share out the Visitor Management Guardian Announcement
- Download the below guide to share information regarding Visitor Management with your guardian community.
Back-to-School Tips & Tricks
The 2025-26 back-to-school season will be here before you know it! Our product experts have created these helpful tips to help you start the new school year off right!
⏹️ Check SIS Sync Status
- SIS Sync Status - Confirm the correct number of students, buildings, and contacts are being synced into Visitor Management:
- PowerSchool Setup - If your school district uses PowerSchool SIS and has purchased the PowerSchool Writeback feature, review the settings to ensure that there are no needed changes.
⏹️ Review Messages and Guidelines
- Restricted Persons Policy - Review your policy for what front office staff should do when they encounter a restricted person (sex offender, person with custody issues, etc.)
- Manage Notifications - Review the notification settings for all users that need to receive security alerts.
- Visit Time Settings - Review the Time in Building Limit and Auto-checkout Time
- Mobile App Settings - Review instructions to be shown after a visitor has scheduled a check-in through the mobile app
- Self Serve Setup - Review the personas enabled for Self-Serve and the Visitor Instructions After Check-in/Check-out
⏹️ Review Visitor and Student Settings
- Visitor Reasons for Visit - Review the customizable Visitor Reason for Visit options for when a person is checked into the building.
- Visitor Types - Review the customizable Visitor Type and Reason for Visit options for when a person is checked into the building.
- Visitor Badge - Review the information that displays on a visitor’s badge when they check in.
- Student Tracking- Review Tardy Settings and the customizable Late Check-in and Early Check-out Reasons (If your district uses PowerSchool, these reasons will need to be re-mapped from the SIS).
⏹️ Review Users
- Users - Invite new, Edit, Activate/Deactivate users based on staffing changes or update permissions/buildings as necessary.
Need Visitor Management Supplies? Click Here
Key Features
🔹 Visitor Screening and Tracking
See exactly who is in your school and who is requesting access
- Vet each visitor against custodial rights and block lists
- Perform national sex offender registry checks on every visitor and volunteer with every visit
- Flag persons of concern and discreetly notify security or necessary staff instantly
- Utilize self-serve and mobile check-in/-out visitor processing and badge printing for easy identification
NEW for 2025!
- Visitors with a saved mobile number will receive a text after check-in, notifying them that their visit details have been shared with Emergency Management for safety purposes
- The “Who are you Visiting?” field now allows visitors to select either linked Students or Staff/Substitutes during check-in
- Users can now send mobile app invitations in bulk from the Visitors page
- If a mobile number is saved on the Visitor Profile, users can send one-way SMS messages directly from the Visitor Profile
🔹 Student & Staff Tracking
Easily monitor and track student late check-ins and early check-outs.
- Customize Late Check-in and Early Check-out Reasons
- Add custody notes directly to a student profile and link to needed guardians
- PowerSchool writeback allows for instant attendance updates for districts that use PowerSchool SIS
- Utilize self-serve and the mobile app for guardians to schedule late check-in and early check-outs
NEW for 2025!
- Admins can now set individual or all Staff/Substitutes as travelers
- For visitors linked to at least one student, a new Notifications option appears in the Visitor Profile, allowing management of guardian notification preferences per student for late check-ins and early check-outs
- Users can now edit Name and Email fields for manually created Staff Profiles
- Admins can enable a Check-out Barcode on Visitor Badges, allowing quick check-out via 2D Scanner at the Self-Serve Kiosk
- A new Guardian persona is available in Self-Serve Setup. When enabled, guardians must scan their ID or QR Code from the mobile app to check students in late or out early at the kiosk
🔹 Rapid, Flexible, Check-in/Check-Out
Streamline preauthorized access.
- Expedite late student check-ins and early-release check-outs
- Print visitor badges for easy identification
- Eliminate manual or fraudulent visitor entries with flexible check-in options including driver’s license scanning and web cam ID capture
- Staff and student options allow for school IDs or RFID tags
NEW for 2025!
- Google Translate is now available on all Self-Serve kiosk pages for all users.
- Admins can now enable or disable all check-in/out options per persona (Students, Staff, Visitors, Guardians, and Volunteers) in Self-Serve Setup, allowing full configuration flexibility
- Users can now perform Bulk Returning Visitor Check-ins and print multiple badges, streamlining group check-ins
- Bulk Visitor Check-outs are now possible by filtering the Visitor list to show currently checked-in visitors and checking them out all at once
- Users can now schedule future check-ins by applying a future date to bulk or individual returning visitor profiles, simplifying arrival-day processing
- Staff can now scan their driver's license to check in and out of the building
🔹 Volunteer Management
Encourage community engagement without compromising security.
- Simplify volunteer and events process with an online volunteer portal
- Collect and maintain detailed profiles including personal information, preferred roles, and school preferences
- Conduct criminal background checks on every volunteer (Optional)
- Track and record volunteer activities and hours
NEW for 2025!
- Two new Volunteer-specific user roles: District Volunteer Coordinator and Building Volunteer Coordinator
- Enhanced customization of the Volunteer Application
- Option for Volunteers to scan their driver's license to check into and out of an event
- Ability to edit a Volunteer visit
- Ability to delete a Volunteer
- Ability to bulk upload volunteer hours for off-site/after-hours events
🔹 Mobile App
- Returning visitors can download the VMS mobile app to streamline their check-in process and to schedule a late check-in or early check-out for a linked student
- Staff and substitutes can be invited to download the mobile app to streamline their check-in and check-out process by using their unique QR code
📳Access the Android mobile app on Google Play
📳Access the iOS mobile app on the App Store
NEW for 2025!
- When the Guardian persona is enabled in the Self-Serve Setup, guardians using the Visitor Check-in mobile app can schedule student late check-ins and early check-outs for one or more linked students. After scheduling the student check-in/check-out, they will receive a QR Code that can be easily accessed from the home screen
🔹 Layered Integrations
Stay aware and connected in the case of an emergency.
- Navigate360’s Visitor Management and Emergency Management integrate to provide safety teams with access to current visitor information for more efficient incident response and reunification
- In the case of an emergency, start an alarm directly in Visitor Management for next steps in Emergency Management
- Visitors that have a mobile number saved to their Visitor Profile will receive a text notification after checking into a building. This text informs them that their visit details have been passed to Emergency Management, in case an emergency occurs during their visit.
🔹 Robust Reporting Capabilities
Analyze trends to ensure accountability with real-time analytics.
- Review data on specific individuals and roles to gain valuable insights
- Easily view and compare data for visitors, staff, substitutes, students and volunteers
- Analyze specific timelines with custom date ranges
- Export data in the preferred format (XLXS, PDF, CSV) for a deeper dive into visitor, staff, substitute, student, & volunteer data
🔹 Hardware Flexibility
Streamline the check-in process with various hardware options.
- Visitor Management is a secure, browser-based cloud solution accessible through any standard computer or mobile device. Choose from RFID, barcode, and license scanners, cameras, and badge printers for greater confidence and convenience
Need Visitor Management Supplies? Click Here