ALICE Launch Guide (2025-26)
Preparation & Response Training: Power User Launch Guide
- Emergency Management
- Connect360
- PBIS Rewards
- Hall Pass
- Preparation & Response Training
- Behavioral Case Manager
- Visitor Management
-
Compass
Training Workshops Getting Started On-Demand Data & User Management Compass Curriculum for Students, Staff, & Families Compass Behavior Intervention Compass Mental Health + Prevention Compass for Florida - Character Ed, Resiliency, & Prevention Compass for Texas - Character Ed Analytics & Reporting Release Notes & Updates Additional Resources
- School Check In
- ALICE Training Institute
- Detect
- Anonymous Tip Reporting
- Resources
- Back-to-School
Follow the steps below to launch your ALICE Training® initiative for the 2025-26 school year.
Note: Each section below can be expanded or collapsed and has important information to read and share.
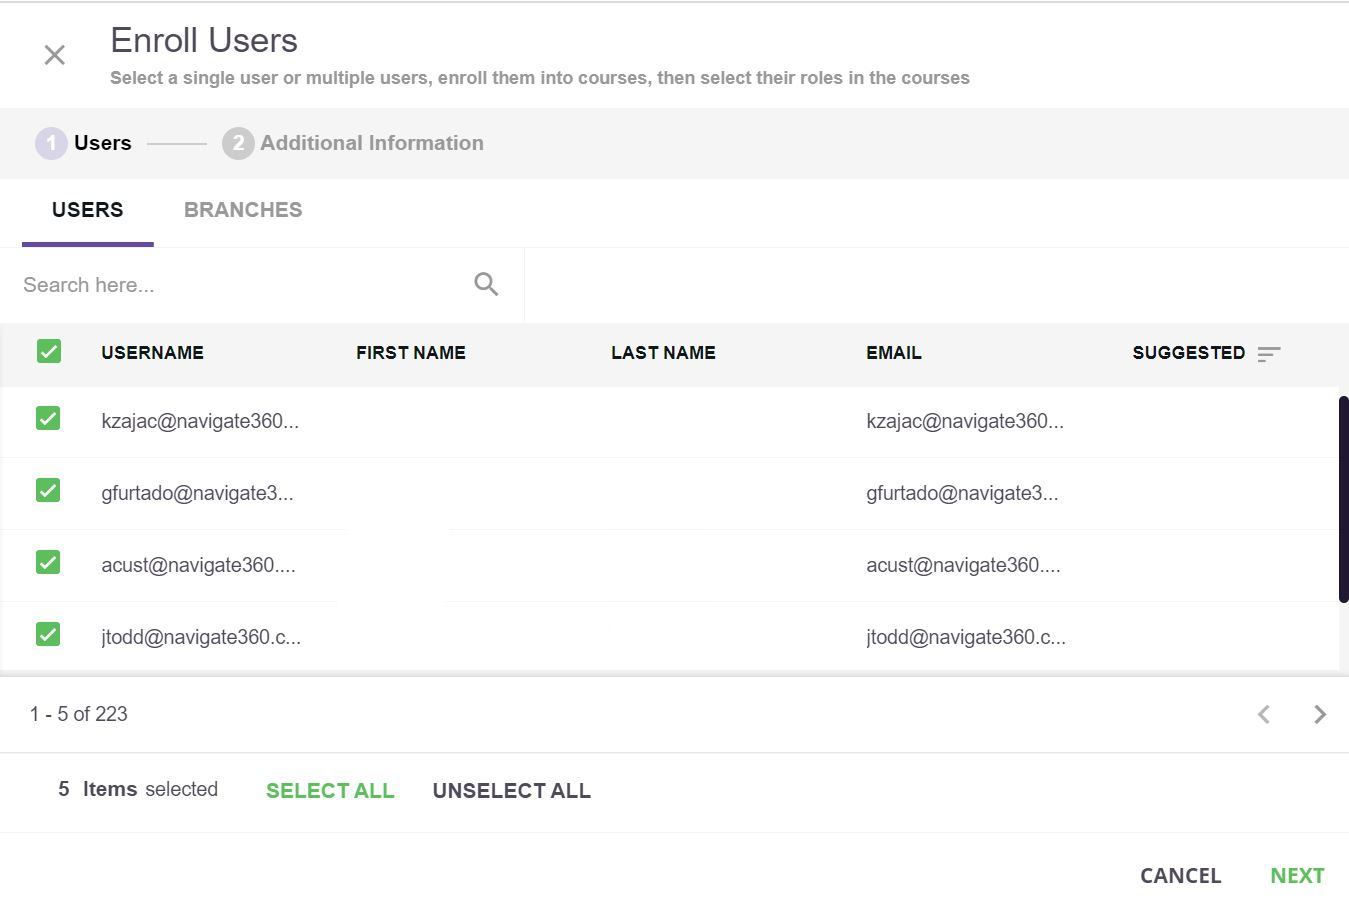
Verify Power Users:
District’s must identify one or more Power Users to manage the Navigate360 Preparation & Response Training.
Power Users are responsible for:
- Delivering access of ALICE Training® to district users
- Assigning required lessons
- Reviewing progress reports to ensure lessons are completed Locate Power Users:
Step 1: Log into https://learn.navigate360.com using your login credentials.
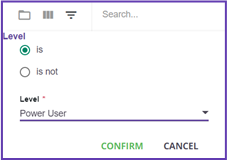
Step 2: Navigate to the ‘Admin Menu’ by clicking the gear icon in the top, right corner of the homepage and click ‘User Management.’
Step 3: Open the Menu Filters in the top-left corner.

Step 4: Add Filter- Level > Is > Power User. Select Confirm.
If you no longer have an active Power User, please send a request to tech@navigate360.com with the name and email of the person who should be provided with Power User access. This request must be sent by a member of your leadership team that can be verified on your school website (ie. Principal, Director, Superintendent, Assistant Superintendent).
If additional Power Users are needed, an existing Power User can submit a request to their Customer Experience Consultant and tech@navigate360.com with the user’s full name and email address.
Adding New Users (Manually or via CSV):
NTI Adding Users
Instructions for adding new users to the Navigate360 Preparation & Response Training. Power U...
Manually adding users:
NTI Power User Warning
Note This activity requires Power User permissions. If you do not have these, ple...
- Log into https://learn.navigate360.com using your login credentials.
- Under Power User Quick Links, click User Management
- Click on
 New Users and then New User.
 - Complete all required fields, ending with Create User. You may need to click through the folders on page 2 to select your organization's branch.
- Immediately after creating the user, you have the option to enroll users into courses by clicking on Enroll users
Passwords
During initial setup, user passwords must include both letters and numbers in any combination.
For subsequent passwords, users will receive an error message if they try to create a password with only letters or only numbers. Additionally, they will receive an error message if they use three consecutive letters or three consecutive numbers.
Adding Users in Bulk Via .CSV:
Power User Warning
Note This activity requires Power User permissions. If you do not have these, ple...
- Log into https://learn.navigate360.com using your login credentials.
- Under Power User Quick Links, click User Management
- Click on
 Import & Manage and then Manage Users via CSV.
 - Download the template, and complete all required fields.
Optional Upload Fields
Update Users - Overwrite existing user data (email address and/or password) with the data uploaded via the CSV file. Select “Add users…” as shown.
- After the CSV is configured and saved:
- Upload the file by clicking the green cloud and selecting the saved CSV file.
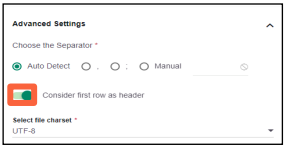
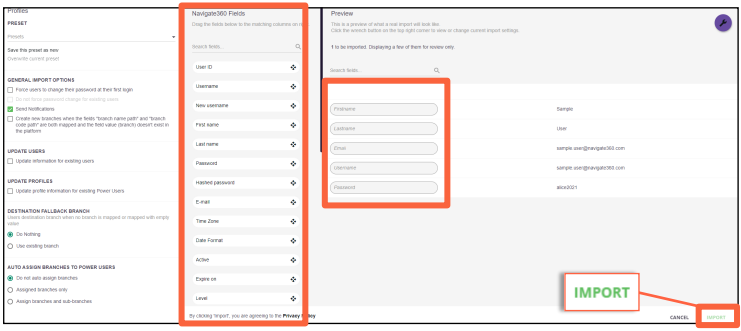
- Scroll down and open Advanced Settings. Ensure Consider first row as header is toggled on.
- Click Confirm in the lower right-hand corner.
- In General Import Options, check the box for Force users to change their password at their first login.
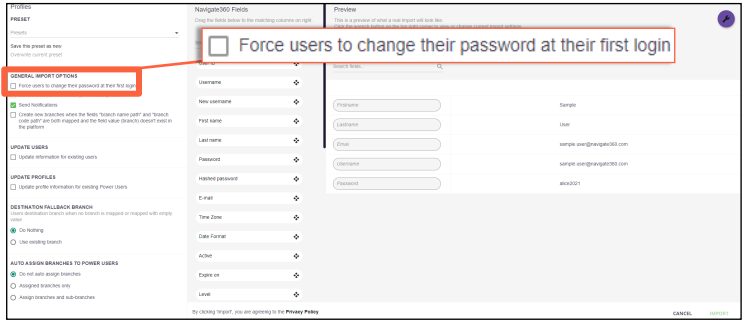
(Optional) In General Import Options, uncheck the box for Send notifications if you plan to notify your staff later. Leaving this box checked will generate an email to each user with login instructions after the import.
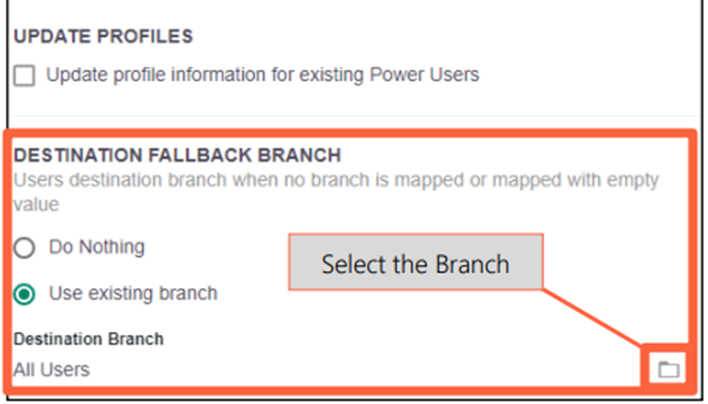
- If no branch exists on your CSV file
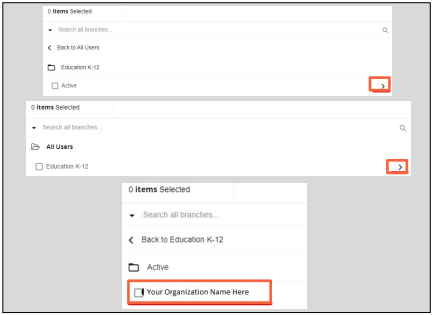
- Under Destination Fallback Branch, click Use Existing Branch
- Then, click the folder to search for and select your branch
- Drag and drop the proper Navigate360 Fields to match the CSV column headers in Preview.
- Click Import in the lower right-hand corner
12. Click Import Users on the popup box.
Important
If you opt to select update information for existing users, the password field entered in the CSV will supersede any import setting and change the user's password.
If you do not wish your existing users to have new passwords, Do NOT toggle update information for existing users.
The option to set passwords in bulk is only available during the initial user setup process.
Deactivate Users:
NTI Deactivating Users
Instructions for deactivating users in the Navigate360 Preparation & Response Training. Power...
Power User Warning
Note This activity requires Power User permissions. If you do not have these, ple...
Note: To ensure historical data is maintained, user accounts cannot be deleted.
How to Deactivate Users Manually:
- Log into https://learn.navigate360.com using your login credentials.
- Under Power User Quick Links, click User Management
- Click the
 checkbox circle once to deactivate a user. Click it again to re-activate a user.
- Green indicates an active user
- Gray indicates an inactive user
You can also deactivate multiple users from this screen:
- Click the box next for each user
- In the bottom, right corner click Choose Action
- On the menu that appears, select Status and Deactivate
- Depending on the number of users, you may see a confirmation box to approve the update
How to Deactivate Users Via .CSV:
- Log into https://learn.navigate360.com using your login credentials.
- Under Power User Quick Links, click User Management
- Click on Import & Manage and then Manage Users via CSV.
- Create a CSV file containing two columns named
-
Username (Column A) contains the username of users to be deactivated (one email address per row)
- Remember, Username and Email Address must be equal in PRT.
- Active (Column B) contains the word no (this must be on each row that has an email address listed)
-
Username (Column A) contains the username of users to be deactivated (one email address per row)
- After the CSV is configured and saved:
- Upload the file by clicking the green cloud and selecting the saved CSV file.
- Scroll down and open Advanced Settings. Ensure Consider first row as header is toggled on.
- Click Confirm in the lower right-hand corner.
- In General Import Options, check the box for Update Information for Existing Users.
- Drag and drop the proper Navigate360 Fields to match the CSV column headers in Preview.
- Make sure to the Navigate360 Field of Username is matched. If email address is matched, the profile won't update during the import.
- Click Import in the lower right-hand corner
Enrolling Users in ALICE eLearning:
2024 How to Enroll in ALICE
This school year, Power Users can assign different courses to Learners based on their completion history. New ALICE learners should be assigned 'AH7 - ALICE for Schools.'
Learners who have completed AH7 can be assigned ‘AS25R - ALICE for Schools 2025-2026 Recertification.’ This course is intended for returning learners who have previously taken the ALICE for Schools course.
If you have any questions about the enhanced content, please contact your Customer Experience Consultant.
For enrollment issues, please contact Technical Support at tech@navigate360.com or by completing the Contact Us form above.
Instructions for enrolling users for ALICE for Workplace can be found here- Enrolling users in ALICE for Workplace
Enrolling Returning Learners
- Log into https://learn.navigate360.com using your login credentials.
- Under Power User Quick Links, click ‘Course Management'
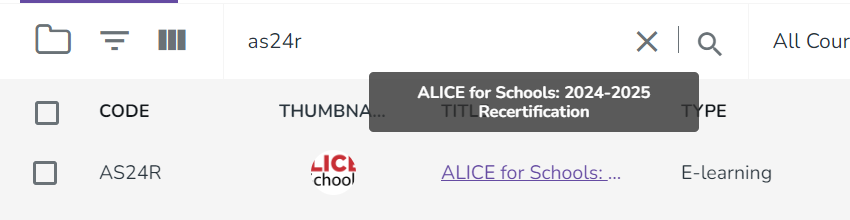
- Search for AS24R - ‘ALICE for School 2024-2025 Recertification.' Click on the course name.
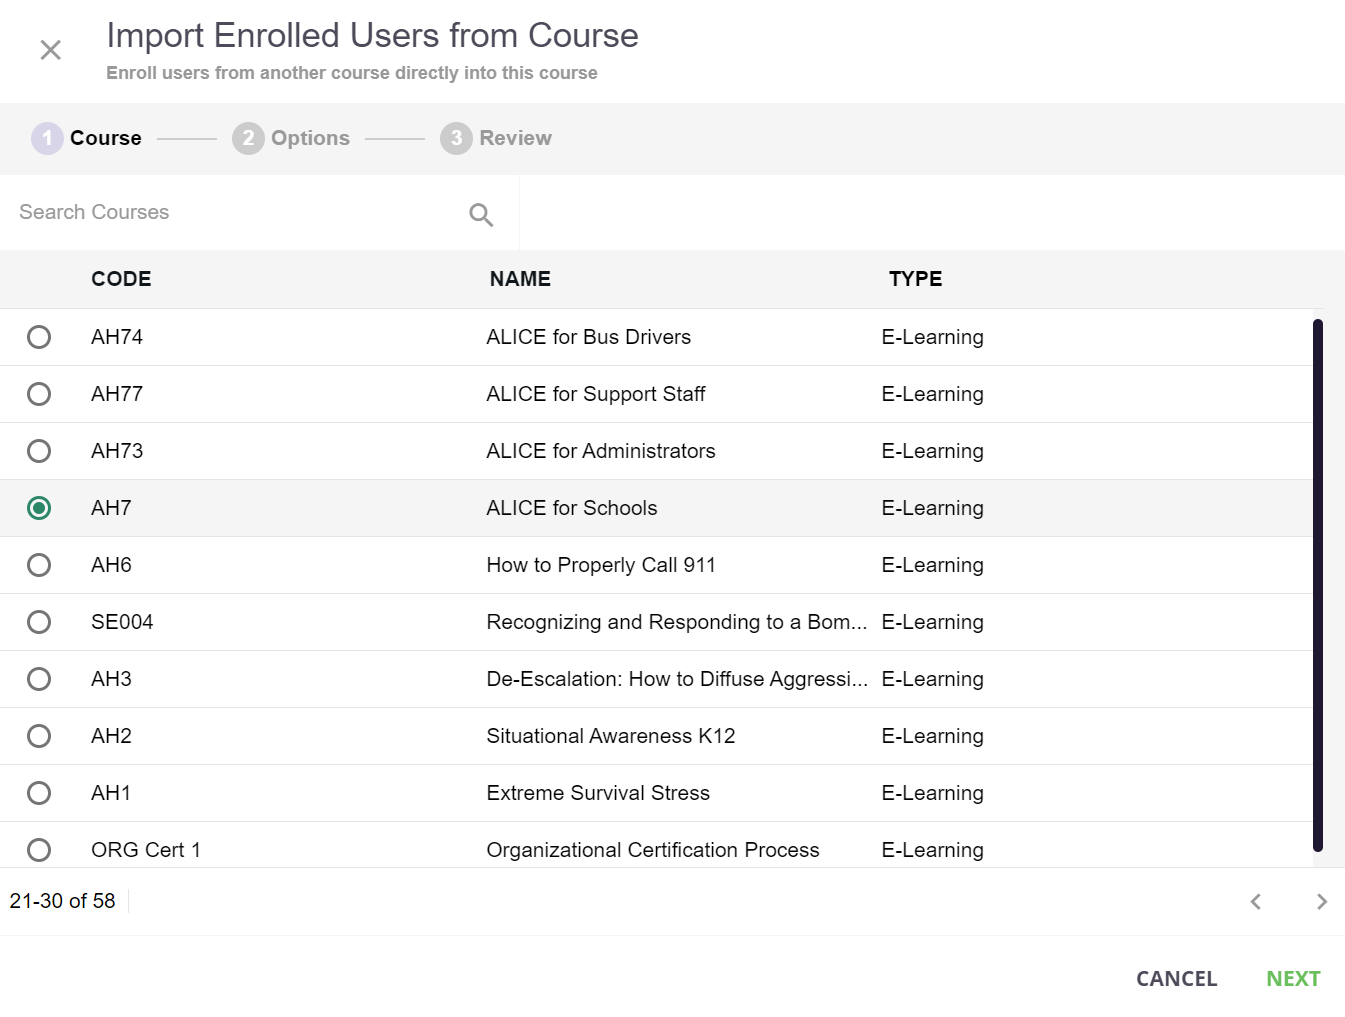
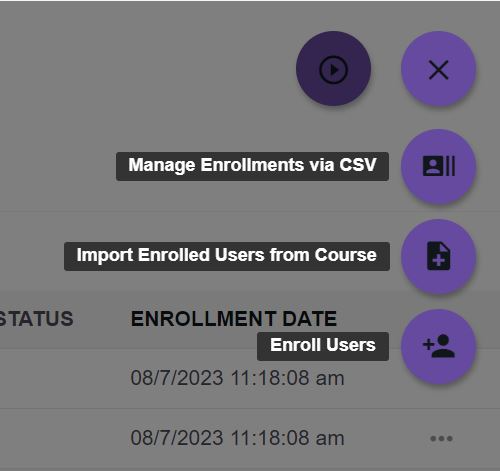
- Once entering the Enrollment page, click the purple ‘Manage Enrollments’ bubble. Then, click ‘Import Users from Course.’

- From the list of courses, select Course Code AH7 - ‘ALICE for Schools.' Click Next
- On the options tab, follow these steps to select Completed Learners:
- User Levels, select ‘All Levels’.
- Enrollment Status, click ‘Select Enrollment Status’ and choose ONLY ‘Completed.'
- Enrollment Deadline should be left blank
- click Next
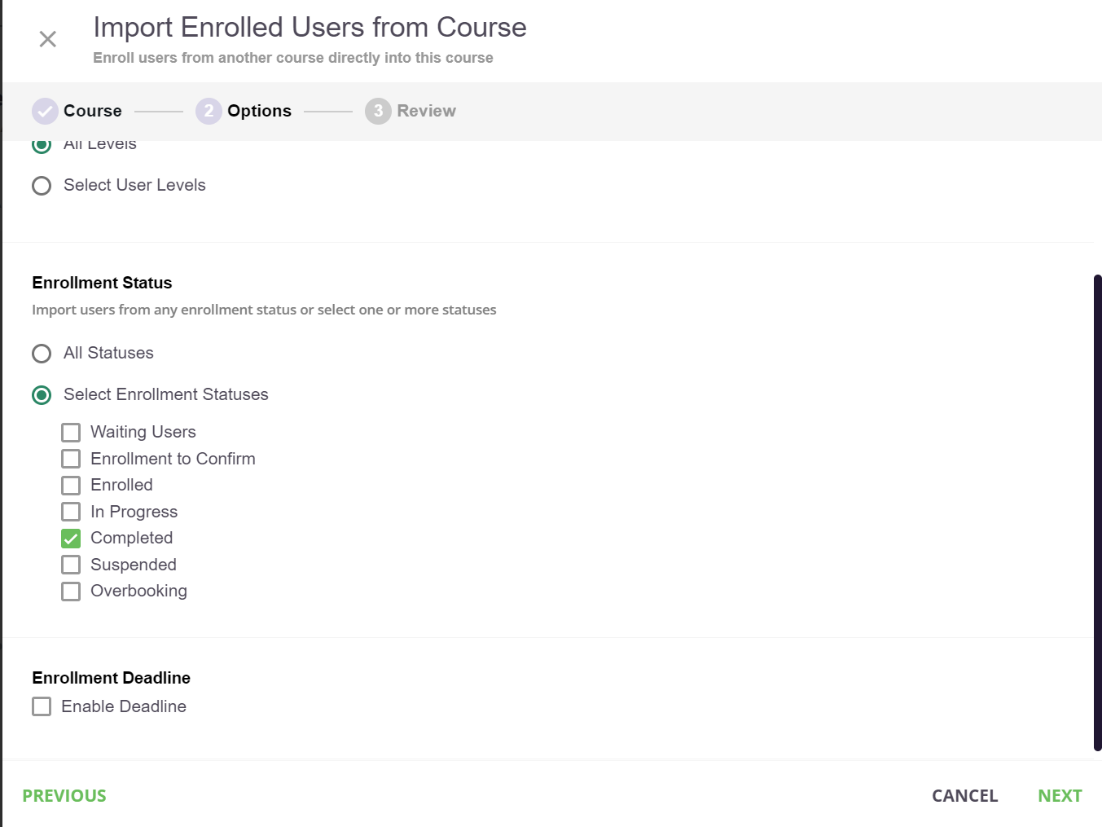
- You will be shown a list of users based on the selected criteria. Review the list of Completed users. Click ‘Submit’ to enroll.
Enrolling New Learners
Ensure user accounts have been created prior to enrollment. Specific Instructions are available below.
Adding New Users
NTI Adding Users
Manually adding users:
NTI Power User Warning
Note This activity requires Power User permissions. If you do not have these, ple...
- Log into https://learn.navigate360.com using your login credentials.
- Under Power User Quick Links, click User Management
- Click on New Users and then New User.
- Complete all required fields, ending with Create User. You may need to click through the folders on page 2 to select your organization's branch.
- Immediately after creating the user, you have the option to enroll users into courses by clicking on Enroll users
Passwords
During initial setup, user passwords must include both letters and numbers in any combination.
For subsequent passwords, users will receive an error message if they try to create a password with only letters or only numbers. Additionally, they will receive an error message if they use three consecutive letters or three consecutive numbers.
Adding Users in Bulk Via .CSV:
Power User Warning
Note This activity requires Power User permissions. If you do not have these, ple...
- Log into https://learn.navigate360.com using your login credentials.
- Under Power User Quick Links, click User Management
- Click on Import & Manage and then Manage Users via CSV.
- Download the template, and complete all required fields.
Optional Upload Fields
Update Users - Overwrite existing user data (email address and/or password) with the data uploaded via the CSV file. Select “Add users…” as shown.
- After the CSV is configured and saved:
- Upload the file by clicking the green cloud and selecting the saved CSV file.
- Scroll down and open Advanced Settings. Ensure Consider first row as header is toggled on.
- Click Confirm in the lower right-hand corner.
- In General Import Options, check the box for Force users to change their password at their first login.
(Optional) In General Import Options, uncheck the box for Send notifications if you plan to notify your staff later. Leaving this box checked will generate an email to each user with login instructions after the import.
- If no branch exists on your CSV file
- Under Destination Fallback Branch, click Use Existing Branch
- Then, click the folder to search for and select your branch
- Drag and drop the proper Navigate360 Fields to match the CSV column headers in Preview.
- Click Import in the lower right-hand corner
12. Click Import Users on the popup box.
Important
If you opt to select update information for existing users, the password field entered in the CSV will supersede any import setting and change the user's password.
If you do not wish your existing users to have new passwords, Do NOT toggle update information for existing users.
The option to set passwords in bulk is only available during the initial user setup process.
Users can be enrolled directly or via CSV into AH7 - ‘ALICE for Schools.' Specific Instructions are available below.
Enroll Users
How to Enroll Users in Courses
How to Enroll Users Via .CSV:
Power Users have the ability to enroll users into a single or multiple courses within Navigate360 Preparation & Response Training via CSV. Before starting this process, users should have been added to the platform.
Prepare the .CSV File
- Download the template
- Remove the example rows
- For single course enrollment, add the username of each user in their own row
- For multi-course enrollment, create a row for each username and fill in the course code. Each course code should be a single row with the username repeated in each of those rows. (It is possible to enroll different users into different courses through this method as well)
- In the level column, enter the word learner for every row on the spreadsheet
- Save the file as a .CSV for upload in the next section
Finding the Course Code
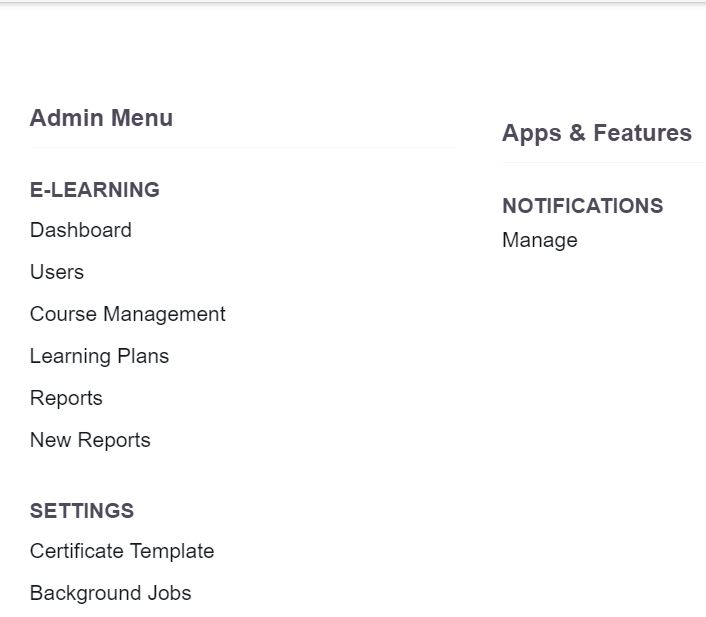
Click on the Admin Menu Gear in the top, right corner

Click on Course Management
A list of courses available for enrollment will show (Note: exact available courses can vary by district)
Course Code is an alphanumeric identifier found under the Code column on the Course list

Enrolling into a Single Course
- Log into https://learn.navigate360.com using your login credentials.
- Click on the Admin Menu Gear in the top, right corner
- Click on “Course Management”
- Navigate to the course in which you want to enroll users
- Click on either the Course Name or the People Icon under Enrollment

- On the Enrollment Screen, click Manage Enrollments
- Then, click Manage Enrollments via CSV
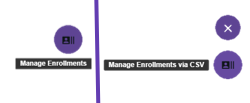
- Click the green cloud and select your saved .CSV file.
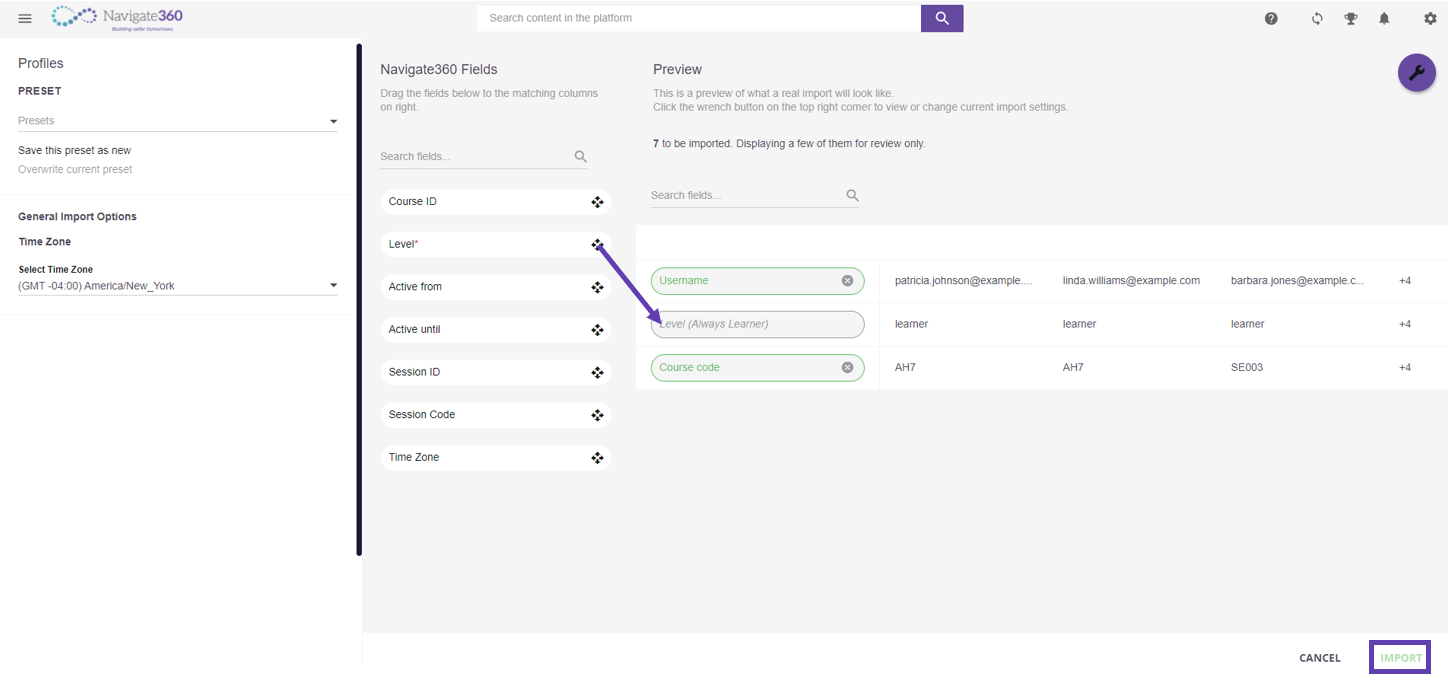
- Open “Advanced Settings” and ensure “Consider first row as header” is toggled on. Click “Confirm” in the lower right-hand corner.
- Under the Navigate360 Fields column, drag Username and Level over to match the Header labels in the Preview column
- Click Import
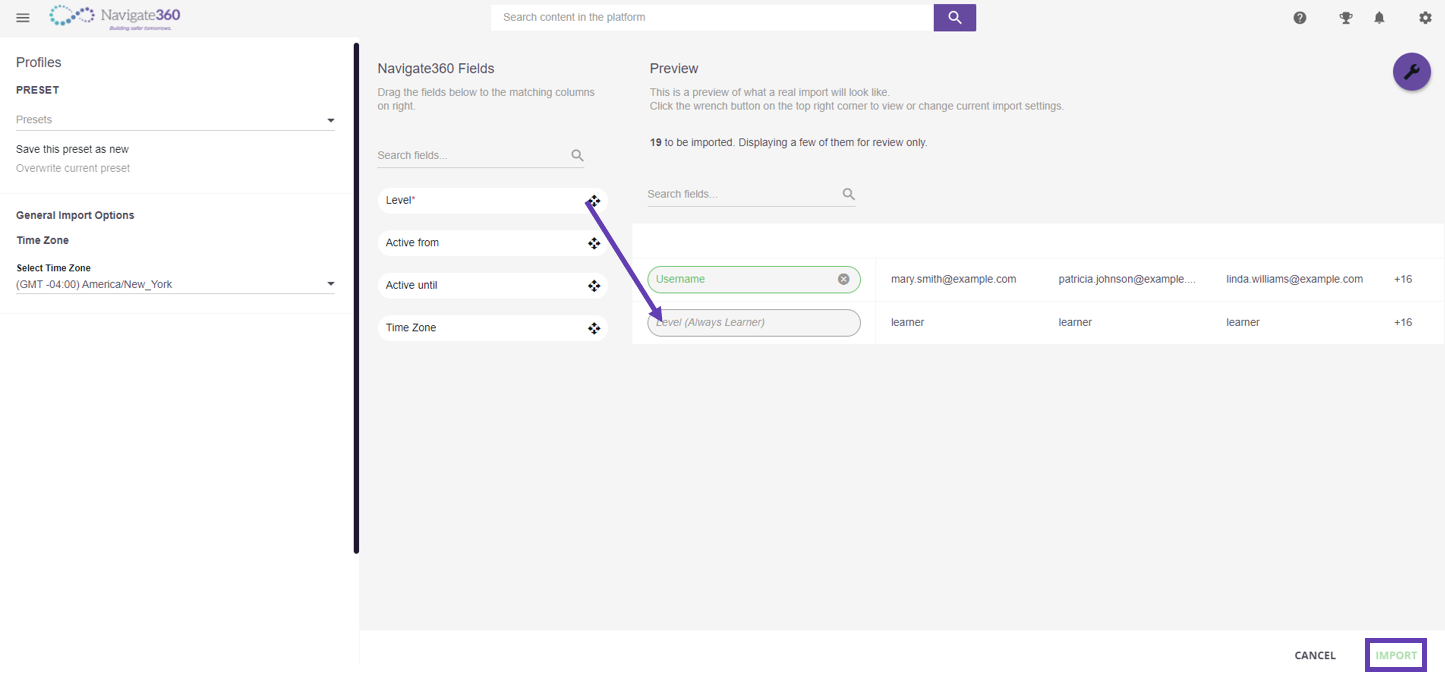
- A confirmation box will appear. Click Enroll Users to complete the enrollment
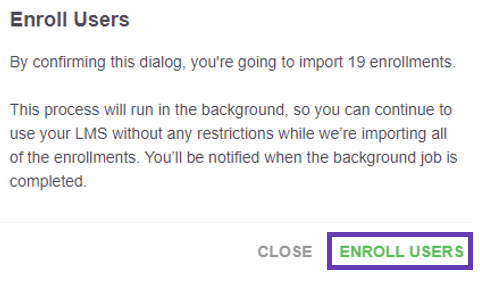
- A notification will appear when the job is complete. Note: larger imports may become a background job. Background jobs will email you once complete
Enrolling into Multiple Courses
- Log into https://learn.navigate360.com using your login credentials.
- Click on the Admin Menu Gear in the top, right corner
- Click on “Course Management”
- On the Course Management screen, click Manage Enrollments
- Then, click Manage Enrollments via .CSV
- Click the green cloud and select your saved CSV file.
- Open “Advanced Settings” and ensure “Consider first row as header” is toggled on. Click “Confirm” in the lower right-hand corner.
- Under the Navigate360 Fields column, drag Username, Level, and Course Code over to match the Header labels in the Preview column
- Click Import
- A confirmation box will appear. Click Enroll Users to complete the enrollment
- A notification will appear when the job is complete.
Note
Larger imports may become a background job. Background jobs will email you once complete
How to Enroll Users Manually:
Step 1: Navigate to the  gear wheel in the top right corner to access admin settings.
Step 2: Click on “Course Management.”
Step 3: Click on the name of the course you want to enroll users in. You will then access the enrollment menu.
Example: Click on the name “ALICE Basic for Schools" |
Step 4: Click on  “Manage Enrollments” and then “Enroll Users.”
Step 5: Select one, multiple, or all users and click “Next.”
Step 6: Review the enrollments and “Confirm” at the bottom of the page.
Video Training: Enrolling Users in a Course (click to expand)
Launch ALICE Training (Sending Email Notifications):
These steps are written for the ALICE for Schools course. You can send notifications for any course you choose, just replace that course's name as you follow the steps.
If you want to send notifications for multiple courses, repeat the steps for each course.
- Log into https://learn.navigate360.com using your login credentials.
- Under Power User Quick Links, click Course Management
- Select ALICE for Schools
- On the next screen, click the filter icon and select enrollment status to Enrolled.

- Now, click the box next to a user. Then Select All at the bottom of the screen.

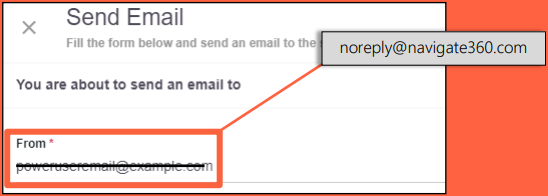
- Also at the bottom, you will find a purple Choose Action button. Click it and you will use Send Email.
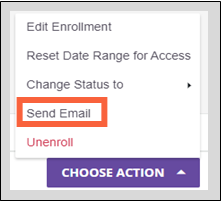
- Enter a subject, customize a message (or see below), then review and Submit. The email will now be sent to all selected users from the email address in the From field.
- You can copy/paste the template email from the next page
- By default, the from field will auto-populate with the username of the Power User
Important
To reduce the risk of the emails being blocked by your organization's email server as phishing attempts, we recommend updating the "from" field to noreply@navigate360.com
Course Invitation Template
NOTE
Use the following template when launching ALICE eLearning.
Prior to sending, Power Users should change the password text at the end of the message depending on the option they've chosen for the assignment of passwords.
We are pleased to announce we will be implementing ALICE strategies for our active shooter response protocol.
ALICE is the original civilian response to an active shooter event. ALICE Training® provides preparation and a plan for individuals and organizations on how to more proactively handle the threat of an aggressive intruder or active shooter event. ALICE Training® option-based tactics have become the accepted response, versus the traditional “lockdown only” approach.
This online course includes 6 modules: ALICE Pre-Test, Introduction, Communication Strategies, Response, Prepare, and ALICE Post-Test and allows users to stop and restart if needed. It will take approximately 60 minutes to complete.
Upon completion of the Foundational Certification, users will receive access to new courses to reinforce and broaden skills on a recurring basis. Throughout our contract, users will have access to all completed courses and may review them as often as desired. We encourage occasional reviews to ensure preparation.
What you do is important and appreciated. Thank you for your cooperation and for participating in your own survival.
Please go to learn.navigate360.com and click the SIGN IN button to login with your email address and password. Do not use the Register button as your account has already been created. If you have a password, you may continue to use it. You can use the FORGOT PASSWORD link to reset your password any time. If you do not receive the reset password email, please check your spam folder.
Password: **Power Users: See NOTE above**
Navigate360 provides a Knowledge Base to help answer questions about platform functions at https://help.navigate360.com/.
Reporting:
NTI Reporting
Instructions for generating progress reports in the Navigate360 Training Institut...
Reporting in Navigate360 Preparation & Response Training updates every hour for actions in the prior hour.
Overview of Branch Reporting - Video
Instructions for generating progress reports in Navigate360 Preparation & Response Training.
- Log into https://learn.navigate360.com using your login credentials.
- Under Power User Quick Links, click Essential Reports
- Select Quick Summary Reports & Dashboards tab
- Choose one of the following:
- User Personal Summary (Quick Summary Report for a user)
- Course Dashboard (Quick Summary Report per course)
- Completion Report (comprehensive custom report)
Reports:
User Personal Summary: Enter the name or email of the user, select the user’s profile and “generate”.
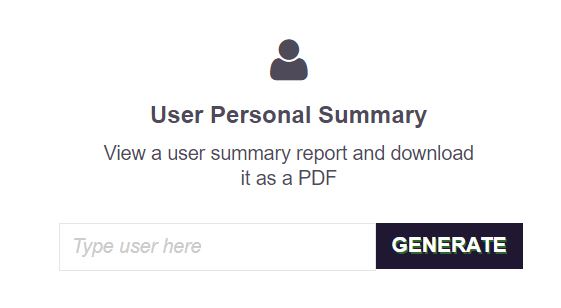
See also: Reviewing an Individual Users Course Progress Through User Personal Summary
Course Dashboard: Click “view” and then select any course on the following screen to see more enrollment progress details. Once you select the course, it can be downloaded to excel or pdf by using these buttons, 
 , found in the top right corner. For best results, select the current year using the custom date filter and click to hide deactivated users.

Completion Report: Click the  export tray and choose between XLS, CSV, or HTML file types. The file will download automatically.

How to Hide Deactivated Users from a Progress Report
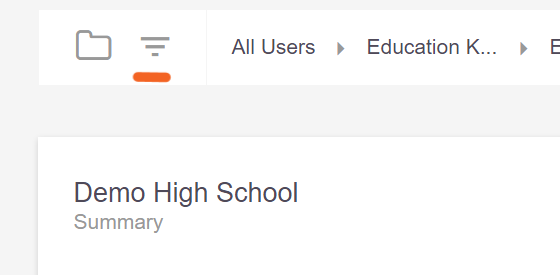
Once viewing the report of your choice, select the funnel feature at the top left to see filter options for your list.
From the filter options, check mark ‘Hide Deactivated Users’ to have deactivated users removed from your progress report.

Manage Passwords:
Resetting Passwords
Instructions for managing passwords in the Navigate360 Preparation & Response Training.
For Admins assisting other Users:
- Log into https://learn.navigate360.com using your login credentials.
- Click User Management
- Hover over the users profile line and click the 3-dots on the right side of the screen.
- Click Edit.
- Enter a new password and re-type for confirmation, then click Submit.
For Individual Users:
- Go to https://learn.navigate360.com
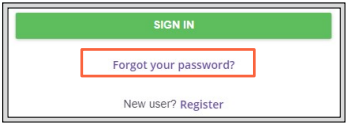
- Click Forgot your password? and follow the prompts. An email will ultimately be sent for you to create a new password.
- If you don't recieve an email, contact your district Power User (Administrator) and have them verify your account has been created.
Passwords must include both letters and numbers
Users will receive an error message if they try to create a password with only letters or only numbers. Additionally, they will receive an error message if they use three consecutive letters or three consecutive numbers.
*Limitations on consecutive characters do not apply to passwords created during initial CSV uploads.
Whitelist Guide:
NTI Whitelist Guide
To ensure your organization's email server receives emails from Navigate360 Train...
To ensure your organization's email server receives emails from Navigate360 Preparation & Response Training, please have your IT department whitelist the following URLs. Without whitelisting, your email server may block delivery or flag these messages as spam.
Please contact tech@navigate360.com for support and troubleshooting.
Common FAQs:
Why can't my staff member log in?
This can happen when a user attempts to use the wrong password. Encourage the user to request a password reset from the login page, or you can update the password for the user as a Power User. The Power User should also verify the user is active and that their email address is accurate.
Are all staff members required to take ALICE for Schools?
All staff should take the enhanced ALICE for Schools. This curriculum is the new standard for ALICE protocol. Completion requirements are at the discretion of the organization.
Does enrolling users into a course send them an invitation?
Enrolling users does not automatically send them an email. Power Users have the ability to send users an email. Please refer to the section title: “Launch ALICE Training (Sending Email Notifications).”
How do I delete a user?
Deactivating users in the Navigate360 Preparation & Response Training allows for historical data to be maintained and referenceable as needed to verify users completed training. If a user no longer needs access to theNavigate360 Preparation & Response Training, Power Users can deactivate that user.
To deactivate a user: click on: Admin Toolbar> User Management > search the list for the user > Select the green check under Status to deactivate the user
To request additional assistance please email our technical support team at tech@navigate360.com.