Wall Mounted Panic Button: Setup & Installation Guide
Learn how to properly set up a wall mounted panic button
- Emergency Management
- Campus360
- Connect360
- PBIS Rewards
- Hall Pass
- Preparation & Response Training
- Behavioral Case Manager
- Visitor Management
-
Compass Curriculum
Training Workshops Getting Started On-Demand Release Notes & Updates Data & User Management Compass Curriculum for Students, Staff, & Families Compass Behavior Intervention Compass Mental Health + Prevention Compass for Florida - Character Ed, Resiliency, & Prevention Compass for Texas - Character Ed Analytics & Reporting Additional Resources
- School Check In
- ALICE Training Institute
- Digital Threat Detection
- Anonymous Tip Reporting
- Resources
- Back-to-School
The Notify360 Wall-Mounted Panic Button provides fast, reliable emergency alerting in areas where staff may not have access to a phone or computer to activate an emergency alarm/ This guide walks through the installation process to mount and configure your Wall Mounted Panic Button
Overview

Wall-Mounted Panic Buttons:
Designed similarly to a Fire Alarm, Wall-Mounted Panic Alarms are adhered to a wall in a fixed location. Once activated, the Wall-Mounted Unit will alert Emergency Management and all Emergency Response Team members of an emergency.
Wall Mounted Units are configured for one Alarm/Incident Type.
Portal Configuration Steps
Configuring Notify360 Panic Button Settings
911Cellular Portal Configuration
Before setting up panic buttons, the 911Cellular admin must complete key portal configurations to enable panic alarm functionality.
Steps to Configure the Portal:
- Navigate to: Settings > Applications > Wireless Panic Buttons.
- Customize the following settings:

-
Toggles (Button Click Sequence):
- Define how users activate specific alarm types.
- Example: Double-click activates a Weather Alarm in Emergency Management and notifies Emergency Response teams.
-
Incident Type Configuration:
- Use the dropdown to select a previously configured Incident Type.
- If the desired type is missing, go to: Settings > Applications > Shared Configuration > Incident Types to add it.
-
Device Sleep Time (Wi-Fi Check-ins):
- Wearable buttons: Default check-in every 120 minutes to stay connected.
- Stationary (wall-mounted) buttons: Default check-in every 1,140 minutes (1 day).
- Check-ins confirm that the system is operational and properly configured.
- The more check-ins a button completes, the more frequent the button will need to be charged.
-
Tracking Duration:
- Determines how long the button will continue geolocating and sharing location data with first responders using the dispatcher application.
- Default setting: 10 minutes.
Charging
Note: for safety, wall mounted units are shipped with the batteries disconnected.
To reattach the battery, remove screws from the faceplate and access the white unit.
 |
 |
Charging 911Cellular Wall-Mounted Panic Buttons
Keeping your panic button devices charged is crucial for reliable performance during emergencies. This guide outlines instructions for charging and maintaining your Wall-Mounted Panic Buttons.
Charging a Wall-Mounted Panic Button
How to get notified when Wall-Mounted Panic Buttons have low battery
How to Configure User Notifications for Panic Button Low Battery Alerts
911Cellular Portal user notifications can be configured to receive low battery and lack of check-in notifications for all wearable and wall-mounted panic buttons.
To configure user settings:
- In the 911Cellular Portal, access Portal Users from Settings → General → Portal Users
- + Add Portal User
- Enter required information
-
Role Types:
Admin: Access to all Zones
Zone Admin: Limits users to that building or zone they are in (Similar to Building Admin in EMS)
Dispatcher: Access to Emergency Calls
BadgeR Config: Access for the person(s) responsible for maintaining and managing the wearable panic buttons. Access to only wearable panic button management items.
-
Role Types:
- Check box “Notify on low battery or lack of checkin for wireless panic buttons” (Image 1)
- Select Add
Once added, Portal Users can be enabled or disabled by Admin Users using the Portal Access toggle.

Image 1
Charging a Wall-Mounted Panic Button
When a wall-mounted unit's battery is low, designated portal users with “notify on low battery or lack of check-in for wireless panic buttons” will receive an email notification indicating the need for charging.
Steps to Charge the Wall-Mounted Unit:
- Unscrew the six retaining screws to detach the device from the wall.
- Locate the USB-C charging port on the white unit (Image 1)
- Plug the USB-C cable into the charging port and connect to power source. Allow the unit to charge for approximately 3 hours. (Image 2)
- Check the battery status via the 911Cellular portal or directly on the device, ensuring the battery is fully charged.
-
Battery Status Indicators on Unit:
Three LEDs lit: 70–100% charge.
Two LEDs lit: 40–70% charge.
One LED lit: 10–40% charge.
Flashing LED: Below 10%, charge immediately.
-
Battery Status Indicators on Unit:
- Secure the device back onto the wall using the four retaining screws.

Maintenance Best Practices
Wall-Mounted Panic Button Maintenance Best Practices
- Verify Connectivity Regularly: Review connectivity in the 911Cellular Portal → Manage Devices → Wireless Panic Buttons
-
Perform Routine Checks: Perform button connectivity test at least once a semester to verify buttons are functioning as expected.
- Don't forget to notify your Emergency Response Team (ERT) members of alarm testing!
- ERTs can be toggled off for testing purposes. Settings → Applications → Shared Configuration → Emergency Response Teams
- Document Routine Checks in Assess: Click here to learn how to create a custom Assess Template in Emergency Management to document routine battery checks.
Setup & Pairing
Steps to Configure your Wall Mounted Panic Button:
To pair a Wall Mounted Panic Button, remove the button from the wall and locate the white unit inside the panic button.
This method involved Bluetooth pairing. If multiple team members are pairing buttons at the same time, coordination is required to ensure you are pairing the correct device.
Before Setup: Review and confirm your panic button settings including button check-in cadence in the 911Cellular Portal, Wireless Panic Button Settings
By default, Wall Mounted Panic Buttons are configured to check-in 24-hours (or 1440 minutes). This means, every 24-hours, the button will ping the network to confirm it is still connected. If the check-in fails, Portal Users will receive an email notification. How to Configure User Notifications for Panic Button Low Battery Alerts
1. Access the 911CellularPortal: Open the 911Cellular Portal and navigate to Manage Devices
2. Navigate to Button Registration: Click on the sub-tab labeled ‘Button Registration’ to locate the green ‘Pair Wireless Device’ button.
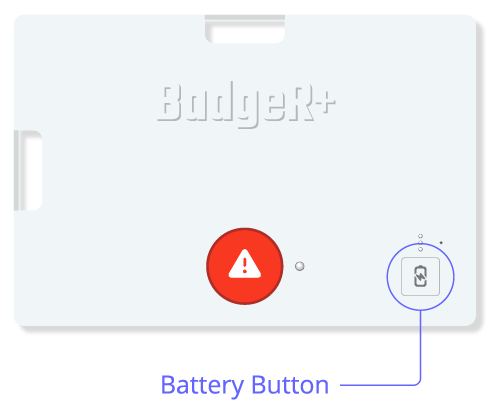
3. Initiate Pairing Mode: Press the Battery Button on the device for 6 seconds to initiate Pairing Mode.
- The Status Indicator Light will blink, confirming Pairing Mode is active.
- Pairing Mode will last for 20 seconds and temporarily disables alert functionality.

4. Pair the Device: Return to your browser and click the green ‘Pair Wireless Device’ button
5. Select the Device for Pairing: In the popup window, select the device labeled ‘BadgeR+’ and click ‘Pair’.
- If the device is already paired, you will see the text ‘Paired’ next to its name.
- If you do not receive a pop-up, confirm your browser settings will allow Bluetooth connection.

6. Enter Device Details: Click ‘Edit Device Details’ and fill in the required fields, including User Email, Device Name, SSID, and password.
* Wifi SSID and Password are case sensitive

6. Link the Device: Click the green ‘Link Device’ button. The device will now appear in the ‘Active Buttons’ sub-tab and is ready for testing before distribution.
7. Mark as Stationary: In the ‘Active Buttons’ sub-tab, find the newly paired button and select the pencil icon on the right side.
- In edit mode, check the box marked “Set Device as Stationary”. This will prompt you to select the assigned Zone.
- Select the Zone the button will reside in
- Click Update


8. Confirm Check-In: In the ‘Active Buttons’ sub-tab, verify the wearable device has checked-in “a few seconds ago”. This confirms the button has now connected to the network.
Configuration Requirement: Last Known Zone
Once paired, all buttons should have a “Last Known Zone” after check-in. If your button does not have a last known zone, confirm Access Points are uploaded for your building. If Access Points are in the 911Cellular Portal and not checking in, contact Navigate360 Technical Support for more assistance. Tech@navigate360.com
Installation
Mount housing in desired wall location with four additional screws provided (plus optional o-rings and plastic wall anchors). Once the housing is secured to the wall, insert the faceplate assembly. Secure the faceplate to the housing using the 2 retained screws and 4 additional screws provided.

Troubleshooting
Check Battery Level / Charge Battery
How to Check the Battery Level of Your Notify360 Panic Buttons
As a best practice, wearable panic buttons should be charged monthly, and wall-mounted buttons should be checked each semester to ensure they remain connected and fully operational. Follow the steps below to view the battery level on your device.
- All 3 Lights On: Battery level is 75% - 100%.
- 2 Bottom Lights On: Battery level is 50% - 74%.
- 1 Bottom Light On: Battery level is 15% - 49%.
- 1 Bottom Light Flashing: Battery level is Less than 15%. Charge immediately.
- No Lights On or Flashing: Battery level is 0%. Charge immediately.
* Wall Mounted Units: Remove the unit from the wall to view the LED lights on the white unit inside the button.
Battery levels can be checked in the 911Cellular Portal, Manage Devices - each button will have a battery status. Once batteries have less than 15% battery life, they run the risk of not connecting to the network.
Check battery levels while the device is charging:
- All 3 Lights Cycling On and Off: Battery level is less than 50% and actively charging.
- Top 2 Lights Cycling, Bottom Light Solid: Battery level is 50% - 74% and actively charging.
- Top Light Cycling, Bottom 2 Lights Solid: Battery level is 75% - 99% and actively charging.
- All 3 Lights Solid: Battery is 100% fully charged.
Reset Device
Reset Notify360 Panic Button
During troubleshooting, you may need to reset your panic device to be reconfigured. Follow the steps below to rest your device.
Note: You’ll need the small reset pin/paperclip to reset the device.
For wall mounted units, remove them from the wall to access the white unit inside the button.

- Press and Hold the Battery Button: Locate the Battery Button on the BadgeR+ device and press it firmly.
- Press the Reset Button: While continuing to hold the Battery Button, use a paperclip or similar small tool to press the Reset Button through the pinhole on the device’s casing.
- Release the Reset Button: After pressing the Reset Button, release it, but continue holding the Battery Button for an additional 5 seconds.
-
Verify the Reset: Once the reset is completed, the device will:
- Vibrate once.
- Display the current charge level on the Battery Indicator Lights
- Wearable Panic Buttons only: Cycle the Status Indicator Light through RGB colors (red, green, blue, then white) within 5 seconds.
The device is now reset and must be reconfigured before use.
Disabling
Disable Notify360 Panic Button
Follow the steps below to disable a button and prevent it from sending emergency alerts.
- Access Manage Devices > Wireless Panic Buttons: https://portal.publicsafetycloud.net/manage-devices/wireless-buttons
- Review Active Status: In the list of Wireless Panic Buttons, find the button that needs to be disabled and toggle the Active Switch OFF.
Only active panic buttons are able to trigger emergency alarms.
