Admin Setup: SEL/Status Check- PBIS Rewards
Learn how to configure SEL and check system status settings quickly and efficiently.
- Emergency Management
- Connect360
- PBIS Rewards
- Hall Pass
- Preparation & Response Training
- Behavioral Case Manager
- Visitor Management
-
Compass
Training Workshops Getting Started On-Demand Data & User Management Compass Curriculum for Students, Staff, & Families Compass Behavior Intervention Compass Mental Health + Prevention Compass for Florida - Character Ed, Resiliency, & Prevention Compass for Texas - Character Ed Analytics & Reporting Release Notes & Updates Additional Resources
- School Check In
- ALICE Training Institute
- Detect
- Anonymous Tip Reporting
- Resources
- Back-to-School
SEL/Status Check: Admin Setup Note: Video may display a previous version of the software. See article below for more recent images.
Important: If you would prefer to have the feature named Status check (instead of SEL check), you can change that in the School Information section of “Settings.” Select “Settings” and “School Information” will be the information displayed. Select “Status Check” from the “Check Name” drop-down and then save the change.
SEL/Status Check Settings
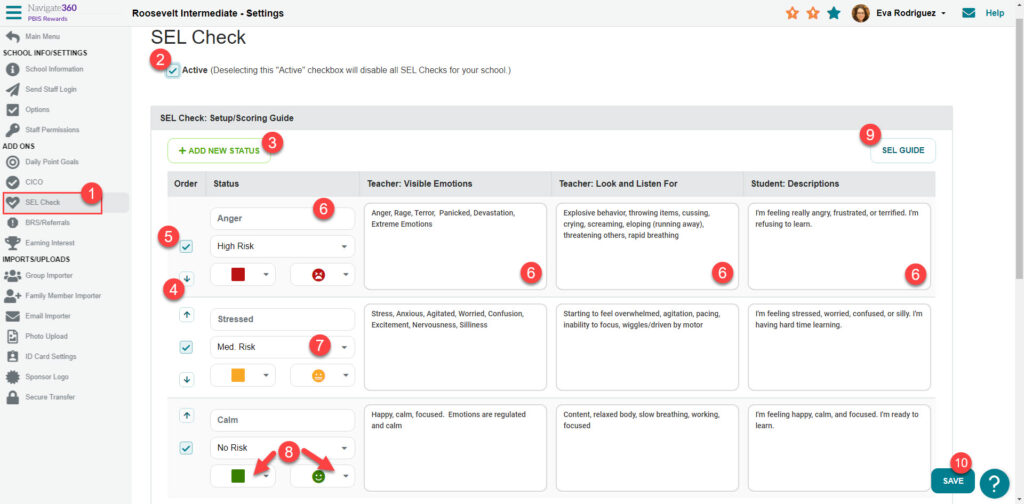
Staff members with Admin permissions can customize the different SEL/Status Check titles, colors, and emojis from the Settings page under the “SEL/Status Check” tab.
- Navigate to the “SEL/Status Check” button from the settings page
- The “Active” checkbox allows this feature to be used.
- The “Add New Status” button allows admin to create additional SEL/Status check options.
- Use the order arrows to change the display order of the SEL/Status Checks.
- Use the “Active” column to turn on or off specific SEL/Status checks.
- Use the text fields to edit existing SEL/Status Checks.
- The risk dropdowns must be selected to determine the risk level of each status.
- Use the color and emoji dropdowns to choose the look of each status.
- The SEL/Status Guide can be printed and shared with other staff members.
- Make sure to select the “Save” button to confirm any changes.
Student Self SEL/Status Check
Admins have the ability to turn on the student self SEL/Status Check so that student can submit their own status from the student portal or student app. Notifications can also be sent to all staff or selected staff when high risk checks are submitted.
- Activate The student self SEL/Status check by selecting the checkbox.
- Decide how many SEL/Status checks a student can submit per day. (This number does not apply to SEL/Status Checks submitted by staff members.)
- Determine the how often students can submit an SEL/Status Check. (This time frame does not apply to SEL/Status Checks submitted by staff members.)
- Set the hours when Self Check will be available. Select “Always Open” or select custom hours.
- Customize and view the text that will appear on the button for student portal and student app.

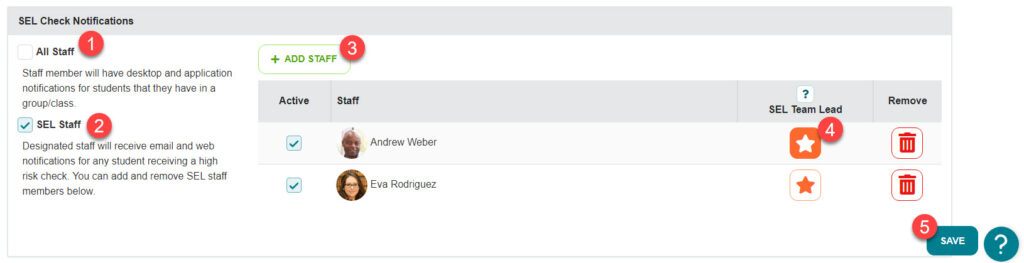
Notifications
- If “All Staff” is selected a new tab will appear on the left side menu that will display students that are in high risk status based on the students that the staff member has in a group/class.
- If “SEL/Status Check Staff” is selected then the staff members that are added with the “Add Staff” button will see all students that are in high risk status and will receive an email notification when a student has been put in high risk. App notifications are also sent if either checkbox is selected.
- Add SEL/Status Check Staff members that will receive notifications when a student has been put in high risk and have access to SEL/Status Check reports from the SEL/Status Check tab of the main menu.
- Designate one SEL/Status Check Staff member as the SEL/Status Check Team Lead, who then have access to this SEL/Status Check settings page.
- Select the “Save” button to finalize any changes.
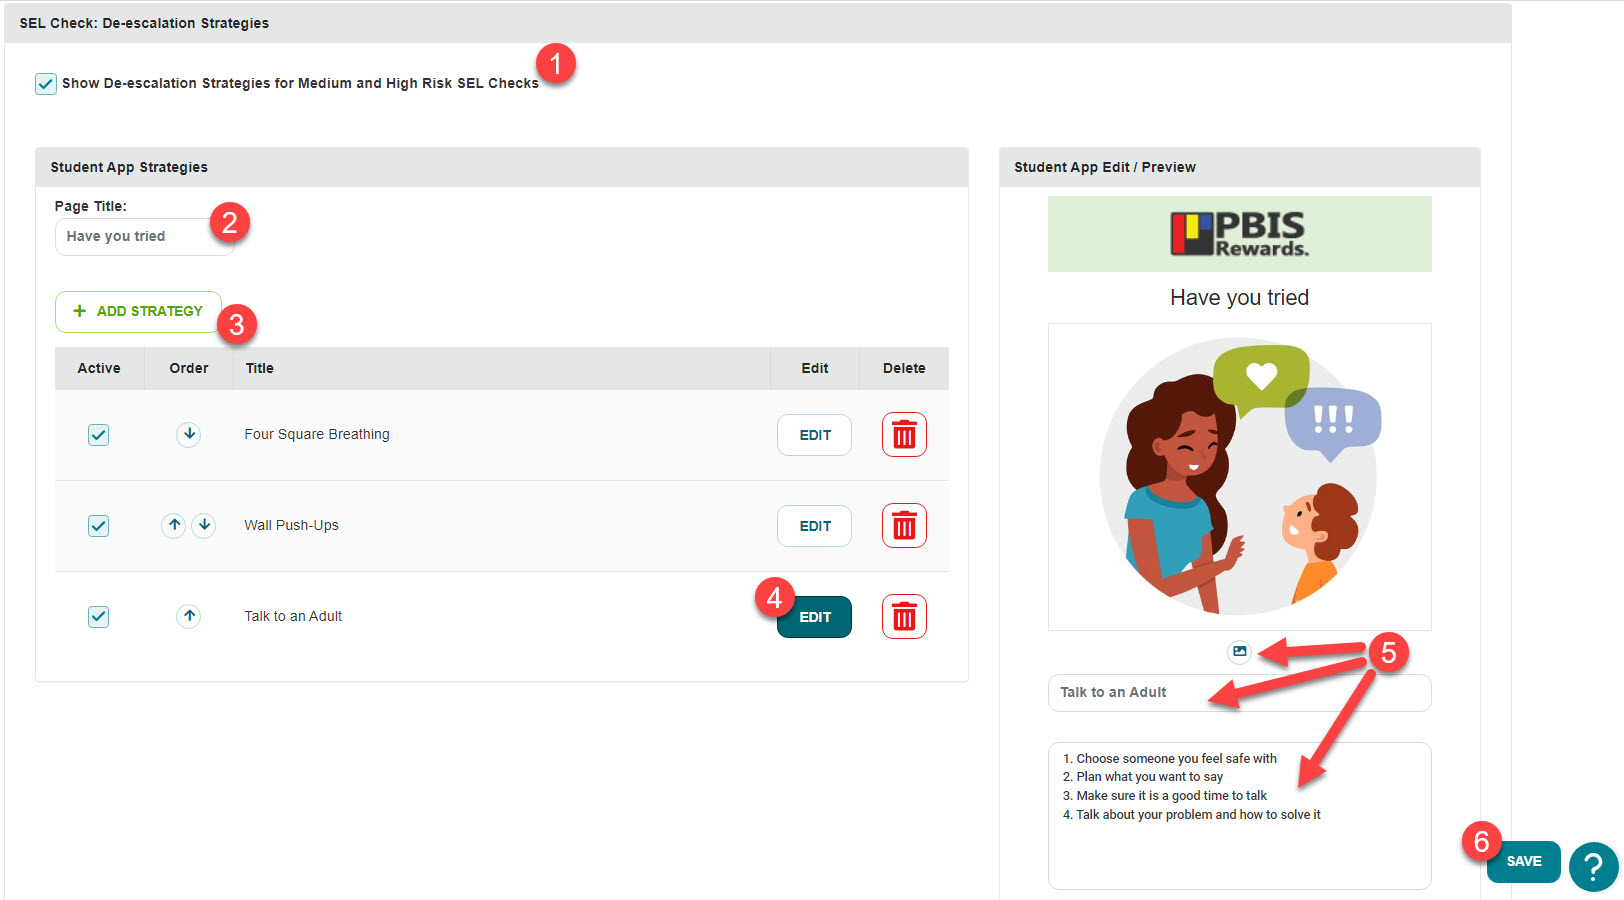
De-escalation Strategies
- Select the checkbox to display the de-escalation strategies to students who self check in a medium or high risk status.
- Customize the text that will appear above the de-escalation strategies on the student portal/app.
- Add additional strategies with the “Add Strategy” button. (Maximum of 5 strategies)
- Use the “Edit” button to customize and view the strategy.
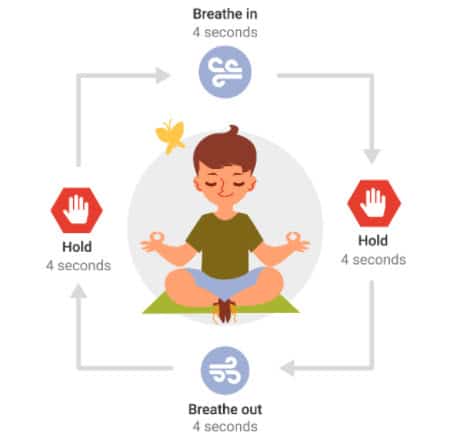
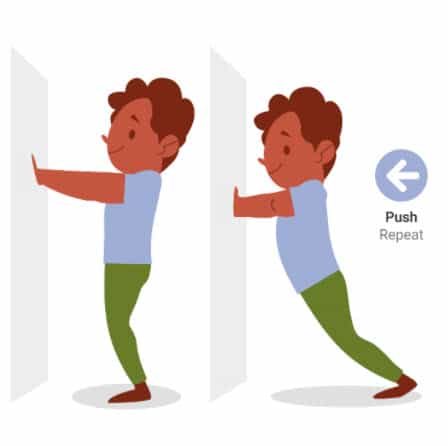
- Upload a picture, edit the header, or change the directions text.
- Select the “Save” button to finalize any changes.
Resources
We have put together some resources to help you customize your SEL/Status Check feature.
Scoring Guide Templates
Need some help with age-appropriate SEL/Status Check designations? We have put together some SEL/Status Check templates that can be used at various school levels. As an admin, you can customize your SEL/Status Check settings from the Settings menu under the “SEL/Status Check” tab.
Elementary example – PDF
Middle School Example – PDF
High School Example – PDF
De-escalation Posters
SEL/Status Check Poster – Stressed – PDF
SEL/Status Check Poster – Anger – PDF
Blank SEL/Status Check Template – Word Doc
De-escalation Images