How to add a new Student- PBIS Rewards
Learn how to easily add a new student to your roster.
- Emergency Management
- Connect360
- PBIS Rewards
- Hall Pass
- Preparation & Response Training
- Behavioral Case Manager
- Visitor Management
-
Compass
Training Workshops Getting Started On-Demand Data & User Management Compass Curriculum for Students, Staff, & Families Compass Behavior Intervention Compass Mental Health + Prevention Compass for Florida - Character Ed, Resiliency, & Prevention Compass for Texas - Character Ed Analytics & Reporting Release Notes & Updates Additional Resources
- School Check In
- ALICE Training Institute
- Detect
- Anonymous Tip Reporting
- Resources
- Back-to-School
Users with PBIS Rewards Admin permission can add new students in the Web Portal. Notes: If you are syncing with ClassLink or Clever, students will be added through the nightly sync. If there are a significant number of additional students above your original agreement, the per-student usage fee may apply to the additional students. If you have an exclamation mark on “Students” on the left-side menu, please update your students for the school year.
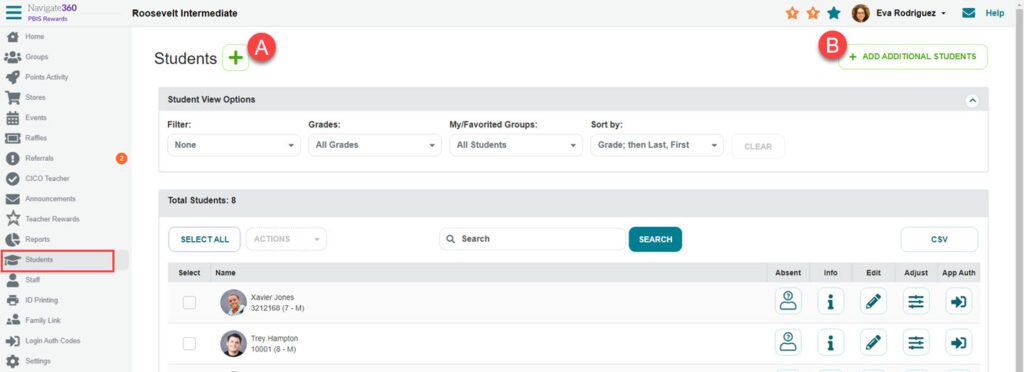
From the left-side “Main Menu,” select “Students”
A. Create new student accounts individually
B. Upload a file to add multiple students
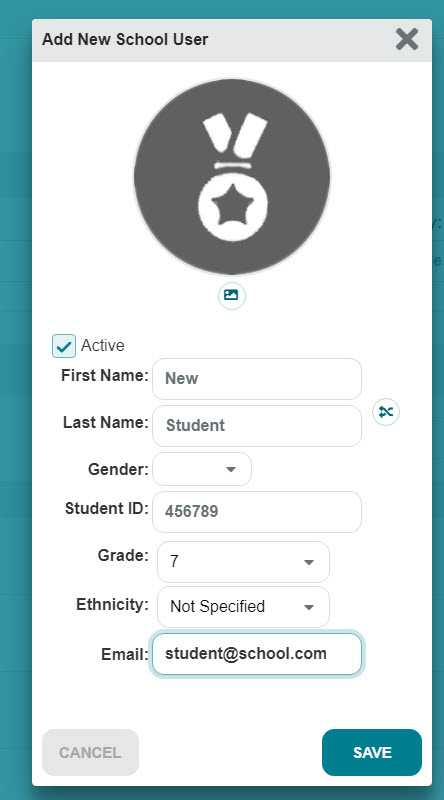
A. Add New Student (School User) Individually
Use the + sign in the green circle near the top to add a student. Fill in the preferred student information for your school.
Complete the required fields “First Name,” “Last Name,” “Student ID,” and “Grade.” Also fill in the optional fields “Gender,” “Ethnicity,” and “Email” if desired. Click the green “Save” button to create the new student account.
Now that you have added the student to PBIS Rewards, that student will be available to be added to manually created groups.
B. Create and Upload a File to Add Multiple Students
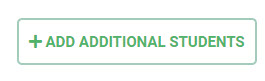
If you have the “Add Additional Students Button,” you will be able to upload multiple students right on the student page.
- Download the PBIS Rewards Student Import Template here to create your file using the example below.
- Use the “Add Additional Students” button to upload the file.
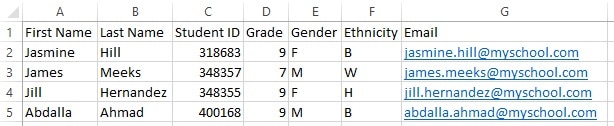
Details of what each column should contain:
- A – “First Name” is a required field in PBIS Rewards so this column must contain data.
- B – “Last Name” is a required field in PBIS Rewards so this column must contain data.
- C – “Student ID” is a required field in PBIS Rewards so this column must contain data.
- D – “Grade” is a required field in PBIS Rewards so this column must contain data.
- PK Enter the letters PK for Pre-school students
- TK Enter the letters TK for Transitional Kindergarten students
- 0 Enter the number zero for Kindergarten or Pre-Primary Year Australia) students
- 1, 2, 3, 4, 5, 6, 7, 8, 9,10,11,12 Enter a number 1-12 for students in grades 1st through 12th. Only enter numbers, no letters
- 13 Enter the number 13 for PostGrad students
- NA Enter the letter NA for students not in a grade level
- E – “Gender” is not a required field in PBIS Rewards so the Gender column may have blank cells. Cells with data must contain one of the following capital letters: M, F, X or N.
- F – “Ethnicity” is not a required field in PBIS Rewards so cells in the Ethnicity column may be blank. Cells with data must contain one of the following capital letters: A, B, H, N, W or O.
- A Enter the capital letter A for Asian / Pacific Islander
- B Enter the capital letter B for Black or African American
- H Enter the capital letter H for Hispanic or Latino
- N Enter the capital letter N for Native American or American Indian
- W Enter the capital letter W for White or Caucasian
- O Enter the capital letter O for other or multiple
- G – “Email” is not a required field in PBIS Rewards so cells in the Email column may be blank. Note: If your school plans to allow students to login with Google SSO, you will need to import student email addresses.
Creating Multiple Students without the Additional Students Button
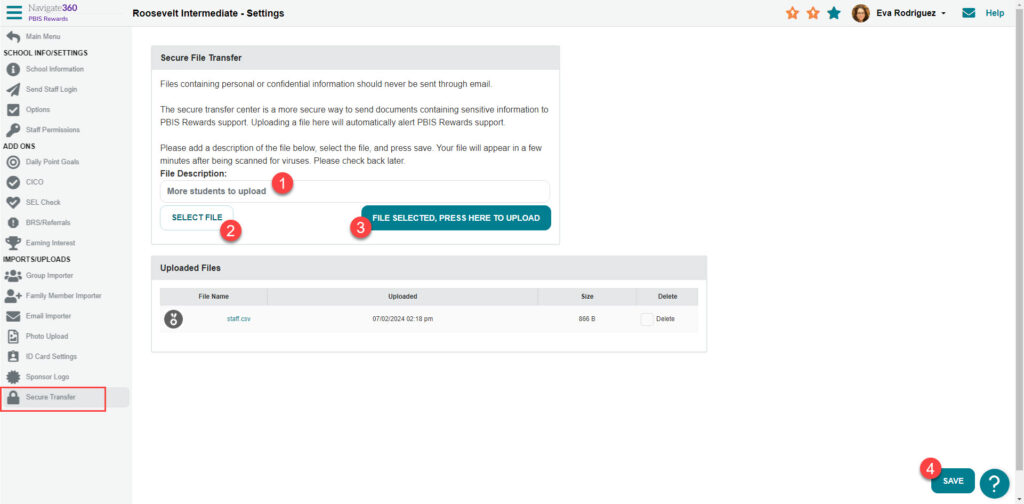
If you do not have the “Add Additional Students” button, you will create a CSV file using the template and guide above and then pass it to us using “Secure Transfer.” This will create a support case so that a member of the support team can upload the file.
From the left-side “Main Menu,” select “Settings.” Choose the “Secure Transfer” tab on the left.
- Provide a short name for the file in the “File Description” field
- Use “Select File” to browse for the file and then select it
- Press the “File Selected, Press Here To Upload” button
- Click “Save” in the lower right-hand corner
Files containing personal or confidential information should never be sent through email.