Behavioral Case Manager
Resources for Back-to-School Success
- Emergency Management
- Campus360
- Connect360
- PBIS Rewards
- Hall Pass
- Preparation & Response Training
- Behavioral Case Manager
- Visitor Management
-
Compass Curriculum
Training Workshops Getting Started On-Demand Release Notes & Updates Data & User Management Compass Curriculum for Students, Staff, & Families Compass Behavior Intervention Compass Mental Health + Prevention Compass for Florida - Character Ed, Resiliency, & Prevention Compass for Texas - Character Ed Analytics & Reporting Additional Resources
- School Check In
- ALICE Training Institute
- Digital Threat Detection
- Anonymous Tip Reporting
- Resources
- Back-to-School
Back-to-School Refresher Training
Review our robust library of on-demand training content to ensure both new and returning administrators are equipped for the upcoming school year.
Our comprehensive resources are designed to help your team confidently navigate the tools and strategies essential for a safe and successful start. Whether you're returning or just getting started, these trainings provide the knowledge and support needed to effectively implement your Navigate360 solutions from day one.
To register for a webinar, click on the subject heading to select a topic of interest. Review at your own pace.
Behavioral Threat & Suicide Case Manager: Admin User Training Plan
Behavioral Case Manager: Admin Training Plan
As the Behavioral Case Manager Administrator, your role is to setup and customize your Behavioral Case Manager solution to enable staff access and customize different case workflows.
Complete the five-part training to learn how to setup and manage your Behavioral Case Manager.
Estimated 45-minutes to complete
Part 1: Launching Behavioral Case Manager
Scope of Training: Learn about key features and functions of Behavioral Case Manager and the implementation process
- Launch Process Overview
- Best Practices for Launch
- Setting Expectations with the Team
- Key Features in BCM
Audience: Case Manager Administrators
Duration: 8-minutes, on-demand
Part 2: Team and User Management
Team Management Scope of Training: Learn how to create and manage teams to organize and maintain different behavioral case workflows in Behavioral Case Manager.
- Creating Teams
- Viewing and Editing Teams
- Adding Team Members
- Logging Team Meetings
- Viewing Team Statistics
Audience: Case Manager Administrators (Requires “Manage Teams” Permission)
User Management Scope of Training: Learn how users gain access to the Behavioral Case Manager.
- Understanding how users are added to your Behavioral Case Manager through your SIS integration via Clever or ClassLink
- Introduction to User Management
- Enabling and Disabling Users
- Inviting Users to Behavioral Case Manager with Welcome Emails
- Understanding Advanced Permission options
- Configuring Notifications
Audience: Case Manager Administrators (Requires “Manage Users” Permission)
Duration: 15-minutes, on-demand
Click here to view: Team and User Management Overview
Additional Resources
Enabling Users from SIS Connection
Adding Users Associated with District SIS Connection
Manage Individual Users
- Log into Case Manager.
- Click the Admin tab then select the Manage Users node.
- Click the Users button and select Disabled Users.
- Next to the desired user, click the three-dot Vertical Ellipsis.
- Select Enable.
Bulk User Change (Optional)
- Log into Case Manager.
- Click the Admin tab then select the Manage Users node.
- Click the Users button and select Disabled Users.
- Check each box next to the desired user(s).
- Click the Enable All button.
All users synced to the Behavioral Case Manager through the SIS connection are automatically set to disabled until enabled by a user with Manage Users permissions.
Manually Adding Users Outside of SIS Connection
Adding Users Not Associated with District SIS
User Permissions:
User must have Manage Users permissions to complete the following steps.
Click here for more information on how to manage a user’s permissions.
- Log into Case Manager.
- Select the Admin tab.
- Select the Manage Users node.
- Click the New Users button.
- Complete the fields in the Create New User pop up.
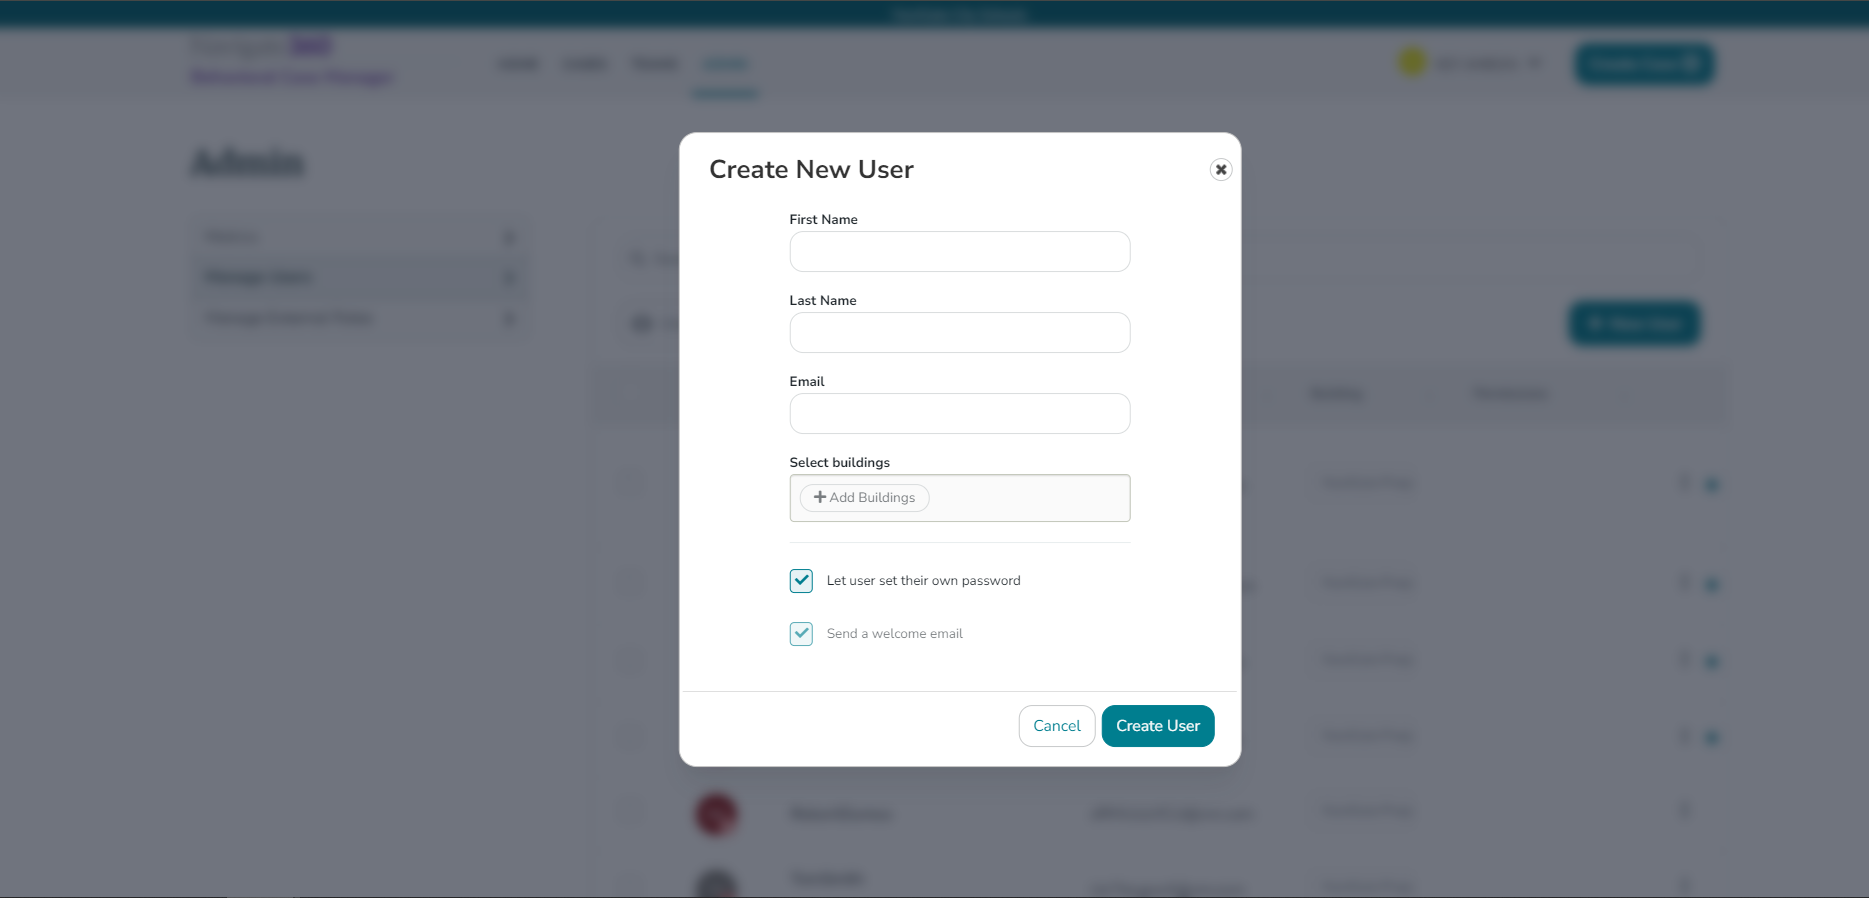
- Click Create User.
Manage Teams Permissions:
User must have Manage Teams permissions to add new user to a team.
User Permissions
Manage User Permissions
User Permissions:
User must have Manage Users permissions to complete the following steps.
Click here for more information on how to manage a user’s permissions.
Update User Permissions
- Log into Case Manager.
- Navigate to the Admin tab.
- Locate the Manage Users node.


- To select a User, click the three-dot Vertical Ellipsis and select Edit for the desired user.
- Locate the Permissions node.
- Check to Enable permissions.
- Uncheck to Disable permissions.
- Click Save Changes.
Permission Options
Manage Users: User can create new users and edit existing user's settings.
Manage Teams: User can view and modify any team, even if they are not the team leader.
Manage District Guidance : User can create and edit district guidance.
Manage System Customization: User can manage New Process Models, Customize Tags, Resources, and customize BCM Models Sections
Manage Cases: User can view and modify any case, regardless of their team and gain access to Case Manager Analytics.
Standard Access: User can acess cases assigned to their team, or those cases in which the user has been added as a guest.
Coordinator: Allows a given user nuanced access to various models. This can be used to give key stakeholders access to certain case types across teams, while restricting their access to other workflows.
A user given the Coordinator permission will have access to the Coordinator tab on their cases dashboard, allowing them nuanced access to specified model types.

Selecting Coordinator permission will allow for per-model access to be specified for a given Coordinator user. This access will apply to all cases in the district, ignoring team-based restrictions.
For a given model, as a Coordinator:
- Read/Write allows for full edit-level access to cases of this type and allows a given user to create new cases of this type.
- Read Only allows for full visibility of all cases of this model, but a given user cannot edit these cases or create new cases of this type.
- No Access prohibits access to cases of a given model. Note: instead of access to a case, a Coordinator with No Access will instead see contact information for the team owning the case to request access.
Individual User Settings
User Settings
- Log into Case Manager.
- Hover over Username in the top right of screen.
- Select Account Settings
-
Basic Info
- First Name
- Last Name
- Time Zone
- Job Title
- Mobile Phone
- Work Phone
- Home Phone
- Team(s)
Users can only add/remove teams they are assigned to, while users with Manage Teams permissions can add/remove any team as necessary.
- Buildings(s)
- Click Save Changes.
-
Change Password
- Current Password
- New Password
- Confirm New Password
- Click Save Changes.
- Two Factor Security
- Mobile Phone
- Work Phone
- Home Phone
- Other Phone
- Click Enable.
-
Basic Info
-
Notification Preferences
To follow a step by step guide on how to edit notification settings click here.
Part 3: Case Management and Movement
Scope of Training: Learn how to create and manage cases in Behavioral Case Manager. This training covers a generalized overview of a case structure.
- Creating Cases
- Viewing Cases
- Opening and Closing Cases
- Viewing and Editing Case Details
- Task Management within a Case
- Viewing Case History
- Case Transfer and Automation
Audience: Case Manager Administrators (Requires “Manage Cases” Permission)
Duration: 10-minutes
Click here to view: Case Management and Movement
Additional Resources:
How to Open and Close Cases
How to Close & Reopen Cases
Close Cases
- Log into Case Manager.
- Select the Cases tab.
- Alternatively, cases can be found on homepage under Open Cases Assigned to You.
- Select the View button to open a specific case.
- Alternatively, cases can be found on homepage under Open Cases Assigned to You.
- Next to the case number, select the three-dot Vertical Ellipsis.
- Select Close.
- User will see a Close Case popup.
- Select the drop down for Disposition and select reason for case closure.

a. Closed - No Further Action (NFA)
b. Closed - Referred or Transferred
c. Closed - Scheduled for team review in 3 months
d. Closed - Scheduled for team review in 6 months
e. Closed - Scheduled for team review in 12 months
7. Add notes for case closure.
8. Select Confirm.
9. If there are any issues identified that prevent the case from being closed, an error message will appear. The most common errors are having assigned tasks that have not been completed or not completing all fields/sections marked as required.
Locate Closed Cases
- Log into Case Manager.
- Select Cases Tab.
- Alternatively you can navigate to Open Cases Assigned to You on homepage and select Search Cases.
- Select Filters.
- Check the box of Show Closed.

5. Click Apply.
Reopen Cases
Manage Cases Permissions
User must have Manage Cases permissions to complete the following steps.
Click here for more information on how to manage a user’s permissions.
- Log into Case Manager.
- Select Cases tab.
- My Cases
- All Cases
- Select Filters.
- Check Closed Cases box.
- Select Apply.
- Select three-dot Vertical Ellipsis.
- Click Reopen.
- State the reason the case is being reopened.

8. Click Confirm.
How to Create a New Case
Create a Case
Why Create a Case?
Creating a case using Behavioral Case Manager offers a structured approach to understanding and addressing complex human behaviors. By defining scenarios and detailing accompanying behaviors, this method provides a clear framework for analysis, intervention, and learning. Cases in Behavioral Case Manager incorporate long-term management and tracking capabilities by centralizing data, enabling ongoing monitoring, and facilitating the aggregation of key information.
The benefits of creating a case in Behavioral Case Manager are extensive. It enhances decision-making abilities by providing comprehensive data insights over time. It also improves teamwork through collaborative case management and fosters a deeper understanding of behavioral theories in practical settings.
- Log into Case Manager.
- Click Create Case button at the top of the screen.

- Alternatively, for CSTAG cases, click New Case button on the homepage.
CSTAG Model:
When selecting CSTAG as the Process Model, the user will be prompted with an additional CSTAG Model Overview pop-up after clicking proceed. Click Minimize to continue case creation.
- Alternatively, for CSTAG cases, click New Case button on the homepage.
- Choose Process Model pops up, select the model type.
- Click Proceed.
- Assign Team in the Team (Required) dropdown.
- Assign Case Manager in the Case Manager (Required) dropdown.

- Fill in the fields with the case details.
- Scroll to the bottom and select Create Case.
How to Download a Case Report
How to Download a Case Report
Download Case Report
- Log into Case Manager.
- Select the Cases tab.
- Alternatively, cases can be found on the homepage under Open Cases Assigned to You.
- Select the View button to open a specific case.
- Alternatively, cases can be found on the homepage under Open Cases Assigned to You.
- Next to the desired case, click the Vertical Ellipsis and select View.
- Next to the case number, select the three-dot Vertical Ellipsis.

- In the drop-down menu, select Download/Print.
6. Select the type of report:
- Overview: This is a brief report including basic case details. This report does NOT include vital case details or attached files.
-
Detailed: This is a thorough report giving all information regarding the case.
- User can select to include attached files in Detailed Reports.
- Select Print.
Overview Reports: Only available for CSTAG and NTAC cases.
Active Case Automation
Case Transfer Automation
What is case transfer automation?
Case transfer automation ensures that a student's case stays with them throughout their time in the district. This functionality promotes greater continuity in handling student cases as they change schools within the district.
Utilizing Case Management’s SIS integration, case transfers between school-based teams can be automated to track students as they advance vertically between grades or move laterally between locations. Configurability enables stakeholders to tailor the flow of different case types to specific teams and determine whether to include historical closed cases.
How do I enable case transfer automation?
Please reach out to your Navigate360 Account Manager to enable the access to the feature. Additionally, user must have Manage Teams permissions to complete the following steps.
- Log into Case Manager.
- Click the Admin tab.
- Select the Manage Buildings node.
- Click the three-dot Vertical Ellipsis next to the desired building.
- Select Edit Mapping.
- Click +Process models button.
- Select the process model(s) to be include in mapping.
- Select All to include all process models the district uses.
- Select the Status of cases to transfer.
- Case Opened
- Case Closed
- Click the dropdown under Select transfer team and select a team.
- This team is the corresponding team for the building .
- If a student is transferred to the building, this team will have visibility when the case transfers.
- This team is the corresponding team for the building .
- Optional - Select Apply this Retroactively.
- This parameter will apply to past cases before new mapping selections were made.
- Click Save.
Additional Mapping:
To add more teams to a specific building, click the +Add button and repeat the steps above.
Part 4: Case Model Walkthrough
Scope of Training: Walk through the case creation process for your district's chosen process models.
- CSTAG case creation
- NTAC case creation
- Suicide Risk Management case creation
Audience: All Users - users must be on a team to create and/or view cases.
Behavioral Case Manager: Team Training
Enable your Behavioral Threat Assessment teams with the resources needed to perform your district's preferred threat assessment process in the Behavioral Case Manager. Share this page with your teams and direct them to select the specific Case Model to register for training.
BCM Platform Overview
The Behavioral Case Manager is a centralized platform designed to help school teams document, track, and manage behavioral intervention cases with efficiency and accuracy.
Scope of training: Provides a clear, in-depth understanding of the platform, highlighting key functionalities and best practices for managing cases effectively and efficiently.
Audience: All Users - users must be on a team to create and/or view cases.
Duration: 11 minutes
Click here to download the End User checklist.
Interested in learning more about Features and Functions in Behavioral Case Manager?
Click here to access the Feature/Function Overview.
CSTAG Case
Comprehensive School Threat Assessment Guidelines
Navigate360 partners with Dr. Cornell, a forensic clinical psychologist and professor at the University of Virginia. As the principal author of CSTAG, he collaborated with our development team to integrate the methodology into our Behavioral Case Manager, ensuring fidelity and providing ongoing guidance.
Scope of training: Complete walkthrough of case creation, management, and closure for a sample CSTAG case.
Audience: All Users - users must be on a team to create and/or view cases.
Duration: 7 minutes
Interested in learning more about the CSTAG methodology? Talk to your Navigate360 team today to discuss CSTAG Training opportunities! Created in partnership with Dr. Dewey Cornell, CSTAG Level 1 training equips staff to identify potential threats, prevent violence, and promote a culture of safety.
NTAC Case
National Threat Assessment Center
Navigate360's Behavioral Case Manager digitizes the National Threat Assessment Center (NTAC) case methodology, empowering staff to identify potential threats, prevent violence, and foster a culture of safety.
Scope of training: Complete walkthrough of case creation, management, and closure for a sample NTAC case.
Audience: All Users - users must be on a team to create and/or view cases.
Duration: 8 minutes
Interested in learning more about the NTAC methodology? Talk to your Navigate360 team today to discuss NTAC Training opportunities! Created by the U.S. Secret service and National Threat Assessment Center, and brought to Navigate360 in partnership with Marissa Randazzo, Ph.D. and Margaret H. Coggins, Ph.D., this training equips staff to identify potential threats, prevent violence, and promote a culture of safety.
Suicide Risk Screening Case
Using the Suicide Risk Screener, teams can support students through processes like the SAFE-T Screening framework, the development of written safety plans, and ongoing monitoring and support. By running suicide risk assessments and threat assessment cases in parallel, the Behavioral Case Manager ensures teams can complete comprehensive evaluations, allowing key associations to be attached for a holistic approach to student safety.
Scope of training: Complete walkthrough of case creation, management, and closure for a sample Suicide Risk Screening case.
Audience: All Users - users must be on a team to create and/or view cases.
Duration: 8 minutes
Interested in learning more about the Suicide Awareness and Prevention training opportunities? Talk to your Navigate360 team today! Reduce the stigma of mental illness on your campus and improve the effectiveness of student well-being programs by providing school staff with this expert-authored curriculum. Built in partnership with Dr. Scott Poland, an international expert on youth suicide prevention, this training is flexible and comprehensive.
Additional Resources:
Behavioral Case Manager - Admin User Training
Behavioral Case Manager Admin Training Plan
How to Create a Case
Create a Case
Why Create a Case?
Creating a case using Behavioral Case Manager offers a structured approach to understanding and addressing complex human behaviors. By defining scenarios and detailing accompanying behaviors, this method provides a clear framework for analysis, intervention, and learning. Cases in Behavioral Case Manager incorporate long-term management and tracking capabilities by centralizing data, enabling ongoing monitoring, and facilitating the aggregation of key information.
The benefits of creating a case in Behavioral Case Manager are extensive. It enhances decision-making abilities by providing comprehensive data insights over time. It also improves teamwork through collaborative case management and fosters a deeper understanding of behavioral theories in practical settings.
- Log into Case Manager.
- Click Create Case button at the top of the screen.
- Alternatively, for CSTAG cases, click New Case button on the homepage.
CSTAG Model:
When selecting CSTAG as the Process Model, the user will be prompted with an additional CSTAG Model Overview pop-up after clicking proceed. Click Minimize to continue case creation.
- Alternatively, for CSTAG cases, click New Case button on the homepage.
- Choose Process Model pops up, select the model type.
- Click Proceed.
- Assign Team in the Team (Required) dropdown.
- Assign Case Manager in the Case Manager (Required) dropdown.
- Fill in the fields with the case details.
- Scroll to the bottom and select Create Case.
Managing Tasks
Managing Tasks
What Are Tasks?
In Behavioral Case Manager, tasks play a crucial role in managing and tracking different steps within a case. Users are assigned specific tasks to ensure that each step in the workflow is completed efficiently. These tasks are included in predefined processes, which are pre-configured and ready to use in standard workflows. Additionally, tasks can be added to custom Process Models, providing flexibility and allowing users to tailor workflows to meet specific needs or unique requirements. This combination of default and custom task management helps streamline and optimize case management processes.
Assign/Add Tasks
- Log into Case Manager.
- Select Cases tab.
- Alternatively, cases can be found on homepage under Open Cases Assigned to You.
- Select the View button to open a specific case.
- Alternatively, cases can be found on homepage under Open Cases Assigned to You.
- Find desired case and select the three-dot Vertical Ellipsis.
- Select View.
- Locate the section containing tasks.
- To Create a New Task:
- Click the Add Task button.
- For Existing Tasks:
- Click the task.
- Complete the the following fields:
- Description (Required) - Briefly describe any additional details required for the task.
-
Task (Required) - Add title of the task.
- For Suggested Tasks - user can change task name if desired.
- Assign User (Required) - Choose user to assign the task to.
- Due Date (Required) - Assign a due date for task completion.
- Recurrence - Choose to make a task recurring daily or weekly.
- Email Reminders - Choose to remind users prior to due date of the task.
Completing Tasks
- Log into Case Manager.
- Click dropdown by username and select My Tasks.
- Alternatively on homepage, view tasks under Tasks Assigned to You in Tasks table.
- Find desired task and click three-dot Horizontal Ellipses.
- For new Tasks:
- Click Accept.
- Alternatively on homepage, view tasks under Tasks Assigned to You in Tasks table.
- Find desired task and click three-dot Horizontal Ellipses.
- For new Tasks:
- Click Accept.
- For new Tasks:
- User has the following options once accepting a task:
- View Details - View the details of the tasks
- Go to Case - View the case
-
Edit - Edit the details of the task
- Persons Spoken To - Add student, staff, visitor that user spoke with
- Findings - Briefly Describe what was found, who it came from etc.
- Files - Drag-and-drop a file or brows to upload.
- Mark Complete - Mark the task complete
- Add to Calendar - Add to Calendar for reminder purposes.
- Delete - Delete the task.
General Task
General tasks can be found in the "Tasks" tab under the Attachment section of any model. Users can utilize these general tasks to track workflows and manage information across various cases.
Bulk General Tasks
The Bulk General Task feature can be used to send tasks to Team Leaders and Case Managers across multiple cases, helpful when communicating deadlines or in requesting updates on cases.
- Team Leaders and Case Managers will each receive tasks created using the Bulk General Task option.
- From the Case Dashboard, select one or more cases and then select Bulk Actions.
- General Tasks can be used to create task for the selected case(s).

The Bulk General Task option allows for creation of tasks across selected cases.
- Task title, due date, and description will populate the tasks and notifications assigned to Team Leaders and Case Managers for the selected case.
- Send Reminders can be used to send reminders to recipients ahead of the tasks’ due date.

Transfer a Case to a Different Team
How to Transfer an Existing Case to a Different Team
User Permissions
User must have Manage Cases permissions to complete the following steps.
Click here for more information on how to manage a user’s permissions.
- Log into Case Manager.
- Select Cases tab at the top of the screen.
- Select a case by clicking the three-dot Vertical Ellipsis to the right of the case and select View.
- Select Edit Initial Details.

- Click the down arrow of the Team dropdown.

- Select the team you want to transfer the case to.
- The team leader of receiving team will automatically be assigned as the Case Manager.
- Florida Districts Only - The chair of the receiving team will automatically be assigned as the Case Manager.
- The team leader of receiving team will automatically be assigned as the Case Manager.
- Scroll to the bottom of the page and click Save Changes.
Alternative Method
- Log into Case Manager.
- Select Cases tab at the top of the screen.
- Select the case of your choice by clicking the vertical ellipsis to right of the case and select Transfer to Team.
- In the pop-up, click the down arrow of the Select Team dropdown.
- Select a team and click Transfer.
The original team will no longer have access to the case as it is now transferred to the new team.
How to add a Case Guest
FAQ: How can I give someone outside of my team access to a specific case?
Adding Team Guest(s) to Case
User Permissions
User must have both Manage Cases and Manage Teams permissions to complete the following steps.
Click here for more information on how to manage a user’s permissions.
- Log into Case Manager.
- Select Cases tab.
- Select My Cases or All Cases.
- Next to desired case, click the three-dot Vertical Ellipsis and select View.
- Next to the case number, click the three-dot Vertical Ellipsis and select Edit User Access.
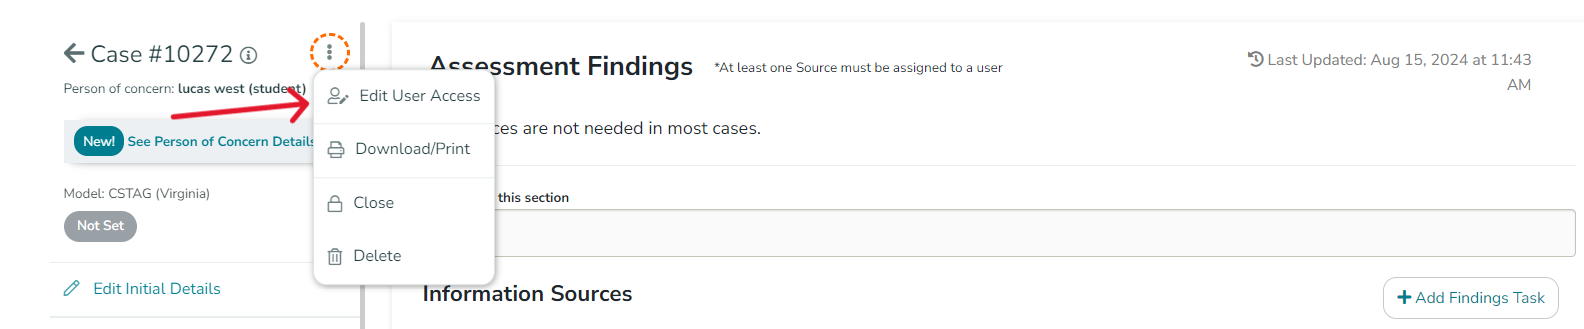
- Click Add Teams(s) and select team.
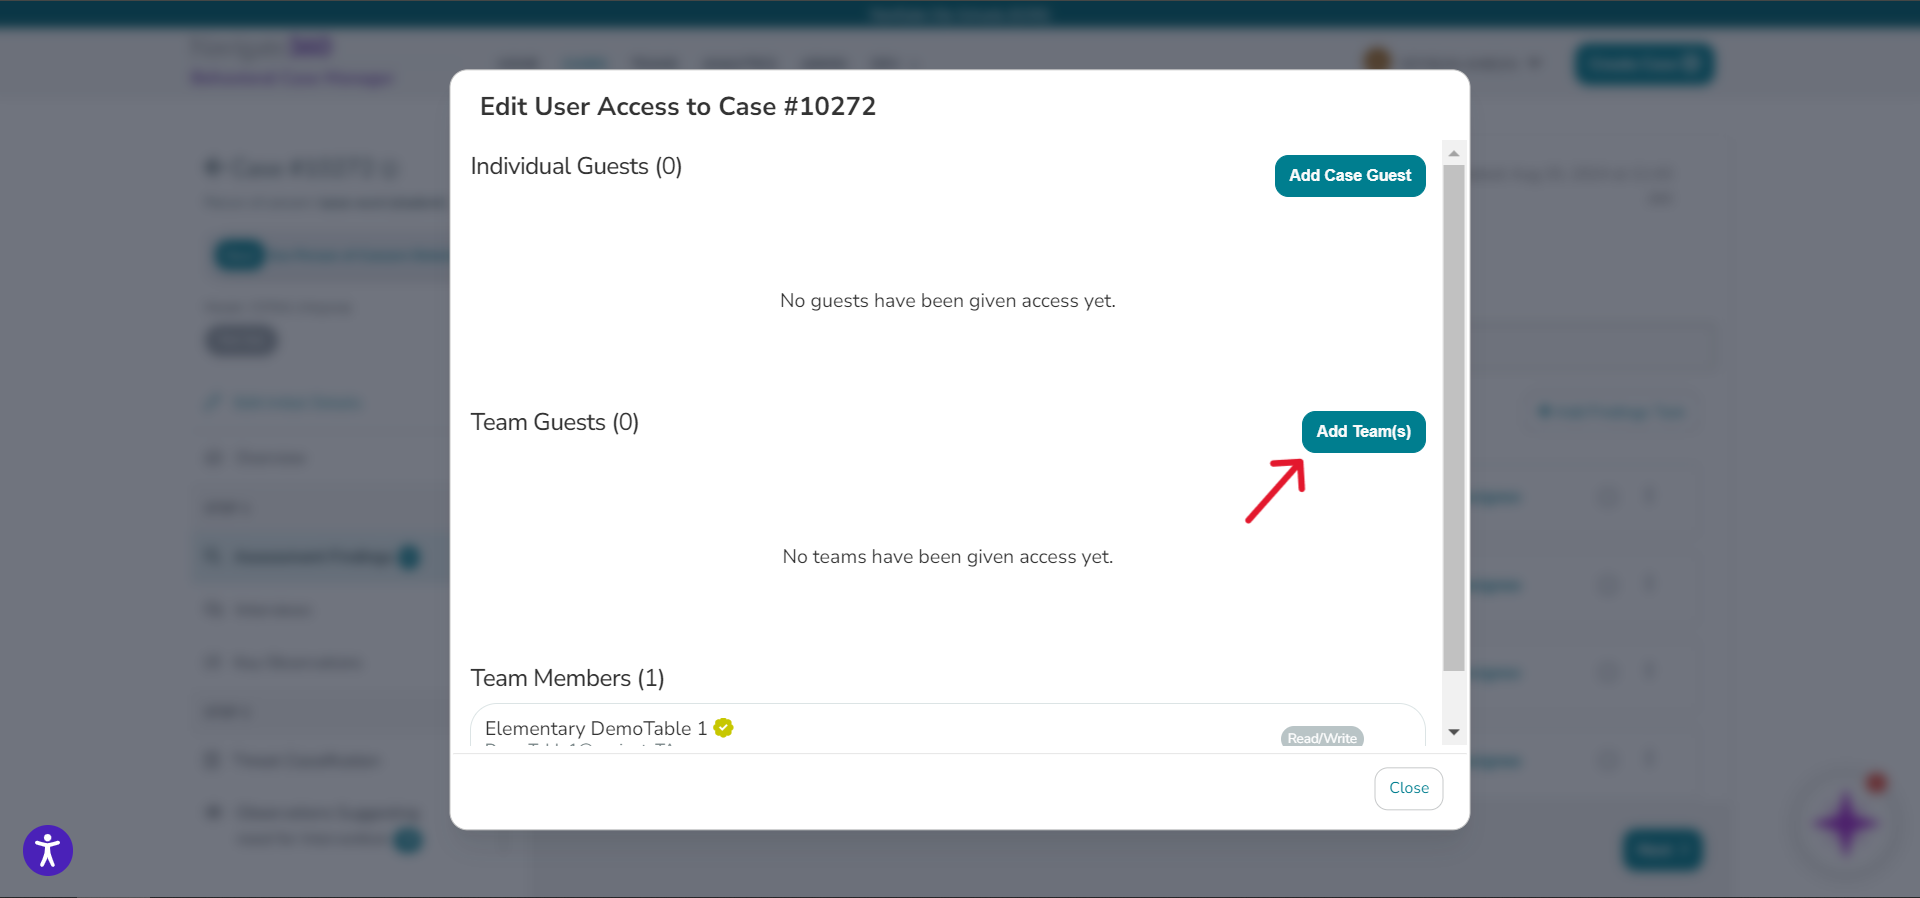
- Set team permissions to Read/Write or Read Only.
- Click Close.
Individual Guests
To add an individual guest, follow the steps above, but in step 6, click the 'Add Case Guests' button instead.
Downloading a Case Report
How to Download a Case Report
Download Case Report
- Log into Case Manager.
- Select the Cases tab.
- Alternatively, cases can be found on the homepage under Open Cases Assigned to You.
- Select the View button to open a specific case.
- Alternatively, cases can be found on the homepage under Open Cases Assigned to You.
- Next to the desired case, click the Vertical Ellipsis and select View.
- Next to the case number, select the three-dot Vertical Ellipsis.
- In the drop-down menu, select Download/Print.
6. Select the type of report:- Overview: This is a brief report including basic case details. This report does NOT include vital case details or attached files.
-
Detailed: This is a thorough report giving all information regarding the case.
- User can select to include attached files in Detailed Reports.
- Select Print.
Overview Reports: Only available for CSTAG and NTAC cases.
Part 5: Analytics and Reporting
Scope of Training: Learn how view and export Behavioral Case Manager analytics across different case models.
- Viewing Analytics
- Exporting Reports
- Creating Custom Charts
- Downloading Individual Case Reports
Audience: Case Manager Administrators (Requires “Manage Cases” Permission)
Duration: 4-minutes
Click here to view: Analytics and Reporting
Additional Resources:
Analytics Overview
Analytics Feature Overview
The Analytics feature allows users with the Manage Cases permission level to view and create graphs and reports for assessing case data at scale and comparing or contrasting concepts within case types. Users with the Manage Cases permission can access the Analytics feature via the Analytics tab in Behavioral Case Manager.
Within the Analytics feature, there are three options: Summary, Reports, and Dashboard:

Summary
- Summary graphs display data points common between workflows, such as tags, grade level, and source of reports
- Data shown here will be compiled across models in a given site, allowing for review of data district-wide

- Additional filter options allow for focus on a given date-range and/or teams/buildings
- One or more filters can be applied under the filter options in the upper right of the summary page
- Filters can be cleared from the filter button using the Reset option
Reports
- The reports tab allows for large-scale exports of case data and other site-wide concepts – it is now included under the Analytics tab

Dashboard
Dashboard allows for the creation of charts, including:
- Line charts (for displaying concepts over time)
- Column charts (for displaying concepts vertically, typically to contrast concepts)
- Bar charts (for displaying data horizontally, typically when large amounts of data are being compared, or data labels are lengthy)


- The creation process allows users to sequentially select the process they would like to chart, version of the process, chart type, and then specific details/filtration of the data
- Under Chart Customization, users can name their chart
Next, users specify the section and then question from a given workflow they would like to chart - The values field allows for selection of one or more answers for charting; selecting multiple values here will allow for comparison of counts of those answers
- Graphs can be produced for the following concepts/question style types:
- Interviews/templates – quantify the number of interviews or templates used in a given model/timeframe
- Select - quantify options users select from in dropdown questions
- Select box – quantify multiple choice selections
- Open select – quantify multiple choice selections that also include ‘other’ or open-ended options
- Radio select – quantify multiple choice selections for radio questions in which users must choose a single answer
- Note: these question styles are used in several pre-defined components, which can also be graphed:
- Race
- Ethnicity
- Section 504
- Yes/No Question
- State or grant-specific reporting components
- IEP status

- When a graph has been created, it will appear on the dashboard alongside other created graphs
- All users with Manage Cases permission can create and view created graphs on the dashboard
- Graphs on the dashboard can be deleted by clicking the ellipsis in the upper-right of each graph
Export District Overview Report
Exporting District Overview Report
This video will teach you how to export a District Overview report from the "Behavioral Threat Assessment and Suicide Case Management" tool into Excel.
Exporting Building Breakdown Report
Exporting Building Breakdown Report
This video will demonstrate how to export a "Building Breakdown" report from within the "Behavioral Threat and Suicide Case Management" tool.
Click here for assistance accessing webinar notifications
Click here for Threat Assessment Team Resources
Become a Subject-Matter Expert in the Behavioral Case Manager! Learn how to further customize your site to add and adopt additional behavioral processes.
Custom Process Models
What is a Custom Process Model?
What is a Custom Process Model?
Custom Process Models are tailor-made to fit user needs. The customization factor enables users to design a step by step guide to seize vital case details. There are various field components to help users create powerful and flexible pages to manage data effectively. Each component serves a specific purpose, allowing users to capture and organize information efficiently.
Layout Components
The layout components allow users to structure the model, while displaying clean and organized data. Here are the available layout components and their functions:
-
Columns: 2
- This option divides the page into two columns and allows users to place different elements side by side for a more polished presentation. While the default setting is 2 columns, users can adjust the number of columns during creation or editing.
-
Field Set:
- Field sets enable users to group related elements together on a page, making it easier to manage and comprehend related data.
-
Table: 3x3
- The table component enables users to create a table with three rows and three columns, perfect for presenting data in a tabular format. Although the default table size is 3x3, users can adjust the number of rows and columns when creating or editing the table.
- The table component enables users to create a table with three rows and three columns, perfect for presenting data in a tabular format. Although the default table size is 3x3, users can adjust the number of rows and columns when creating or editing the table.
Pre-defined Components
Pre-defined components are pre-built versions of basic components and cannot be edited. They serve specific purposes related to individual or case details. Here are the available pre-defined components and their functions:
-
Address
- Home Address
- City
- State
- Zip
-
Race (Drop-down with options):
- American Indian or Alaska Native
- Asian
- Black or African American
- Native Hawaiian or Other Pacific Islander
- White
- Multiracial
- Unknown
-
Ethnicity (Options):
- Hispanic or Latino or Spanish Origin
-
Not Hispanic or Latino or Spanish Origin
-
Individual Education Program (Yes/No)
- Indicates whether the individual has an education program tailored to their needs.
-
Section 504 (Yes/No)
- Indicates whether Section 504 applies to the individual.
-
Related Cases
- Manually link cases to display related incidents.
-
Target
- An open field that pulls data from the SIS (Student Information System) or relevant sources.
-
Person Completing Form (Open Field):
- Captures the information about the individual completing the form and provides an audit trail of the input.
- Captures the information about the individual completing the form and provides an audit trail of the input.
Basic Components
Basic components offer essential form elements for capturing different types of data. Users can customize these elements as needed. Here are the basic components and their functions:
-
Content
- Add headers, paragraphs, or any other textual content. Users can also include links, images, tables, and videos. The content will appear on exported reports as "Content 1," "Content 2," and so on.
-
Text Field
- Captures a single line of text, suitable for short responses.
-
Text Area
- Provides an area for multiple lines of text, ideal for longer explanations or descriptions.
- Provides an area for multiple lines of text, ideal for longer explanations or descriptions.
- Number
- Allows users to input or select only numbers. The label can be customized, for example, to "ID".
-
Checkbox
- Displays a box next to text provided by the model creator, allowing users to check it to make a choice or selection.
- Displays a box next to text provided by the model creator, allowing users to check it to make a choice or selection.
-
Email
- Collects email addresses from individuals.
-
Phone Number:
- Collects phone numbers. The label can be customized, for example, to “Home/Mobile”.
- Collects phone numbers. The label can be customized, for example, to “Home/Mobile”.
-
Date/Time:
- Captures date and time information. It can be configured to record either date only or time only..
-
Select Boxes:
- Enables users to select multiple options based on the available content.
- Enables users to select multiple options based on the available content.
-
Open Select Boxes:
- Allows users to add their own content to the select boxes and then check the relevant options.
-
Select:
- Displays as a drop-down menu, enabling users to select a single option from the list..
-
Radio:
- Displays options with radio buttons, allowing users to select only one option.
-
Tags:
- Allows users to add custom tags to organize and categorize data effectively.
- Allows users to add custom tags to organize and categorize data effectively.
Field Requirements:
Users can designate fields as required or set them as the initial focus. This feature helps guide users' attention to specific questions or content, especially in sections with extensive information or multiple questions.
Video Training: Managing Process Models (click to expand)
Interested in learning more about Custom Models? Talk to your Navigate360 team today to discuss custom model creation options!
The Student Well-Being Library
Student Well-Being Library
What is the Student Well-Being Library?
The Student Well-Being Library is a cloud-based solution that centralizes student behavioral trends. Schools can utilize pre-built workflows and processes within the library to assess and intervene in behaviors exhibited by students. The Student Well-Being Library offers assessment and management tools to help identify the trends in students' behavior.
Student Well-Being Library Content
The Student Well-Being Library has a menu of pre-built processes that include assessment, intervention and management practices such as Student Support, Bullying Prevention, Non-Suicidal Self-Injury, Title IX, and Reintegration.
Customization:
The Student Well-Being Library is customizable and can be configured in numerous ways to fit a district's needs. It includes localized language to align guidance and support, data collection to identify trends and follow-up activities, and linked processes to provide timely, proactive support and intervention.
Student Well-Being Library processes are imported in an unpublished state and can be viewed and edited before being published for use.
How to access the Student Well-Being Library
User Permissions
Users must have Manage System Customization permissions can access the contents of the Student Well-Being Library.
Click here for more information on how to manage a user’s permissions.
- Log into Case Manager.
- Navigate to the Admin tab.
- Click Manage Models and select Process Models.
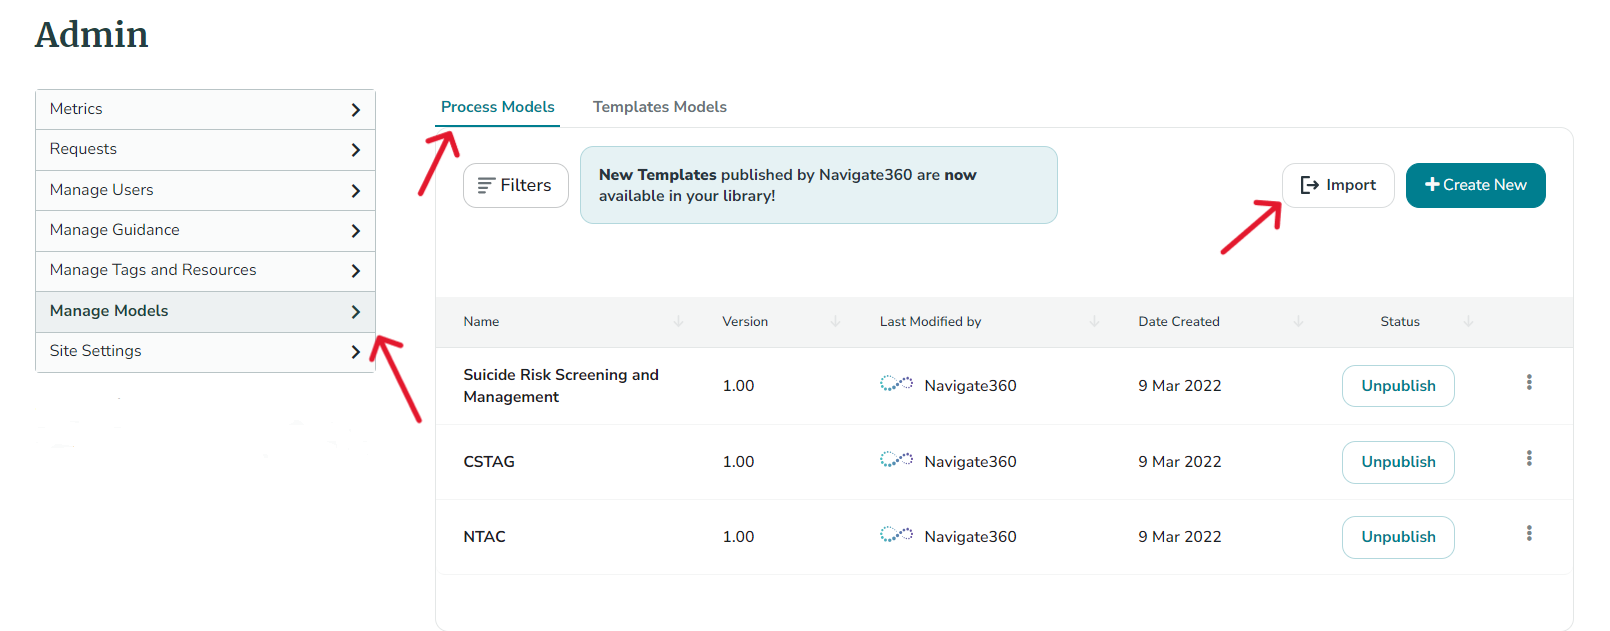
- Click Import to view a list of processes available within the library.
- Select a Template from the list and click Import.
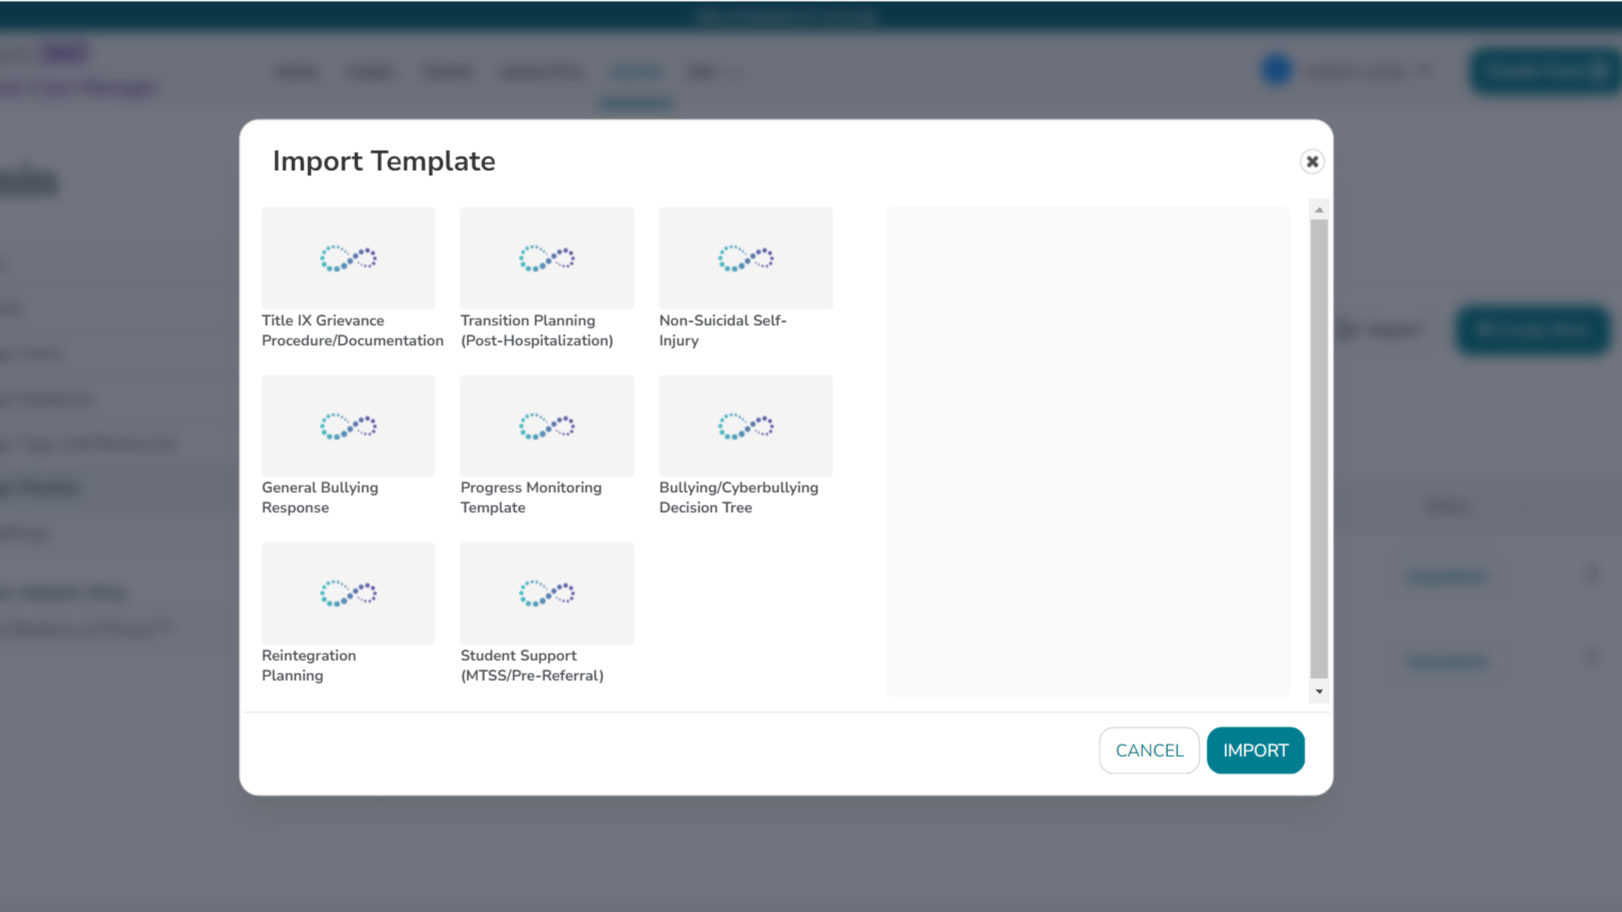
Student Well-Being Library Case
The Progress Monitoring Template can function independently to monitor and refine interventions for an individual. Additionally, it can be integrated with other processes, enabling users to uphold management strategies across diverse situations. When integrated with a process such as Student Support (MTSS/Pre-Referral), the Progress Monitoring Template facilitates seamless transition from one process to another. Initial case details automatically transfer from the initiating case to the linked process, enabling closure of the initiating case as needed. Information regarding linking cases can be found here.
Video Training: Student Well-Being Library (click to expand)
Behavioral Threat & Suicide Case Manager: Team Training
Behavioral Case Manager: Team Training
Enable your Behavioral Threat Assessment teams with the resources needed to perform your district's preferred threat assessment process in the Behavioral Case Manager. Share this page with your teams and direct them to select the specific Case Model to register for training.
BCM Platform Overview
The Behavioral Case Manager is a centralized platform designed to help school teams document, track, and manage behavioral intervention cases with efficiency and accuracy.
Scope of training: Provides a clear, in-depth understanding of the platform, highlighting key functionalities and best practices for managing cases effectively and efficiently.
Audience: All Users - users must be on a team to create and/or view cases.
Duration: 11 minutes
Click here to download the End User checklist.
Interested in learning more about Features and Functions in Behavioral Case Manager?
Click here to access the Feature/Function Overview.
CSTAG Case
Comprehensive School Threat Assessment Guidelines
Navigate360 partners with Dr. Cornell, a forensic clinical psychologist and professor at the University of Virginia. As the principal author of CSTAG, he collaborated with our development team to integrate the methodology into our Behavioral Case Manager, ensuring fidelity and providing ongoing guidance.
Scope of training: Complete walkthrough of case creation, management, and closure for a sample CSTAG case.
Audience: All Users - users must be on a team to create and/or view cases.
Duration: 7 minutes
Interested in learning more about the CSTAG methodology? Talk to your Navigate360 team today to discuss CSTAG Training opportunities! Created in partnership with Dr. Dewey Cornell, CSTAG Level 1 training equips staff to identify potential threats, prevent violence, and promote a culture of safety.
NTAC Case
National Threat Assessment Center
Navigate360's Behavioral Case Manager digitizes the National Threat Assessment Center (NTAC) case methodology, empowering staff to identify potential threats, prevent violence, and foster a culture of safety.
Scope of training: Complete walkthrough of case creation, management, and closure for a sample NTAC case.
Audience: All Users - users must be on a team to create and/or view cases.
Duration: 8 minutes
Interested in learning more about the NTAC methodology? Talk to your Navigate360 team today to discuss NTAC Training opportunities! Created by the U.S. Secret service and National Threat Assessment Center, and brought to Navigate360 in partnership with Marissa Randazzo, Ph.D. and Margaret H. Coggins, Ph.D., this training equips staff to identify potential threats, prevent violence, and promote a culture of safety.
Suicide Risk Screening Case
Using the Suicide Risk Screener, teams can support students through processes like the SAFE-T Screening framework, the development of written safety plans, and ongoing monitoring and support. By running suicide risk assessments and threat assessment cases in parallel, the Behavioral Case Manager ensures teams can complete comprehensive evaluations, allowing key associations to be attached for a holistic approach to student safety.
Scope of training: Complete walkthrough of case creation, management, and closure for a sample Suicide Risk Screening case.
Audience: All Users - users must be on a team to create and/or view cases.
Duration: 8 minutes
Interested in learning more about the Suicide Awareness and Prevention training opportunities? Talk to your Navigate360 team today! Reduce the stigma of mental illness on your campus and improve the effectiveness of student well-being programs by providing school staff with this expert-authored curriculum. Built in partnership with Dr. Scott Poland, an international expert on youth suicide prevention, this training is flexible and comprehensive.
Additional Resources:
Behavioral Case Manager - Admin User Training
Behavioral Case Manager Admin Training Plan
As the Behavioral Case Manager Administrator, your role is to setup and customize your Behavioral Case Manager solution to enable staff access and customize different case workflows.
Complete the five-part training to learn how to setup and manage your Behavioral Case Manager.
Estimated 45-minutes to complete
Part 1: Launching Behavioral Case Manager
Scope of Training: Learn about key features and functions of Behavioral Case Manager and the implementation process
- Launch Process Overview
- Best Practices for Launch
- Setting Expectations with the Team
- Key Features in BCM
Audience: Case Manager Administrators
Duration: 8-minutes, on-demand
Part 2: Team and User Management
Team Management Scope of Training: Learn how to create and manage teams to organize and maintain different behavioral case workflows in Behavioral Case Manager.
- Creating Teams
- Viewing and Editing Teams
- Adding Team Members
- Logging Team Meetings
- Viewing Team Statistics
Audience: Case Manager Administrators (Requires “Manage Teams” Permission)
User Management Scope of Training: Learn how users gain access to the Behavioral Case Manager.
- Understanding how users are added to your Behavioral Case Manager through your SIS integration via Clever or ClassLink
- Introduction to User Management
- Enabling and Disabling Users
- Inviting Users to Behavioral Case Manager with Welcome Emails
- Understanding Advanced Permission options
- Configuring Notifications
Audience: Case Manager Administrators (Requires “Manage Users” Permission)
Duration: 15-minutes, on-demand
Click here to view: Team and User Management Overview
Additional Resources
Enabling Users from SIS Connection
Adding Users Associated with District SIS Connection
Manage Individual Users
- Log into Case Manager.
- Click the Admin tab then select the Manage Users node.
- Click the Users button and select Disabled Users.
- Next to the desired user, click the three-dot Vertical Ellipsis.
- Select Enable.
Bulk User Change (Optional)
- Log into Case Manager.
- Click the Admin tab then select the Manage Users node.
- Click the Users button and select Disabled Users.
- Check each box next to the desired user(s).
- Click the Enable All button.
All users synced to the Behavioral Case Manager through the SIS connection are automatically set to disabled until enabled by a user with Manage Users permissions.
Manually Adding Users Outside of SIS Connection
Adding Users Not Associated with District SIS
User Permissions:
User must have Manage Users permissions to complete the following steps.
Click here for more information on how to manage a user’s permissions.
- Log into Case Manager.
- Select the Admin tab.
- Select the Manage Users node.
- Click the New Users button.
- Complete the fields in the Create New User pop up.
- Click Create User.
Manage Teams Permissions:
User must have Manage Teams permissions to add new user to a team.
User Permissions
Manage User Permissions
User Permissions:
User must have Manage Users permissions to complete the following steps.
Click here for more information on how to manage a user’s permissions.
Update User Permissions
- Log into Case Manager.
- Navigate to the Admin tab.
- Locate the Manage Users node.
- To select a User, click the three-dot Vertical Ellipsis and select Edit for the desired user.
- Locate the Permissions node.
- Check to Enable permissions.
- Uncheck to Disable permissions.
- Click Save Changes.
Permission Options
Manage Users: User can create new users and edit existing user's settings.
Manage Teams: User can view and modify any team, even if they are not the team leader.
Manage District Guidance : User can create and edit district guidance.
Manage System Customization: User can manage New Process Models, Customize Tags, Resources, and customize BCM Models Sections
Manage Cases: User can view and modify any case, regardless of their team and gain access to Case Manager Analytics.
Standard Access: User can acess cases assigned to their team, or those cases in which the user has been added as a guest.
Coordinator: Allows a given user nuanced access to various models. This can be used to give key stakeholders access to certain case types across teams, while restricting their access to other workflows.
A user given the Coordinator permission will have access to the Coordinator tab on their cases dashboard, allowing them nuanced access to specified model types.
Selecting Coordinator permission will allow for per-model access to be specified for a given Coordinator user. This access will apply to all cases in the district, ignoring team-based restrictions.
For a given model, as a Coordinator:
- Read/Write allows for full edit-level access to cases of this type and allows a given user to create new cases of this type.
- Read Only allows for full visibility of all cases of this model, but a given user cannot edit these cases or create new cases of this type.
- No Access prohibits access to cases of a given model. Note: instead of access to a case, a Coordinator with No Access will instead see contact information for the team owning the case to request access.
Individual User Settings
User Settings
- Log into Case Manager.
- Hover over Username in the top right of screen.
- Select Account Settings
-
Basic Info
- First Name
- Last Name
- Time Zone
- Job Title
- Mobile Phone
- Work Phone
- Home Phone
- Team(s)
Users can only add/remove teams they are assigned to, while users with Manage Teams permissions can add/remove any team as necessary.
- Buildings(s)
- Click Save Changes.
-
Change Password
- Current Password
- New Password
- Confirm New Password
- Click Save Changes.
- Two Factor Security
- Mobile Phone
- Work Phone
- Home Phone
- Other Phone
- Click Enable.
-
Basic Info
-
Notification Preferences
To follow a step by step guide on how to edit notification settings click here.
Part 3: Case Management and Movement
Scope of Training: Learn how to create and manage cases in Behavioral Case Manager. This training covers a generalized overview of a case structure.
- Creating Cases
- Viewing Cases
- Opening and Closing Cases
- Viewing and Editing Case Details
- Task Management within a Case
- Viewing Case History
- Case Transfer and Automation
Audience: Case Manager Administrators (Requires “Manage Cases” Permission)
Duration: 10-minutes
Click here to view: Case Management and Movement
Additional Resources:
How to Open and Close Cases
How to Close & Reopen Cases
Close Cases
- Log into Case Manager.
- Select the Cases tab.
- Alternatively, cases can be found on homepage under Open Cases Assigned to You.
- Select the View button to open a specific case.
- Alternatively, cases can be found on homepage under Open Cases Assigned to You.
- Next to the case number, select the three-dot Vertical Ellipsis.
- Select Close.
- User will see a Close Case popup.
- Select the drop down for Disposition and select reason for case closure.
a. Closed - No Further Action (NFA)
b. Closed - Referred or Transferred
c. Closed - Scheduled for team review in 3 months
d. Closed - Scheduled for team review in 6 months
e. Closed - Scheduled for team review in 12 months
7. Add notes for case closure.
8. Select Confirm.
9. If there are any issues identified that prevent the case from being closed, an error message will appear. The most common errors are having assigned tasks that have not been completed or not completing all fields/sections marked as required.
Locate Closed Cases
- Log into Case Manager.
- Select Cases Tab.
- Alternatively you can navigate to Open Cases Assigned to You on homepage and select Search Cases.
- Select Filters.
- Check the box of Show Closed.
5. Click Apply.
Reopen Cases
Manage Cases Permissions
User must have Manage Cases permissions to complete the following steps.
Click here for more information on how to manage a user’s permissions.
- Log into Case Manager.
- Select Cases tab.
- My Cases
- All Cases
- Select Filters.
- Check Closed Cases box.
- Select Apply.
- Select three-dot Vertical Ellipsis.
- Click Reopen.
- State the reason the case is being reopened.
8. Click Confirm.
How to Create a New Case
Create a Case
Why Create a Case?
Creating a case using Behavioral Case Manager offers a structured approach to understanding and addressing complex human behaviors. By defining scenarios and detailing accompanying behaviors, this method provides a clear framework for analysis, intervention, and learning. Cases in Behavioral Case Manager incorporate long-term management and tracking capabilities by centralizing data, enabling ongoing monitoring, and facilitating the aggregation of key information.
The benefits of creating a case in Behavioral Case Manager are extensive. It enhances decision-making abilities by providing comprehensive data insights over time. It also improves teamwork through collaborative case management and fosters a deeper understanding of behavioral theories in practical settings.
- Log into Case Manager.
- Click Create Case button at the top of the screen.
- Alternatively, for CSTAG cases, click New Case button on the homepage.
CSTAG Model:
When selecting CSTAG as the Process Model, the user will be prompted with an additional CSTAG Model Overview pop-up after clicking proceed. Click Minimize to continue case creation.
- Alternatively, for CSTAG cases, click New Case button on the homepage.
- Choose Process Model pops up, select the model type.
- Click Proceed.
- Assign Team in the Team (Required) dropdown.
- Assign Case Manager in the Case Manager (Required) dropdown.
- Fill in the fields with the case details.
- Scroll to the bottom and select Create Case.
How to Download a Case Report
How to Download a Case Report
Download Case Report
- Log into Case Manager.
- Select the Cases tab.
- Alternatively, cases can be found on the homepage under Open Cases Assigned to You.
- Select the View button to open a specific case.
- Alternatively, cases can be found on the homepage under Open Cases Assigned to You.
- Next to the desired case, click the Vertical Ellipsis and select View.
- Next to the case number, select the three-dot Vertical Ellipsis.
- In the drop-down menu, select Download/Print.
6. Select the type of report:- Overview: This is a brief report including basic case details. This report does NOT include vital case details or attached files.
-
Detailed: This is a thorough report giving all information regarding the case.
- User can select to include attached files in Detailed Reports.
- Select Print.
Overview Reports: Only available for CSTAG and NTAC cases.
Active Case Automation
Case Transfer Automation
What is case transfer automation?
Case transfer automation ensures that a student's case stays with them throughout their time in the district. This functionality promotes greater continuity in handling student cases as they change schools within the district.
Utilizing Case Management’s SIS integration, case transfers between school-based teams can be automated to track students as they advance vertically between grades or move laterally between locations. Configurability enables stakeholders to tailor the flow of different case types to specific teams and determine whether to include historical closed cases.
How do I enable case transfer automation?
Please reach out to your Navigate360 Account Manager to enable the access to the feature. Additionally, user must have Manage Teams permissions to complete the following steps.
- Log into Case Manager.
- Click the Admin tab.
- Select the Manage Buildings node.
- Click the three-dot Vertical Ellipsis next to the desired building.
- Select Edit Mapping.
- Click +Process models button.
- Select the process model(s) to be include in mapping.
- Select All to include all process models the district uses.
- Select the Status of cases to transfer.
- Case Opened
- Case Closed
- Click the dropdown under Select transfer team and select a team.
- This team is the corresponding team for the building .
- If a student is transferred to the building, this team will have visibility when the case transfers.
- This team is the corresponding team for the building .
- Optional - Select Apply this Retroactively.
- This parameter will apply to past cases before new mapping selections were made.
- Click Save.
Additional Mapping:
To add more teams to a specific building, click the +Add button and repeat the steps above.
Part 4: Case Model Walkthrough
Scope of Training: Walk through the case creation process for your district's chosen process models.
- CSTAG case creation
- NTAC case creation
- Suicide Risk Management case creation
Audience: All Users - users must be on a team to create and/or view cases.
Behavioral Case Manager: Team Training
Part 5: Analytics and Reporting
Scope of Training: Learn how view and export Behavioral Case Manager analytics across different case models.
- Viewing Analytics
- Exporting Reports
- Creating Custom Charts
- Downloading Individual Case Reports
Audience: Case Manager Administrators (Requires “Manage Cases” Permission)
Duration: 4-minutes
Click here to view: Analytics and Reporting
Additional Resources:
Analytics Overview
Analytics Feature Overview
The Analytics feature allows users with the Manage Cases permission level to view and create graphs and reports for assessing case data at scale and comparing or contrasting concepts within case types. Users with the Manage Cases permission can access the Analytics feature via the Analytics tab in Behavioral Case Manager.
Within the Analytics feature, there are three options: Summary, Reports, and Dashboard:
Summary
- Summary graphs display data points common between workflows, such as tags, grade level, and source of reports
- Data shown here will be compiled across models in a given site, allowing for review of data district-wide
- Additional filter options allow for focus on a given date-range and/or teams/buildings
- One or more filters can be applied under the filter options in the upper right of the summary page
- Filters can be cleared from the filter button using the Reset option
Reports
- The reports tab allows for large-scale exports of case data and other site-wide concepts – it is now included under the Analytics tab
Dashboard
Dashboard allows for the creation of charts, including:
- Line charts (for displaying concepts over time)
- Column charts (for displaying concepts vertically, typically to contrast concepts)
- Bar charts (for displaying data horizontally, typically when large amounts of data are being compared, or data labels are lengthy)
- The creation process allows users to sequentially select the process they would like to chart, version of the process, chart type, and then specific details/filtration of the data
- Under Chart Customization, users can name their chart
Next, users specify the section and then question from a given workflow they would like to chart - The values field allows for selection of one or more answers for charting; selecting multiple values here will allow for comparison of counts of those answers
- Graphs can be produced for the following concepts/question style types:
- Interviews/templates – quantify the number of interviews or templates used in a given model/timeframe
- Select - quantify options users select from in dropdown questions
- Select box – quantify multiple choice selections
- Open select – quantify multiple choice selections that also include ‘other’ or open-ended options
- Radio select – quantify multiple choice selections for radio questions in which users must choose a single answer
- Note: these question styles are used in several pre-defined components, which can also be graphed:
- Race
- Ethnicity
- Section 504
- Yes/No Question
- State or grant-specific reporting components
- IEP status
- When a graph has been created, it will appear on the dashboard alongside other created graphs
- All users with Manage Cases permission can create and view created graphs on the dashboard
- Graphs on the dashboard can be deleted by clicking the ellipsis in the upper-right of each graph
Export District Overview Report
Exporting District Overview Report
This video will teach you how to export a District Overview report from the "Behavioral Threat Assessment and Suicide Case Management" tool into Excel.
Exporting Building Breakdown Report
Exporting Building Breakdown Report
This video will demonstrate how to export a "Building Breakdown" report from within the "Behavioral Threat and Suicide Case Management" tool.
Click here for assistance accessing webinar notifications
Click here for Threat Assessment Team Resources
Become a Subject-Matter Expert in the Behavioral Case Manager! Learn how to further customize your site to add and adopt additional behavioral processes.
Custom Process Models
What is a Custom Process Model?
What is a Custom Process Model?
Custom Process Models are tailor-made to fit user needs. The customization factor enables users to design a step by step guide to seize vital case details. There are various field components to help users create powerful and flexible pages to manage data effectively. Each component serves a specific purpose, allowing users to capture and organize information efficiently.
Layout Components
The layout components allow users to structure the model, while displaying clean and organized data. Here are the available layout components and their functions:
-
Columns: 2
- This option divides the page into two columns and allows users to place different elements side by side for a more polished presentation. While the default setting is 2 columns, users can adjust the number of columns during creation or editing.
-
Field Set:
- Field sets enable users to group related elements together on a page, making it easier to manage and comprehend related data.
-
Table: 3x3
- The table component enables users to create a table with three rows and three columns, perfect for presenting data in a tabular format. Although the default table size is 3x3, users can adjust the number of rows and columns when creating or editing the table.
- The table component enables users to create a table with three rows and three columns, perfect for presenting data in a tabular format. Although the default table size is 3x3, users can adjust the number of rows and columns when creating or editing the table.
Pre-defined Components
Pre-defined components are pre-built versions of basic components and cannot be edited. They serve specific purposes related to individual or case details. Here are the available pre-defined components and their functions:
-
Address
- Home Address
- City
- State
- Zip
-
Race (Drop-down with options):
- American Indian or Alaska Native
- Asian
- Black or African American
- Native Hawaiian or Other Pacific Islander
- White
- Multiracial
- Unknown
-
Ethnicity (Options):
- Hispanic or Latino or Spanish Origin
-
Not Hispanic or Latino or Spanish Origin
-
Individual Education Program (Yes/No)
- Indicates whether the individual has an education program tailored to their needs.
-
Section 504 (Yes/No)
- Indicates whether Section 504 applies to the individual.
-
Related Cases
- Manually link cases to display related incidents.
-
Target
- An open field that pulls data from the SIS (Student Information System) or relevant sources.
-
Person Completing Form (Open Field):
- Captures the information about the individual completing the form and provides an audit trail of the input.
- Captures the information about the individual completing the form and provides an audit trail of the input.
Basic Components
Basic components offer essential form elements for capturing different types of data. Users can customize these elements as needed. Here are the basic components and their functions:
-
Content
- Add headers, paragraphs, or any other textual content. Users can also include links, images, tables, and videos. The content will appear on exported reports as "Content 1," "Content 2," and so on.
-
Text Field
- Captures a single line of text, suitable for short responses.
-
Text Area
- Provides an area for multiple lines of text, ideal for longer explanations or descriptions.
- Provides an area for multiple lines of text, ideal for longer explanations or descriptions.
- Number
- Allows users to input or select only numbers. The label can be customized, for example, to "ID".
-
Checkbox
- Displays a box next to text provided by the model creator, allowing users to check it to make a choice or selection.
- Displays a box next to text provided by the model creator, allowing users to check it to make a choice or selection.
-
Email
- Collects email addresses from individuals.
-
Phone Number:
- Collects phone numbers. The label can be customized, for example, to “Home/Mobile”.
- Collects phone numbers. The label can be customized, for example, to “Home/Mobile”.
-
Date/Time:
- Captures date and time information. It can be configured to record either date only or time only..
-
Select Boxes:
- Enables users to select multiple options based on the available content.
- Enables users to select multiple options based on the available content.
-
Open Select Boxes:
- Allows users to add their own content to the select boxes and then check the relevant options.
-
Select:
- Displays as a drop-down menu, enabling users to select a single option from the list..
-
Radio:
- Displays options with radio buttons, allowing users to select only one option.
-
Tags:
- Allows users to add custom tags to organize and categorize data effectively.
- Allows users to add custom tags to organize and categorize data effectively.
Field Requirements:
Users can designate fields as required or set them as the initial focus. This feature helps guide users' attention to specific questions or content, especially in sections with extensive information or multiple questions.
Video Training: Managing Process Models (click to expand)
Interested in learning more about Custom Models? Talk to your Navigate360 team today to discuss custom model creation options!
The Student Well-Being Library
Student Well-Being Library
What is the Student Well-Being Library?
The Student Well-Being Library is a cloud-based solution that centralizes student behavioral trends. Schools can utilize pre-built workflows and processes within the library to assess and intervene in behaviors exhibited by students. The Student Well-Being Library offers assessment and management tools to help identify the trends in students' behavior.
Student Well-Being Library Content
The Student Well-Being Library has a menu of pre-built processes that include assessment, intervention and management practices such as Student Support, Bullying Prevention, Non-Suicidal Self-Injury, Title IX, and Reintegration.
Customization:
The Student Well-Being Library is customizable and can be configured in numerous ways to fit a district's needs. It includes localized language to align guidance and support, data collection to identify trends and follow-up activities, and linked processes to provide timely, proactive support and intervention.
Student Well-Being Library processes are imported in an unpublished state and can be viewed and edited before being published for use.
How to access the Student Well-Being Library
User Permissions
Users must have Manage System Customization permissions can access the contents of the Student Well-Being Library.
Click here for more information on how to manage a user’s permissions.
- Log into Case Manager.
- Navigate to the Admin tab.
- Click Manage Models and select Process Models.
- Click Import to view a list of processes available within the library.
- Select a Template from the list and click Import.
Student Well-Being Library Case
The Progress Monitoring Template can function independently to monitor and refine interventions for an individual. Additionally, it can be integrated with other processes, enabling users to uphold management strategies across diverse situations. When integrated with a process such as Student Support (MTSS/Pre-Referral), the Progress Monitoring Template facilitates seamless transition from one process to another. Initial case details automatically transfer from the initiating case to the linked process, enabling closure of the initiating case as needed. Information regarding linking cases can be found here.
Video Training: Student Well-Being Library (click to expand)
How to Create a Case
Create a Case
Why Create a Case?
Creating a case using Behavioral Case Manager offers a structured approach to understanding and addressing complex human behaviors. By defining scenarios and detailing accompanying behaviors, this method provides a clear framework for analysis, intervention, and learning. Cases in Behavioral Case Manager incorporate long-term management and tracking capabilities by centralizing data, enabling ongoing monitoring, and facilitating the aggregation of key information.
The benefits of creating a case in Behavioral Case Manager are extensive. It enhances decision-making abilities by providing comprehensive data insights over time. It also improves teamwork through collaborative case management and fosters a deeper understanding of behavioral theories in practical settings.
- Log into Case Manager.
- Click Create Case button at the top of the screen.
- Alternatively, for CSTAG cases, click New Case button on the homepage.
CSTAG Model:
When selecting CSTAG as the Process Model, the user will be prompted with an additional CSTAG Model Overview pop-up after clicking proceed. Click Minimize to continue case creation.
- Alternatively, for CSTAG cases, click New Case button on the homepage.
- Choose Process Model pops up, select the model type.
- Click Proceed.
- Assign Team in the Team (Required) dropdown.
- Assign Case Manager in the Case Manager (Required) dropdown.
- Fill in the fields with the case details.
- Scroll to the bottom and select Create Case.
Managing Tasks
Managing Tasks
What Are Tasks?
In Behavioral Case Manager, tasks play a crucial role in managing and tracking different steps within a case. Users are assigned specific tasks to ensure that each step in the workflow is completed efficiently. These tasks are included in predefined processes, which are pre-configured and ready to use in standard workflows. Additionally, tasks can be added to custom Process Models, providing flexibility and allowing users to tailor workflows to meet specific needs or unique requirements. This combination of default and custom task management helps streamline and optimize case management processes.
Assign/Add Tasks
- Log into Case Manager.
- Select Cases tab.
- Alternatively, cases can be found on homepage under Open Cases Assigned to You.
- Select the View button to open a specific case.
- Alternatively, cases can be found on homepage under Open Cases Assigned to You.
- Find desired case and select the three-dot Vertical Ellipsis.
- Select View.
- Locate the section containing tasks.
- To Create a New Task:
- Click the Add Task button.
- For Existing Tasks:
- Click the task.
- Complete the the following fields:
- Description (Required) - Briefly describe any additional details required for the task.
-
Task (Required) - Add title of the task.
- For Suggested Tasks - user can change task name if desired.
- Assign User (Required) - Choose user to assign the task to.
- Due Date (Required) - Assign a due date for task completion.
- Recurrence - Choose to make a task recurring daily or weekly.
- Email Reminders - Choose to remind users prior to due date of the task.
Completing Tasks
- Log into Case Manager.
- Click dropdown by username and select My Tasks.
- Alternatively on homepage, view tasks under Tasks Assigned to You in Tasks table.
- Find desired task and click three-dot Horizontal Ellipses.
- For new Tasks:
- Click Accept.
- Alternatively on homepage, view tasks under Tasks Assigned to You in Tasks table.
- Find desired task and click three-dot Horizontal Ellipses.
- For new Tasks:
- Click Accept.
- For new Tasks:
- User has the following options once accepting a task:
- View Details - View the details of the tasks
- Go to Case - View the case
-
Edit - Edit the details of the task
- Persons Spoken To - Add student, staff, visitor that user spoke with
- Findings - Briefly Describe what was found, who it came from etc.
- Files - Drag-and-drop a file or brows to upload.
- Mark Complete - Mark the task complete
- Add to Calendar - Add to Calendar for reminder purposes.
- Delete - Delete the task.
General Task
General tasks can be found in the "Tasks" tab under the Attachment section of any model. Users can utilize these general tasks to track workflows and manage information across various cases.
Bulk General Tasks
The Bulk General Task feature can be used to send tasks to Team Leaders and Case Managers across multiple cases, helpful when communicating deadlines or in requesting updates on cases.
- Team Leaders and Case Managers will each receive tasks created using the Bulk General Task option.
- From the Case Dashboard, select one or more cases and then select Bulk Actions.
- General Tasks can be used to create task for the selected case(s).
The Bulk General Task option allows for creation of tasks across selected cases.
- Task title, due date, and description will populate the tasks and notifications assigned to Team Leaders and Case Managers for the selected case.
- Send Reminders can be used to send reminders to recipients ahead of the tasks’ due date.
Transfer a Case to a Different Team
How to Transfer an Existing Case to a Different Team
User Permissions
User must have Manage Cases permissions to complete the following steps.
Click here for more information on how to manage a user’s permissions.
- Log into Case Manager.
- Select Cases tab at the top of the screen.
- Select a case by clicking the three-dot Vertical Ellipsis to the right of the case and select View.
- Select Edit Initial Details.
- Click the down arrow of the Team dropdown.
- Select the team you want to transfer the case to.
- The team leader of receiving team will automatically be assigned as the Case Manager.
- Florida Districts Only - The chair of the receiving team will automatically be assigned as the Case Manager.
- The team leader of receiving team will automatically be assigned as the Case Manager.
- Scroll to the bottom of the page and click Save Changes.
Alternative Method
- Log into Case Manager.
- Select Cases tab at the top of the screen.
- Select the case of your choice by clicking the vertical ellipsis to right of the case and select Transfer to Team.
- In the pop-up, click the down arrow of the Select Team dropdown.
- Select a team and click Transfer.
The original team will no longer have access to the case as it is now transferred to the new team.
How to add a Case Guest
FAQ: How can I give someone outside of my team access to a specific case?
Adding Team Guest(s) to Case
User Permissions
User must have both Manage Cases and Manage Teams permissions to complete the following steps.
Click here for more information on how to manage a user’s permissions.
- Log into Case Manager.
- Select Cases tab.
- Select My Cases or All Cases.
- Next to desired case, click the three-dot Vertical Ellipsis and select View.
- Next to the case number, click the three-dot Vertical Ellipsis and select Edit User Access.
- Click Add Teams(s) and select team.
- Set team permissions to Read/Write or Read Only.
- Click Close.
Individual Guests
To add an individual guest, follow the steps above, but in step 6, click the 'Add Case Guests' button instead.
Downloading a Case Report
How to Download a Case Report
Download Case Report
- Log into Case Manager.
- Select the Cases tab.
- Alternatively, cases can be found on the homepage under Open Cases Assigned to You.
- Select the View button to open a specific case.
- Alternatively, cases can be found on the homepage under Open Cases Assigned to You.
- Next to the desired case, click the Vertical Ellipsis and select View.
- Next to the case number, select the three-dot Vertical Ellipsis.
- In the drop-down menu, select Download/Print.
6. Select the type of report:- Overview: This is a brief report including basic case details. This report does NOT include vital case details or attached files.
-
Detailed: This is a thorough report giving all information regarding the case.
- User can select to include attached files in Detailed Reports.
- Select Print.
Overview Reports: Only available for CSTAG and NTAC cases.
Back-to-School Checklist
District Admin Users:
✔ NEW: Set up Coordinator Role Permissions to provide advanced manage cases permissions on a per-process model basis
✔ REVIEW: Analytics Dashboard to set up custom charts and graphs, ensuring quick access to the data points that matter most
✔ Check your rosters Navigate360 will resume syncing with your Student Information System the week of July 28. This is for those integrated through Clever or ClassLink. Starting Monday, August 4, please check that your rosters appear correct. If the information is not correct, please verify that your information is correct with your SIS administrator. Then, please contact Navigate360 Tech Support at tech@navigate360.com.
✔ Review Users and Teams: Make sure new team members are enabled and assigned to the correct team and all teams have an assigned Team Leader. Don't forget: if you opened a new building this year, you will need a new team!
✔ Check your email filters Ensure the navigate360.com domain is allowed in your district email/spam filters to ensure users receive important communications.
Team Leaders:
✔ Schedule your first Team Meeting of the year to conduct a case audit. Capture your meeting notes using the Team Meeting Log feature
✔ Conduct a case audit to review any open cases, close any cases that have been completed, or transfer cases to a new team as needed.
Team Members:
✔ Review your profile and notification settings for any changes needed
✔ Verify your team assignments are correct
✔ Complete any outstanding tasks assigned to you
Back-to-School Tips & Tricks
The 2026-27 back-to-school season will be here before you know it! Our product experts have created these helpful tips to help you start the new school year off right!
🔹 Customize the guidance sections with district-specific details to ensure team members have access to the most up-to-date information needed
🔹 Set up Case Transfer Automation to ensure cases follow the student if they move within the district
🔹Check out the Student Well-Being Library to determine if any other process models can be added to your Case Manager site - things that are currently being tracked on paper and pencil or other local systems may be more uniformly and visibly managed in Case Manager.
Key Features
Behavioral Case Manager boasts a host of features, available across all models and developed based on feedback from those in the field and their biggest pain points when assessing, intervening, and documenting behavioral concerns.
These features include:
|