BadgeR+ Wearable Panic Button Setup
Learn how to set up the 911Cellular BadgeR+ wearable panic button
- Emergency Management
- Preparation & Response Training
- PBIS Rewards
-
Compass
Getting Started Webinar Links Data & User Management Compass Curriculum for Students, Staff, & Families Compass Behavior Intervention Compass Mental Health + Prevention Compass for Florida - Character Ed, Resiliency, & Prevention Compass for Texas - Character Ed Analytics & Reporting Release Notes & Updates Additional Resources
- Behavioral Case Manager
- Visitor Management
- School Check In
- ALICE Training Institute
- Detect
- Anonymous Tip Reporting
- Hall Pass
- Resources
- Back-to-School
Follow the steps below to configure your BadgeR+ Wearable Panic Button devices. Each button is configured individually.
This method involved Bluetooth pairing. If multiple team members are pairing buttons at the same time, coordination is required to ensure you are pairing the correct device.
BadgeR+ Overview
BadgeR+ Wearable Panic Buttons provide users with another way to activate up to three distinct alarm types, initiating an Emergency Management alarm to notify staff and automatically notify designated Emergency Response teams, including 911*. Customizable through the Emergency Management system and the 911Cellular Portal, each alarm type is activated with a Single Click, Double Click, or Press-and-Hold action on the red panic button.
These devices are designed to function exclusively on the designated W-iFi network established during configuration and should be charged every 1–2 months to maintain reliable connectivity.
* 911Cellular configuration required to enable E911 call to First Responding agencies.


BadgeR+ Pairing & Setup
Steps to Configure your BadgeR+ Button:
-
Access the 911CellularPortal: Open the 911Cellular Portal and navigate to Manage Devices
-
Navigate to Button Registration: Click on the sub-tab labeled ‘Button Registration’ to locate the green ‘Pair Wireless Device’ button.
-
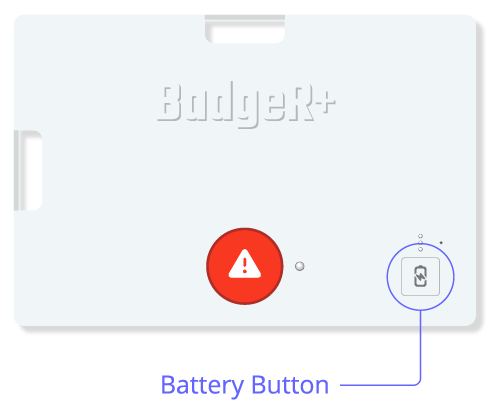
Initiate Pairing Mode: Press the Battery Button on the BadgeR+ device for 6 seconds to initiate Pairing Mode.
- The Status Indicator Light will blink blue, confirming Pairing Mode is active.
- Pairing Mode will last for 20 seconds and temporarily disables alert functionality.
-
Pair the Device: Return to your browser and click the green ‘Pair Wireless Device’ button
-
Select the Device for Pairing: In the popup window, select the device labeled ‘BadgeR+’ and click ‘Pair’.
- If the device is already paired, you will see the text ‘Paired’ next to its name.
- If you do not receive a pop-up, confirm your browser settings will allow Bluetooth connection.
-
Enter Device Details: Click ‘Edit Device Details’ and fill in the required fields, including User Email, Device Name, and SSID. Enter accurate details to ensure proper functionality and alert notifications.
Best Practice: List the Panic Button Device Manager for all device details. Learn more about the Panic Button Device Manager role in District Decisions, Pre-Configuration Checklist
-
Link the Device: Click the green ‘Link Device’ button. The BadgeR+ device will now appear in the ‘Active Buttons’ sub-tab and is ready for testing before distribution.
-
Confirm Check-In: In the ‘Active Buttons’ subtab, verify the wearable device has checked-in “a few seconds ago”. This confirms the button has now connected to the network.
BadgeR+ Settings Configuration: Button check-in cadence is configured in the 911Cellular Portal, Wireless Panic Button Settings
By default, buttons are configured to check-in every 120-minutes
Best Practices for Paired Devices:
- Label devices and keep an inventory sheet for reference. While all buttons will be listed and labeled in the 911Cellular Portal, create a quick reference sheet for button distribution.
- Charge buttons every 1-2 months for optimal usage and battery life
- Initiate a check-in daily to confirm network connectivity. Press and release the battery button.
- My Status Indicator Light blinks green 4 (four) times
- If your Status Indicator Light blinks green 4 (four) times (may take several seconds after Battery Button is pressed), your BadgeR+ is configured properly and you can continue to the next step, Using Your BadgeR+.
- My Status Indicator Light is doing something else
- If your Status Indicator Light does NOT light up at all, your BadgeR+ may need charging. Refer to the next step, Using Your BadgeR+, for information on how to properly charge your device, then return to this step to check your BadgeR+ status again before use.
- If your Status Indicator Light is cycling between RGB (red, green, blue) and white, blinking red 3 (three) times, blinking orange 6 (six) times, blinking pink 7 (seven) times, or blinking yellow 9 (nine) times, your BadgeR+ is NOT configured properly and must be given to your system administrator. If this is the case, do NOT attempt to use your BadgeR+. Notify your system administrator immediately.
- My Status Indicator Light blinks green 4 (four) times
BadgeR+ Troubleshooting
Reference the steps below for troubleshooting devices. If these steps have been taken and the button is not connecting, reach out to Navigate360 for assistance.
Check Battery Level / Charge Battery
Use the LED lights on your BadgeR+ device to quickly determine its battery status:
- All 3 Lights On: Battery level is 75% - 100%.
- 2 Bottom Lights On: Battery level is 50% - 74%.
- 1 Bottom Light On: Battery level is 15% - 49%.
- 1 Bottom Light Flashing: Battery level is Less than 15%. Charge immediately.
- No Lights On or Flashing: Battery level is 0%. Charge immediately.
Check battery levels while the device is charging:
- All 3 Lights Cycling On and Off: Battery level is less than 50% and actively charging.
- Top 2 Lights Cycling, Bottom Light Solid: Battery level is 50% - 74% and actively charging.
- Top Light Cycling, Bottom 2 Lights Solid: Battery level is 75% - 99% and actively charging.
- All 3 Lights Solid: Battery is 100% fully charged.
Battery levels can be checked in the 911Cellular Portal, Manage Devices - each button will have a battery status. Once batteries have less than 15% battery life, they run the risk of not connecting to the network.
Keep your device fully charged to ensure it is always ready for emergencies.
Reset Device
To reset a BadgeR+ device and return it to its default (unconfigured) state, follow these steps carefully. Only perform a reset if the device is malfunctioning and needs reconfiguration.

- Press and Hold the Battery Button: Locate the Battery Button on the BadgeR+ device and press it firmly.
- Press the Reset Button: While continuing to hold the Battery Button, use a paperclip or similar small tool to press the Reset Button through the pinhole on the device’s casing.
- Release the Reset Button: After pressing the Reset Button, release it, but continue holding the Battery Button for an additional 5 seconds.
-
Verify the Reset: Once the reset is completed, the device will:
- Vibrate once.
- Cycle the Status Indicator Light through RGB colors (red, green, blue, then white) within 5 seconds.
- Display the current charge level on the Battery Indicator Lights
The device is now reset and must be reconfigured before use.
Disabling Device
If a BadgeR+ device is lost/missing and needs to be deactivated, log into the 911Cellular portal and follow these steps:
- Access Manage Devices > Wireless Panic Buttons: https://portal.publicsafetycloud.net/manage-devices/wireless-buttons
- Review Active Status: In the list of Wireless Panic Buttons, find the button that needs to be disabled and toggle the Active Switch OFF.
Only active panic buttons are able to trigger emergency alarms.
