Referrals: Teacher Focus- PBIS Rewards
Gain insight into methods to use teacher referrals to better focus the classroom.
- Emergency Management
- Connect360
- PBIS Rewards
- Hall Pass
- Preparation & Response Training
- Behavioral Case Manager
- Visitor Management
-
Compass
Getting Started Webinar Links Data & User Management Compass Curriculum for Students, Staff, & Families Compass Behavior Intervention Compass Mental Health + Prevention Compass for Florida - Character Ed, Resiliency, & Prevention Compass for Texas - Character Ed Analytics & Reporting Release Notes & Updates Additional Resources
- School Check In
- ALICE Training Institute
- Detect
- Anonymous Tip Reporting
- Resources
- Back-to-School
Referrals: Teacher Focus Note: Video may display a previous version of the software. See article below for more recent images.
Basic
If your school uses PBIS Rewards for referrals, learn how to create and complete major and minor referrals in the Web Portal and Staff App
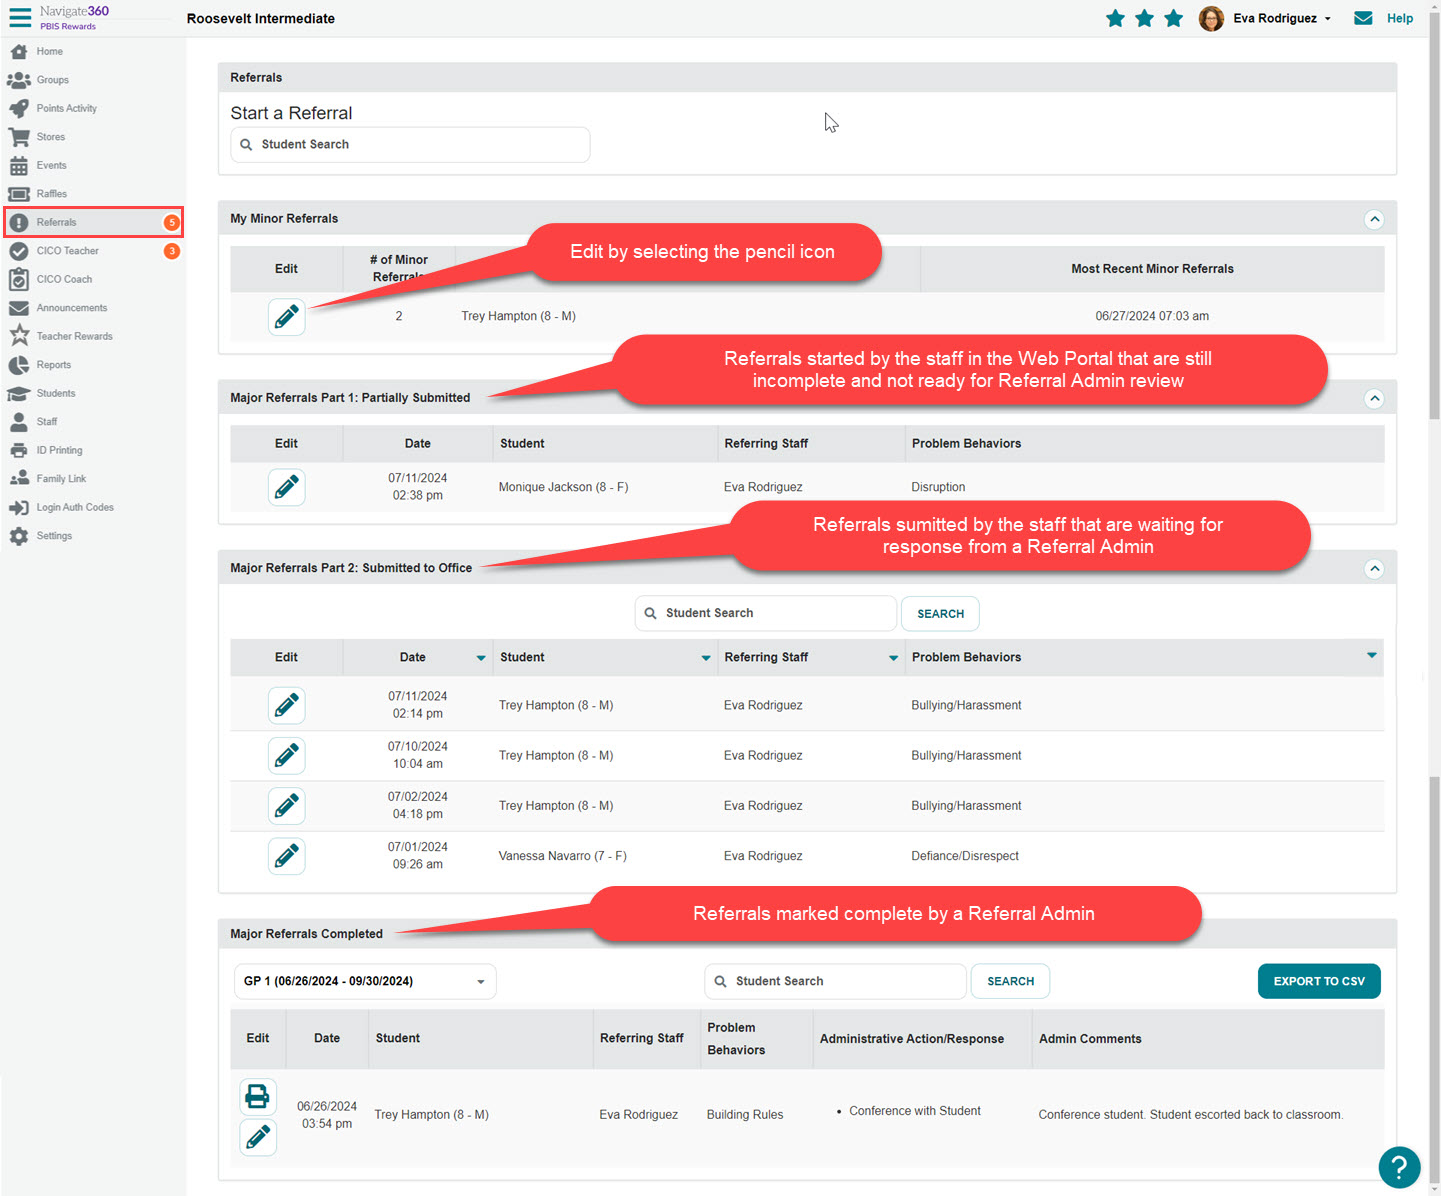
Referral Form: Part 1
Creating Major Referral on the Web Portal – Staff
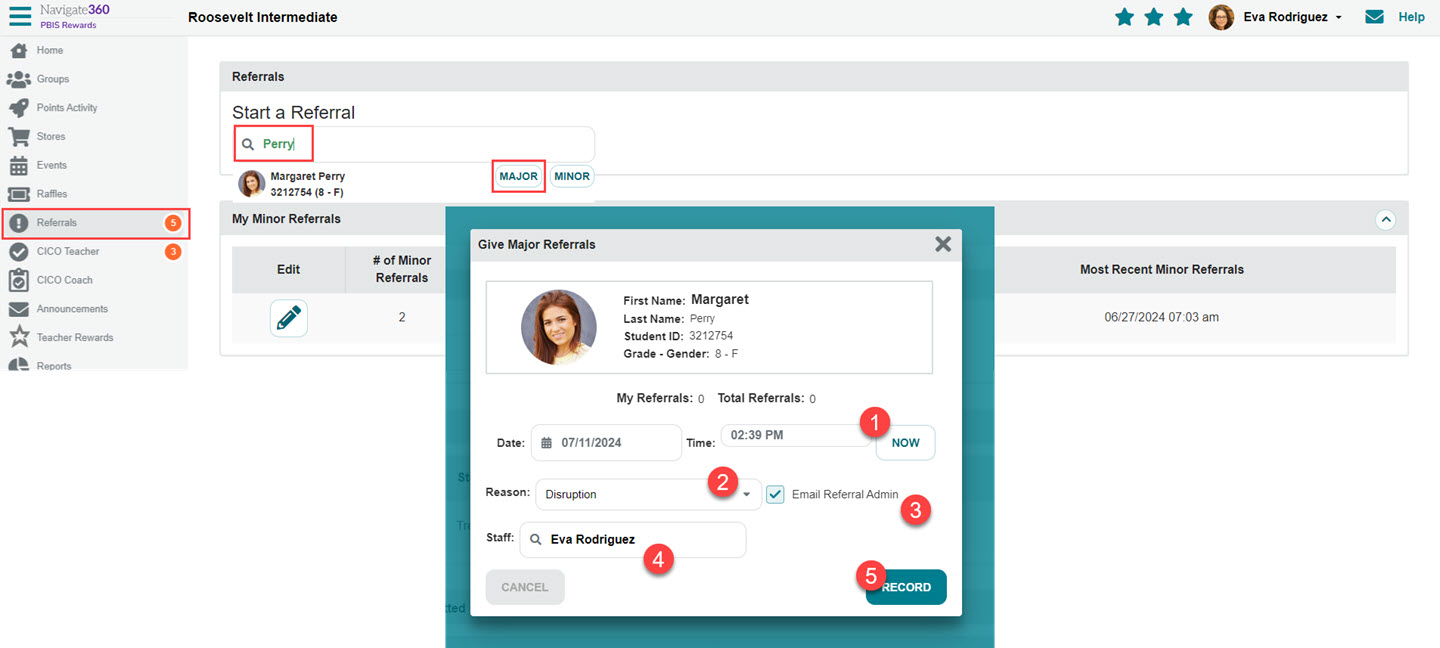
In the web portal, click on Referrals in the left-side menu, then search for the student. Select Major next to the student’s name. A pop-up will appear for some initial requests for information.
- Select the time. Clicking Now will fill in the current time.
- Select the reason for the referral.
- Determine if an email will be sent to referral admins with the checkbox next to the reason. It is checked by default.
- The logged-in user’s name will be pre-filled in the Staff box, but another staff member’s name may be used, if appropriate.
- Select the “Record” button to start the referral.
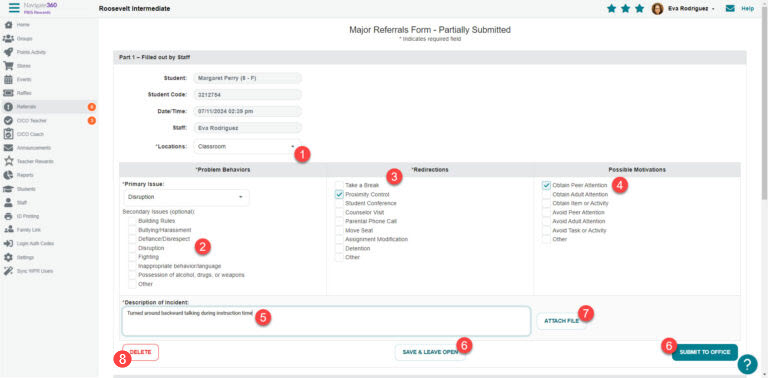
Once the “Record” button is selected, the major referral form will appear and requires the following information:
- Places: The location where the incident took place.
- Secondary Issues: Any additional problem behaviors that may have occurred (not required).
- Redirections: Select the redirections that were taken.
- Possible motivations: Select applicable for the incident (not required).
- Description of Incident: Give a description.
- Select the “Submit” button when complete to send the referral to the office for further action. You can also use the “Save & Leave Open” button to keep it open if you need to come back to the referral in order to complete later.
- In the Web Portal, the “Attach File” button allows you to attach documents or images.
- Delete – Deleted referrals cannot be recovered. Select “DELETE” then type delete in lower case when prompted. Select “DELETE” to complete the deletion.
Required fields are marked with asterisks (*). The referral cannot be submitted to the office until all required fields have been filled out.
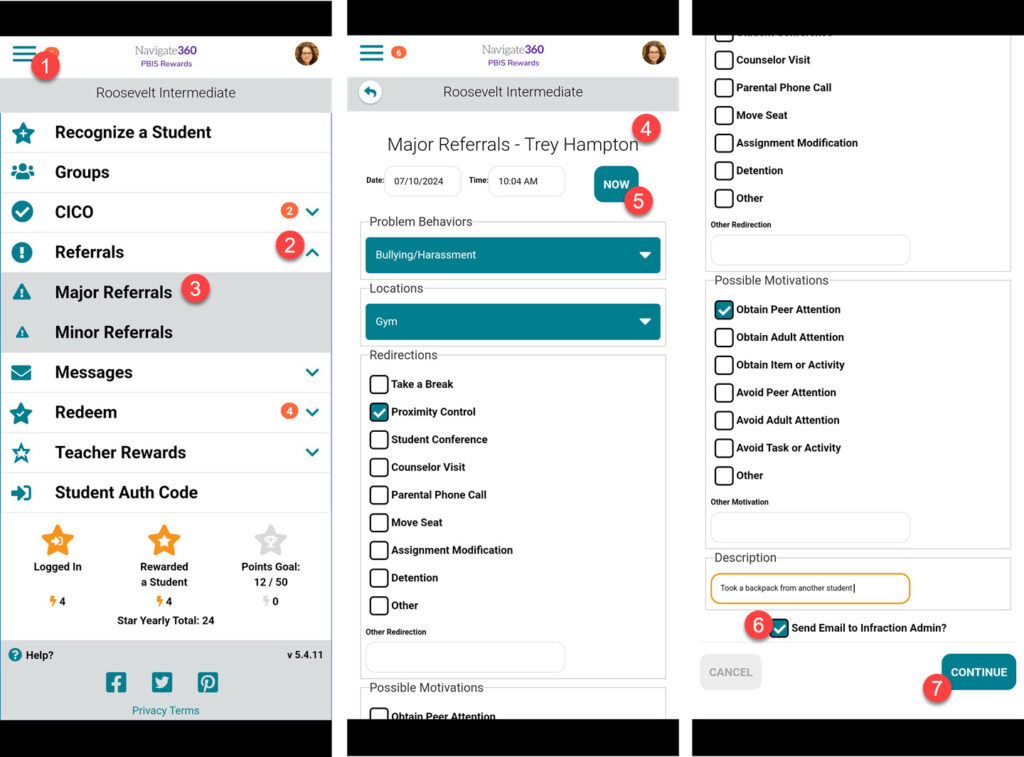
Staff Mobile App
- From the home screen select the three horizontal lines in the top left corner to get to the Main Menu.
- On the Main Menu expand the “Referrals” tab to reveal “Majors” and “Minors.”
- Select the “Majors” option.
- Search for a student by typing the first few letters of his or her name and selecting “Search.” Select the correct student and the referral form will open up.
- Select a time and date, or click “Now” to record the current time and date.
- Complete all fields and the description, leave the check box selected if you would like to email the referral admin.
- Select the “Continue” button to save the referral to complete later or “Submit to Office.”
Referral Form: Part 2 and Completed
Complete a major referral on the Web Portal – Admin
Referral Admins will fill out Part 2 of the referral form. Referral Admins are those who manage referrals that come to the office.
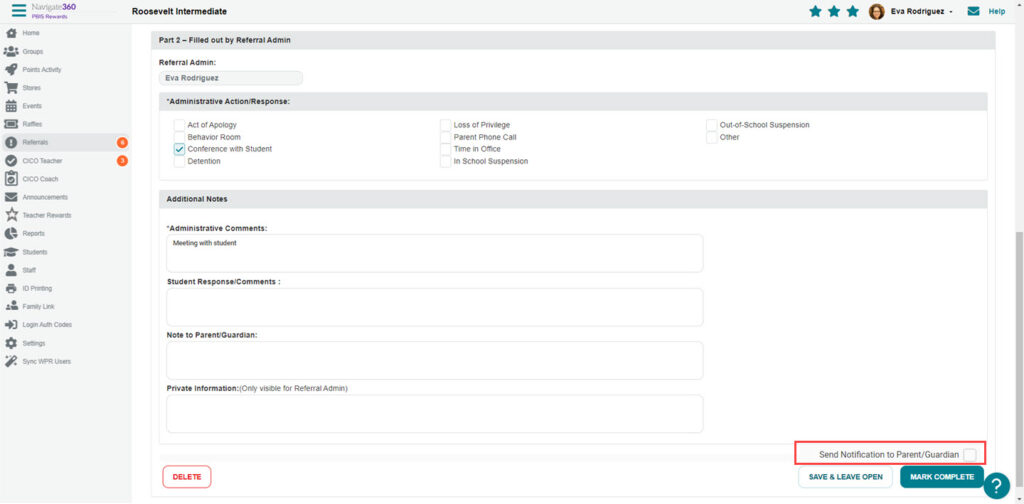
Required fields are marked with asterisks. The referral cannot be marked as complete until all required fields have been filled out.
Once all of the fields have been completed, you will have the option to send a notification to the parent/guardian via the family app before you select the “Mark Complete” button by selecting the Send Notification to Parent/Guardian checkbox.
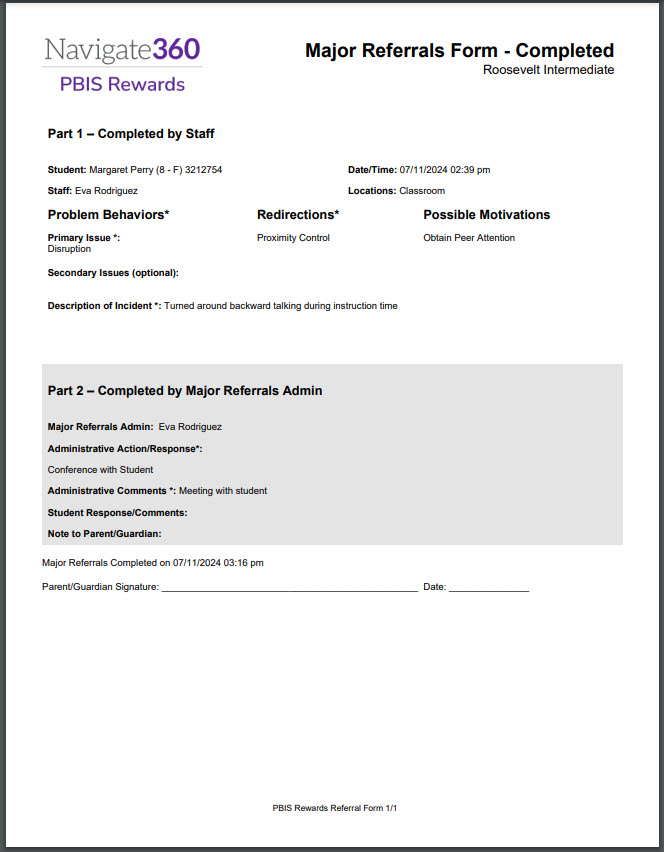
Once the office has processed the referral, it will automatically move to the “Completed” part of the referral screen, at the bottom. The referring staff on the original submission of Part 1 will be able to see the final report in all circumstances. When you select the option to generate the completed PDF, you can include lines for a Signature and Date. If you are a Referral Admin you will be given the option of including a Private Message.
Example Referral Form: Completed PDF
Creating a Minor Referral
Create a Minor Referral in the Web Portal or on the Mobile App (Staff App)
Web Portal
Choose “Referrals” from the Main Menu, search for a student. The buttons “Major” and “Minor” are next to the student’s name. Select the “Minor” button.
Select the green + button to add a new minor for that student. Enter the time/date, location, and problem behavior. If you’d like, include redirections, possible motivations, and a description of the incident. Then click “Save”.
- Edit one of the “Minor Referrals” by using the pencil icon. (The staff member who created the minor referral can also delete it by clicking on the pencil icon.)
- Use the green “+ New ” button to create a new minor.
- Use the selection boxes to roll selected minors to a major or to print selected referrals.
- You can submit minors as a major using the “Submit Selected” button. Once a student has accumulated enough minors to warrant a major, use the checkboxes to select the specific minors, then choose the “Submit Selected” button to roll all selected minors into a major. You will not be able to edit minors after this point. This will move the selected minors into a major referral located in Part 2: Submitted to Office section.
- Press the “Print Selected” button to print the selected minors.
- Choose the “Archived” but to see the archived minors. The options for how to archive minors are in the ARS Customization article.

Things to note:
- Only one set of minor referrals will be collected on each student.
- The staff member who submits the repeated minor referrals as a major to the office will have that referral data associated with them.
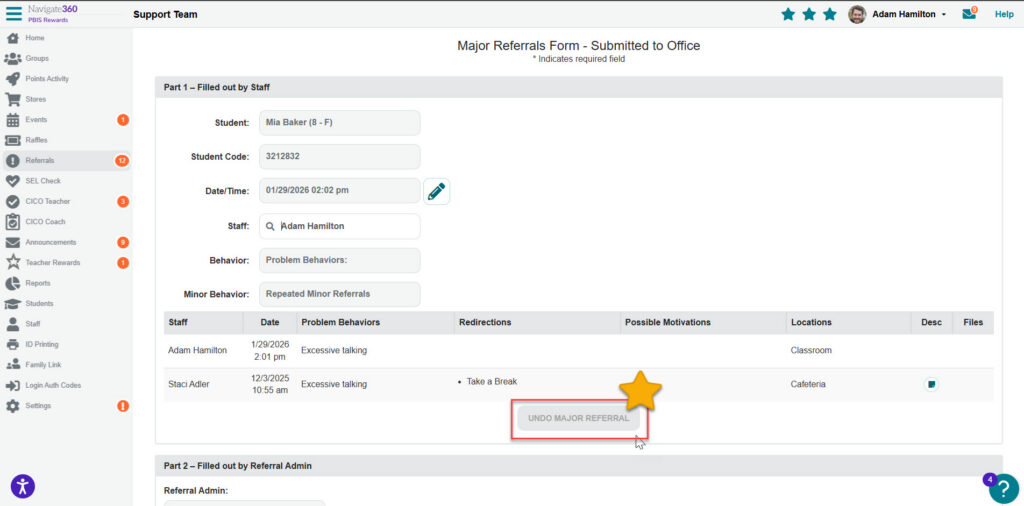
Once the minor has been submitted as a major, a referral admin can undo the action, if necessary. The minor referrals will be moved back into the list of minor referrals displayed for the student.
Mobile App (Staff App)
- Choose the three lines in the top left-hand corner to reach the “Main Menu”
- Expand the “Referrals” tab and select “Minor Referrals”
- Search for the student and choose the appropriate student from the list.
- Enter time/date, select a “Minor Problem Behavior” and add the Location. If you’d like, include redirections, possible motivations, and a description of the incident, but these items are not required.