PowerSchool Write Back Integration for Visitor Management
Learn how to effectively implement PowerSchool Write Back integration for streamlined data management in your VM environment.
- Emergency Management
- Campus360
- Connect360
- PBIS Rewards
- Hall Pass
- Preparation & Response Training
- Behavioral Case Manager
- Visitor Management
-
Compass Curriculum
Training Workshops Getting Started On-Demand Release Notes & Updates Data & User Management Compass Curriculum for Students, Staff, & Families Compass Behavior Intervention Compass Mental Health + Prevention Compass for Florida - Character Ed, Resiliency, & Prevention Compass for Texas - Character Ed Analytics & Reporting Additional Resources
- School Check In
- ALICE Training Institute
- Digital Threat Detection
- Anonymous Tip Reporting
- Resources
- Back-to-School
This guide walks you through the complete integration process between Visitor Management (VM) and PowerSchool. You’ll learn how to prepare your SIS data, install the PowerSchool plug-in, establish the connection in Visitor Management, and troubleshoot common platform errors as transactions sync. Follow each tab in order for a smooth and successful setup.
Prepare Your SIS Data
PowerSchool Setup - SIS Sync Setup for PowerSchool Writebacks
To ensure Visitor Management has the correct students IDs for PowerSchool Writebacks, please follow the guidelines below when setting up your Clever or ClassLink SIS connections.
Note: The PowerSchool Writeback functionality requires a paid subscription. To learn more about this functionality, please reach out to your Navigate360 Account Manager.
How it Works:
When a Late Check-in or Early Check-out has been completed for a student, Visitor Management creates an Attendance Record to write back to PowerSchool. Visitor Management then sends the record to PowerSchool for the student's profile to be updated accordingly. In order for the attendance record to be applied to the intended student's profile, PowerSchool requires a specific ID from the STUDENTS Table to be included in the record.
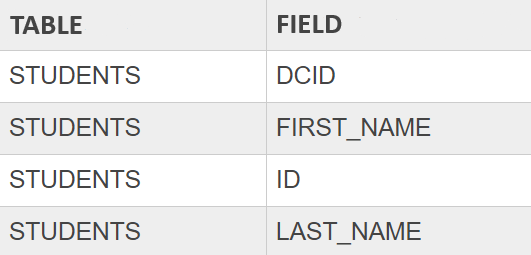
By default, Visitor Management attempts to use a student's DCID (located on the STUDENTS table in PowerSchool) to acquire their unique ID from PowerSchool's API. This ID is then added to the Attendance Record to ensure a successful writeback. Because of this, it is important that student DCIDs are mapped to specific fields in Clever or ClassLink when sharing student data with Visitor Management.
Student DCID Mapping:
Clever
When setting up a SIS connection from PowerSchool to Clever, please ensure that the Student DCID field in PowerSchool is mapped to the Student ID field in Clever.
This will ensure that Visitor Management uses the correct ID number to obtain a student's unique ID from PowerSchool, when performing a PowerSchool Writeback.
If the school/district uses another Student ID/Number to identify students such as searching for their Profile, ID cards, Barcode/RFID scanning, etc., the Preferred Student ID that is used in PowerSchool should be mapped to the Student Number field in Clever.

Note: A District Admin can then log into Visitor Management and follow the below steps to have the preferred Student ID displayed/used for Student Profiles on the platform:
- Navigate to the Admin → PowerSchool Setup page
- On the Settings tab, set the Visible Student ID option to: Student Number
- Click Save and Apply to All Schools
If for any reason the DCID field cannot be mapped into Clever and shared with Visitor Management:
The ID field from PowerSchool's STUDENTS table should be mapped in it's place and a Configuration Request will need to be submitted to our Product Team.
ClassLink
When setting up a SIS connection from PowerSchool to ClassLink, please ensure that the Student DCID field in PowerSchool is mapped to the Sourced ID field in ClassLink.
This will ensure that Visitor Management uses the correct ID number to obtain a student's unique ID from PowerSchool, when performing a PowerSchool Writeback.
If the school/district uses another Student ID/Number to identify students such as searching for their Profile, ID cards, Barcode/RFID scanning, etc., the Preferred Student ID that is used in PowerSchool should be mapped to the Identifier field in ClassLink.

Note: The Student ID/Number that is mapped to the Identifier field in ClassLink will automatically be displayed/used for Student Profiles in Visitor Management.
If for any reason the DCID field cannot be mapped into ClassLink and shared with Visitor Management:
The ID field from PowerSchool's STUDENTS table should be mapped in it's place and a Configuration Request will need to be submitted to our Product Team.
Install the PowerSchool Plug-In
PowerSchool - Navigate360 Attendance Access Plugin Install
Follow the steps outlined in this installation guide to enable PowerSchool Writeback functionality in Visitor Management
Note: PowerSchool Writeback functionality and the Navigate360 Attendance Access Plugin requires a paid subscription. To learn more about this functionality and/or receive your Attendance Access Plugin download, please reach out to your Navigate360 Customer Experience Consultant.
Installing the Navigate360 Plugin in PowerSchool:
- Log into your PowerSchool Admin Portal.
- Confirm that the District Office is selected in the top right corner.
- Click System Management on the left navigation menu.
- Click Server → Plugin Configuration.
- Click on Install and use the Choose File option to select the plugin.xml file that was provided to you. Then click Install.
- A success message will appear and the Navigate360 Attendance Access Plugin should now be listed under your Installed Plugins.
- Enable the plugin by clicking on the Enable/Disable checkbox and click Enable on the popup window.
- Confirm that the checkbox is now selected and showing as enabled.
Finding your PowerSchool Client ID and Client Secret:
Congratulations! You have successfully installed the Navigate360 Attendance Access Plugin within your PowerSchool instance. For more information on completing the setup in Visitor Management, please see our guide that covers the PowerSchool Setup page here.
Build the VM Connection
PowerSchool Setup
Note: PowerSchool Writeback functionality and the Navigate360 Attendance Access Plugin requires a paid subscription. To learn more about this functionality and/or receive your Attendance Access Plugin download, please reach out to your Navigate360 Account Manager.
Functionality Overview
Visitor Management's PowerSchool Writeback functionality enables each school to transfer Student Check-in and Check-out events back to their PowerSchool instance. Once configured and enabled, any time a student event occurs in Visitor Management (VM), the event is instantly transferred to PowerSchool without any additional work needed from the school.
PowerSchool Setup Page
The PowerSchool Setup page allows Admin Users to form the connection between VM and PowerSchool, enable the functionality for all or individual schools in the district, and monitor the status of student events being transferred to PowerSchool.
Admin Users can access the PowerSchool Setup page by following the steps below:
- Log into Visitor Management as a District Admin or Building Admin
- Navigate to the Admin Settings by clicking the key icon on the side navigation menu
- Select the PowerSchool Setup tab under General Settings
Configuring Writebacks & Viewing Logs
The PowerSchool Setup page is split into the below three tabs. To learn how each tab is used to configure and monitor the PowerSchool Writeback functionality in Visitor Management, see below:
Settings
After installing the Navigate360 Attendance Access Plugin in your PowerSchool instance, District Admins can follow the below steps to connect VM to their district's PowerSchool instance before continuing to the School Building Setup tab:
- Enter the PowerSchool URL for the school district.
- This should match the base URL used to log into the PowerSchool Admin Portal.
- Please exclude any trailing forward-slashes from the end the URL.
- Example:
- Correct: "https://sample-district.powerschool.com"
- Incorrect: "https://sample-district.powerschool.com/"
- Incorrect: "https://sample-district.powerschool.com/admin"
- Enter the Client ID and Client Secret.
- These details can be found by opening the Navigate360 Attendance Access Plugin in PowerSchool and viewing the Data Provider Configuration section.
- Set the Visible Student ID that you would like to be displayed in Visitor Management:
- SIS ID
-
Student Number
- Note: This is a cosmetic setting for customers that are syncing their SIS data into Visitor Management via Clever. Allowing the preferred Student ID to be used for searching, scanning, etc.
- For more information on setting up the SIS Sync for PowerSchool Writebacks, click here.
- Click Save and Apply to All Schools.
Once the above settings have been saved, District Admins and Building Admins will have access to the School Building Setup and Writeback Logs tabs.
School Building Setup
The School Building Setup tab allows District Admins and Building Admins to quickly select the needed Attendance Mode for individual schools. As well as disable the writeback functionality for any schools that don't want to utilize this feature.
- District Admins will see a list of all schools from their district that have been added to VM and have the ability to view/edit the writeback settings for each school.
- Building Admins will only be able to view/edit the writeback settings for the school(s) assigned to them, based on the permissions applied to their User Profile.
Admins will be able to apply the below writeback settings for each school listed on the page:
- Status - (enabled by default)
- When enabled:
- An Attendance Mode must be selected in order to save the writeback settings.
- VM will attempt to transfer all Student Late Check-ins and Early Check-outs back to this school's PowerSchool instance.
- The school's PowerSchool Attendance Codes will need to be imported and mapped as Late Check-in and/or Early Check-out Reasons on the Student Tracking page.
- For more information on importing your PowerSchool Attendance Codes, click here.
- When disabled:
- VM will not attempt to transfer Student Late Check-ins and Early Check-outs back to this school's PowerSchool instance.
- The school will have access to VM's default Late Check-in and Early Check-out Reasons, as well as the ability to add Custom Reasons on the Student Tracking page.
- For more information on the Late Check-in and Early Check-out Reasons, click here.
- Users will need to manually enter any Student Late Check-ins and Early Check-outs in the school's PowerSchool instance.
- When enabled:
- Attendance Mode
- Daily
- Time
-
Meeting
- Note: The Attendance Mode selected on this page must match the Attendance Mode selected in the school's PowerSchool instance.
- Note: Each school in the district can select a different Attendance Mode, but only one Attendance Mode can be selected per school.
Admins can click the Save button to apply all updated writeback settings for the list of schools.
Prevent School Overrides
If all schools need to be enabled and have the Attendance mode set by the District Admin only, then the Prevent School Overrides setting needs to be toggled on. If individual schools either need to opt out or set their own Attendance mode, then the Prevent School Overrides setting needs to be toggled off. Toggling this setting off allows Building Admins to opt out the needed school building or set the needed Attendance mode specific to their building.
Writeback Logs
The Writeback Logs tab allows District Admins and Building Admins to quickly view the status of all Student Events that VM has attempted to transfer back to their PowerSchool instance.
Admins will see the logs listed in the Writeback Events table, with the below values for each event:
-
Type
- Late Check-in
- Early Check-out
-
Student Name
- Name of the student that was checked in or out.
-
Student PS ID
- The student's unique ID number returned from PowerSchool's STUDENTS table.
-
Date/Time
- The date and time that the event occurred in VM
- VM is set to instantly transfer Student Events immediately after the Check-in and Check-out process.
- The date and time that the event occurred in VM
-
Grade
- Grade of the student that was checked in or out.
-
Reason
- The Reason/Attendance Code that was selected during the Check-in or Check-out process.
-
Status
- Successful
- Failed
Admins will be able to filter the list of events using the below filters:
-
Status
- All
- Successful
- Failed
- Student Name Search
-
Building
- User will only see the buildings that they have access to.
- Date Range
When reviewing a failed Writeback Event, Admins can click on the ∨ (chevron) in the Status column to view the error message that was received from PowerSchool. For assistance troubleshooting common error messages, click here.
Troubleshoot VM Transaction Errors
Common PowerSchool Writeback Errors
Note: PowerSchool Writeback functionality and the Navigate360 Attendance Access Plugin requires a paid subscription. To learn more about this functionality and/or receive your Attendance Access Plugin download, please reach out to your Navigate360 Account Manager.
Visitor Management's PowerSchool Setup page allows Admin users to quickly monitor the status of individual writeback events via the Writeback Logs tab, and view related error messages for any failed writeback attempts. For assistance troubleshooting these errors, please see below for a list of common error messages, what they mean, and how to resolve them.
Plain-text Error Messages:
Certain error messages returned by PowerSchool are delivered in a plain-text format, making them easier to read. However, they can still be difficult to troubleshoot without context. See below for examples of the common plain-text errors received from PowerSchool.
Could not find student's period.
Meaning:
Visitor Management is trying to write back an attendance record for a time that PowerSchool doesn't recognize as a scheduled period for the student.
When the PowerSchool Writeback functionality is enabled, Visitor Management will immediately attempt to post an Attendance Record to the connected PowerSchool instance for the exact time that the student was checked in late or out early.
Possible Causes:
- The student was checked in or out at a time that they do not have an active class or period in PowerSchool.
- The SIS sync may be sending incorrect student IDs to Visitor Management, causing the system to attempt a writeback for the wrong student.
How to Resolve:
- Confirm that the student had an active class/period during the time of the check-in/out.
- Verify that the correct student IDs are being shared between your SIS and Visitor Management. Click here for more information.
Could not find student's PowerSchool id.
Meaning:
PowerSchool could not locate a valid ID when attempting to convert the student's DCID.
By default, the PowerSchool Writeback functionality expects that student DCIDs are being shared with Visitor Management. When attempting to perform a Writeback, the DCID is sent to PowerSchool to be converted into the student's unique ID. Which is then used to create the new Attendance Record.
Possible Cause:
- The SIS sync may be sending incorrect student IDs to Visitor Management, causing the system to attempt a writeback for the wrong student.
How to Resolve:
- Verify that the correct student IDs are being shared between your SIS and Visitor Management. Click here for more information.
Technical Error Messages:
Certain error messages returned by PowerSchool are delivered in a more technical, raw format. The most important information for troubleshooting these errors are the Error Code, Error Message, and Error Details (if included). See below for an example of this error format and some of the common technical errors received from PowerSchool.
- Client error: `POST https://example.powerschool.com/exampleURL` resulted in a `example error code` response: {"message":"example error message","errors":[{example error details (truncated...)
Message: "Record Not Saved. : [Number] doesn't match the term's year value: [Number]."
Meaning:
Visitor Management is attempting to post an Attendance Record to PowerSchool using an outdated Attendance Code.
In PowerSchool, every Attendance Code is assigned a “year ID” that links it to a specific school year/term. This ID ensures that attendance records are properly categorized and reported within the relevant academic year.
Cause:
- Visitor Management has not been updated with the latest Attendance Codes for the current school year.
How to Resolve:
- Go to Admin → Student Tracking in Visitor Management and import the latest Attendance Codes from PowerSchool. Click here for more information.
Message: "Record Not Saved. : The student [Student Name] isn't enrolled on [Date]."
Meaning:
Visitor Management is attempting to post an Attendance Record for a student who is not enrolled in PowerSchool on the date of check-in or check-out.
Possible Causes:
- The SIS sync may be sending incorrect student IDs to Visitor Management, causing the system to attempt a writeback for the wrong student.
- The student’s enrollment dates may not cover the check-in/out date.
How to Resolve:
- Verify that the correct student IDs are being shared between your SIS and Visitor Management. Click here for more information.
- Confirm the student’s enrollment status in PowerSchool for the relevant date.
Error: "You have ATT_Mode[Meeting/Daily/Time] set as the method to use..."
Meaning:
The Attendance Mode setting in Visitor Management does not match the Attendance Mode configured in PowerSchool for this school.
Cause:
- A mismatch between the Attendance Mode in the two systems.
How to Resolve:
- Go to Admin → PowerSchool Setup in Visitor Management and update the Attendance Mode setting for the building to match the attendance settings configured in PowerSchool. Click here for more information.
Error Code: `401 Unauthorized` response
Meaning:
Visitor Management’s connection to PowerSchool has been denied.
Possible Causes:
- The Navigate360 Attendance Access Plugin may not be enabled/configured properly in PowerSchool.
- The PowerSchool URL, Client ID, or Client Secret may be saved incorrectly in Visitor Management.
How to Resolve:
- Ensure the Navigate360 Attendance Access Plugin is installed and enabled in PowerSchool.
- If using PowerSchool SIS version 25.2.0.0 or later, ensure that Full Access is selected under the Data Provider Configuration settings of the plugin.
- Go to Admin → PowerSchool Setup in Visitor Management and verify that the correct PowerSchool URL, Client ID, and Client Secret are saved. Click here for more information.
If you continue to receive errors after making any corrections or need help troubleshooting an error that isn't listed above, please contact Navigate360 Support for further assistance.