Managing an Emergency Using the EM Mobile App
Learn how school staff can quickly and effectively manage an emergency using the EM app.
- Emergency Management
- Connect360
- PBIS Rewards
- Hall Pass
- Preparation & Response Training
- Behavioral Case Manager
- Visitor Management
-
Compass
Getting Started Webinar Links Data & User Management Compass Curriculum for Students, Staff, & Families Compass Behavior Intervention Compass Mental Health + Prevention Compass for Florida - Character Ed, Resiliency, & Prevention Compass for Texas - Character Ed Analytics & Reporting Release Notes & Updates Additional Resources
- School Check In
- ALICE Training Institute
- Detect
- Anonymous Tip Reporting
- Resources
- Back-to-School
Home Screen
The Home screen of the EM app will change depending on the alarm status at the building(s) for which you are added as a user:
When there are no active alarms (emergency, drill or training) across any of the buildings you have access to, you will see a grey banner at the top of the screen stating there are no active alarms. Towards the bottom of the screen you will see the Slide to activate alarm slider, which is in place should you need to promptly activate an alarm in any mode (emergency, drill or training.)
|
NO Active Alarms (No Emergency, Drill or Training alarm active at any of the building(s) you have access to) |
 |
When there is at least one building with an active alarm (emergency, drill or training), you will see a notification at the top of the Home screen with the count of alarms as well as a navigation button to view more details in Rapid Alarm. The Slide to Start Emergency slider may or may not be enabled on the home screen depending on what mode (emergency, drill or training) of alarms are active in each building.
Note that an emergency mode alarm can be activated during a drill or training alarm, which will automatically end the drill or training alarm. Staff should not activate an emergency alarm during an active drill or training unless an actual emergency occurs. Drill or training alarms cannot be activated while an emergency alarm is active for a building.
|
Active Alarm(s) Activate Alarm Slider still enabled due to some buildings not having an active alarm at that time, and/or some or all active alarms being a drill or training, which still allows you to activate an emergency alarm should an incident occur |
Active Alarm(s) Activate Alarm Slider disabled due to your building(s) already having an active emergency alarm at that time, which will not allow you to activate a new alarm in any mode until the initial emergency alarm is ended |
 |
 |
Navigating the App
You can navigate anywhere on the app at any point by using the navigation icon (3 lines) at the top right corner of the screen. By tapping on this icon, a menu will open on the left side of the screen with navigation options, including the ability to:
- Navigate to the Home Screen
- Navigate to view Flipcharts
- Navigate to Rapid Alarm
- Navigate to view/update Site Settings
- Navigate to view/update User Account Settings (accessed by clicking on your name)
- Log Out of the app
Users with access to multiple locations will also see:
- Switch District (for users with access to more than one district)
*NEW: As of March 2025, users will no longer have to select to view one site at a time. The EM mobile application will automatically display alarm information across all building(s) each user has access to.
|
Accessing the navigation menu (Tap on the 3 Lines) |
Navigation Menu |
 |
 |
Activating an Alarm
Alarm Modes:
Any alarm mode can be activated from the slider on home screen and/or Rapid Alarm.
- Emergency Alarm: Used for actual emergencies. This mode will send notifications immediately to staff.
- Drill Alarm: Used for executing drills. This mode will send notifications immediately to staff that include indication that the alarm is a drill.
- Training Alarm: Used for training new staff and EMS users. It does NOT send notifications.
To activate an alarm, navigate to either the Home screen or Rapid Alarm.
From the Home screen, press and slide the slider (Slide to activate alarm) to the right of the screen. This will initiate the process of activating an alarm*:
*The steps of activating an alarm may vary depending on site access and alarm type settings
- First, select an Alarm Mode (Emergency, Drill or Training)
- Next, select an Alarm Type
- Next, select Sites to Notify* (Only users who are associated to more than one building will see this step, as it allows for activating an alarm in multiple buildings at once)
- Note that some buildings may already have an active alarm, which will be indicated on this screen:
- Any building that already has an active emergency alarm will be disabled from being selected and will say Emergency alarm active below the building name.
- Any building with either a drill or training alarm can still be selected if you are attempting to activate an emergency alarm, and will say Will end [DRILL/TRAINING] alarm in progress below the building name.
- Any building with either a drill or training alarm will be disabled from being selected if you are attempting to activate another drill or training alarm, and will say [DRILL/TRAINING] alarm in progress below the building name.
- Note that some buildings may already have an active alarm, which will be indicated on this screen:
- Next, you will see a 5 Second Countdown with ability to override and activate alarm (The countdown will only shown if a custom alarm type with a countdown applied is being activated)
- Lastly, you will receive the alarm activation confirmation (At this point the alarm is activated. If you've activated an alarm for more than one building, you will be navigated to Rapid Alarm with the list view of alarms. If you've activated an alarm in one building, you will be navigated directly into the details for this alarm.)
Example: Currently no active alarms, Activating an emergency alarm for more than one building from the Home screen:

From Rapid Alarm, press the Activate alarm button near the bottom of the screen. This will initiate the same process of activating an alarm as from the Home screen*:
*The steps of activating an alarm may vary depending on site access and alarm type settings
- First, select an Alarm Mode (Emergency, Drill or Training)
- Next, select an Alarm Type
- Next, select Sites to Notify* (Only users who are associated to more than one building will see this step, as it allows for activating an alarm in multiple buildings at once)
- Note that some buildings may already have an active alarm, which will be indicated on this screen:
- Any building that already has an active emergency alarm will be disabled from being selected and will say Emergency alarm active below the building name.
- Any building with either a drill or training alarm can still be selected if you are attempting to activate an emergency alarm, and will say Will end [DRILL/TRAINING] alarm in progress below the building name.
- Any building with either a drill or training alarm will be disabled from being selected if you are attempting to activate another drill or training alarm, and will say [DRILL/TRAINING] alarm in progress below the building name.
- Note that some buildings may already have an active alarm, which will be indicated on this screen:
- Next, you will see a 5 Second Countdown with ability to override and activate alarm (The countdown will only shown if a custom alarm type with a countdown applied is being activated)
- Lastly, you will receive the alarm activation confirmation (At this point the alarm is activated. If you've activated an alarm for more than one building, you will be navigated to Rapid Alarm with the list view of alarms. If you've activated an alarm in one building, you will be navigated directly into the details for this alarm.)
Example: Currently 2 active alarms, Activating an emergency alarm for more than one building from Rapid Alarm:

Adjusting alarm activation settings and cancelling alarm
Depending on what step you are in the alarm activation process, you can cancel or go back at any point before activating:

Anyone may activate an emergency alarm. After the alarm has started, only administrators can end the alarm.
Alarm Notifications
-
Emergency Alarm
- Used for actual emergencies
- This mode will send notifications immediately to staff
-
Drill:
- Used for drills
- Drill mode will send notifications immediately to staff that include indication that the alarm is a drill
-
Training:
- Used for training new staff and EM users
- Training mode does NOT send notifications to anyone
Depending on your device/alarm type settings, you will receive an audible sound and a push notification on your device once an actual alarm or drill alarm has been activated for the building you are associated with. This may mean you will receive multiple push notifications if an alarm is activated in more than one building that you are associated to.
For more information on audible alerts and sound settings, please reference these articles: EMS Respond Sound Override Guide for Android and EMS Respond Sound Override Guide for iOS
If you’ve selected to receive alerts via SMS and/or email via your user settings in the web/desktop version of EMS, you will also receive these once an actual or drill alarm is activated for your building.
Accounting for Yourself and Others During an Alarm
Roll Call is the name of the workflow that allows you to account for students, staff and visitors* during an alarm.
*Roll Call accountability for visitors requires an add-on subscription to Navigate360's Visitor Management Solution. Please contact your Customer Experience Consultant if you are interested.
Accounting for Yourself
All users will be prompted to select their status when they attempt to access Roll Call. They can also choose to skip and update their status at a later time. This status will be displayed above the alarm details on the home screen and can be updated as the alarm progresses by tapping Change Status.
Status options are:
- I am safe
- I need assistance (with option to provide a note)
- I am not on campus
Example: Staff member (Non-administrator role) being prompted to select their Roll Call status when attempting to go into Roll Call:

Example: Administrator being prompted to select their Roll Call status when attempting to go into Roll Call:

Accounting for Others
During an alarm, staff can use the Roll Call feature to update the status of students, staff and visitors*. There may be some alarm types that do not automatically include a Roll Call. In this case, only an administrator can activate a Roll Call once the alarm is underway.
*Building visitor list and ability to update their status during an alarm will only be available in EMS if Navigate360's Visitor Management Solution is adopted.
Roll Call in EM Mobile Application
- Open the app or navigate to the home screen to view the active alarm details
- If a Roll Call is a part of the alarm protocol, you will be able to tap on Go to Roll Call near the bottom of the screen (Staff view) or from the Alarm details view (Administrator view)
- You will then be prompted to update your own status if you haven't done so already (You can update your status throughout the alarm.)
You will then be able to begin accounting with views of My Classes, Students, Staff, or Visitors*
Status options for Students, Staff and Visitors are:
- Accounted for (This person is safe and can be physically accounted for)
- Needs Assistance (This person can be physically accounted for but needs assistance due to an injury, disability or some other reason)
- Not on Campus (This person was not on campus during the alarm and cannot be physically accounted for)
- Exception - with a prompt to leave a note/explanation (This person may have been transferred to receive care, there has been a fatality, or some other reason that can does not fit any of the other status options)
- Transfer to Reunify
Transfer to Reunify - This additional status is available only for Students. Reunification must be active in the alarm to use this status.
Transfer to Reunify does not overwrite the student's initial check in status, but allows for an additional step between Roll Call and Reunification to be documented. For example, if a student has been accounted for by staff during the alarm and they are now being loaded onto a bus to the Reunification site, a staff member can also mark the student Transfer to Reunify in Roll Call.
This feature helps administrators to know which students have departed the rally point(s) and are en route to Reunification, and assists staff at the Reunification site to have a list of those students to help expedite the Check In to the location.
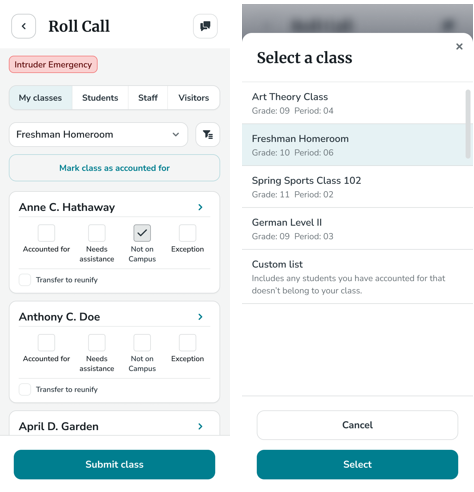
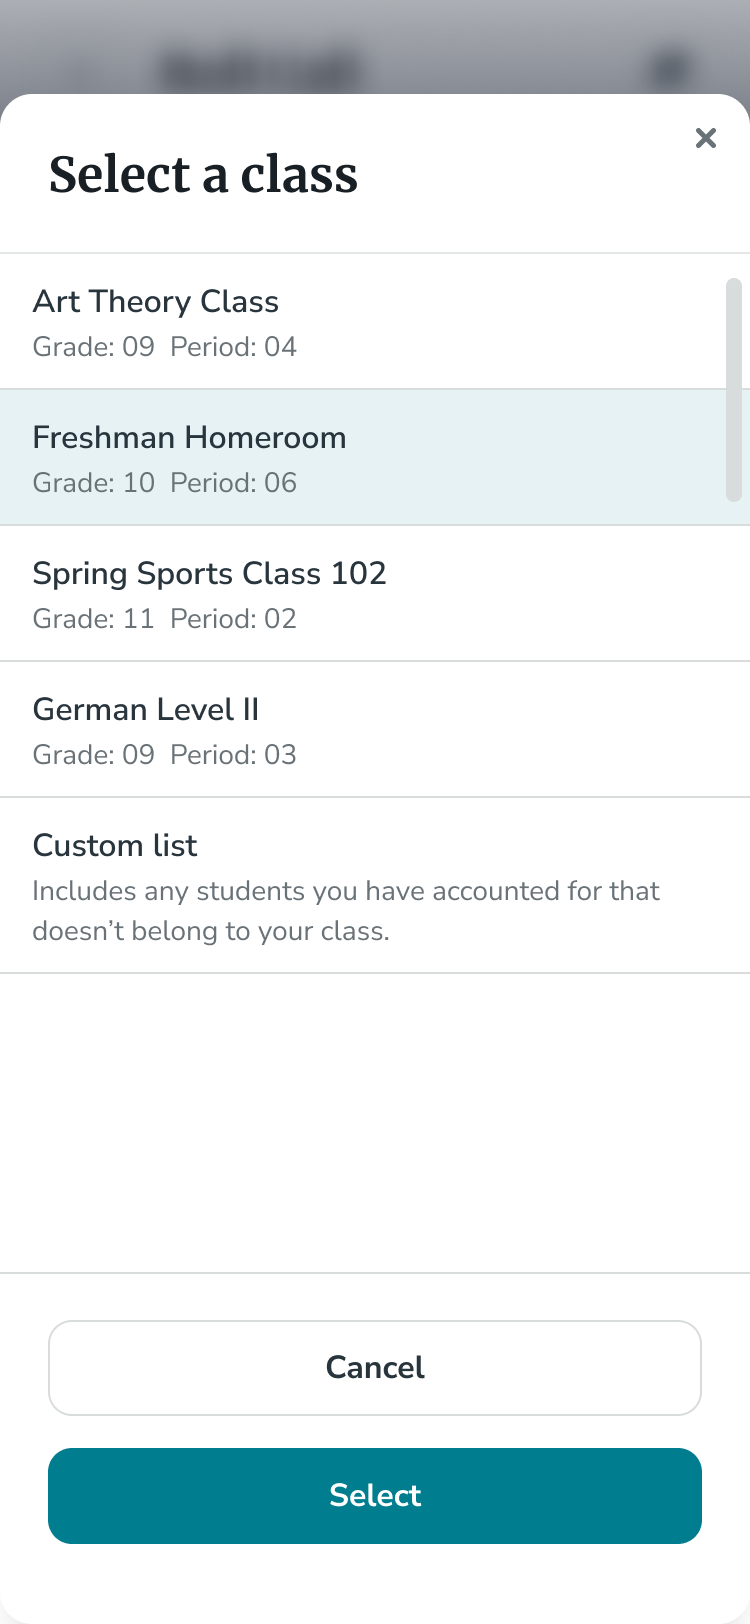
My Classes View
- Here you will see a list of your classes (for teachers) or all classes for the building (for administrators)
- To change between classes, tap on the dropdown and select the appropriate class, then tap Select
Class information (including class name and student lists) are provided by synced data from your district SIS
- Once a class is selected, you will then be able to Tap the Appropriate Status for each student within that class
- If this setting is configured by your administrator, you can also tap Mark class as accounted for to mark all students in the class with the Accounted for status
- To submit that class for your administrator's reporting purposes, tap the Submit Class option
- You can resubmit each class as many times as necessary, especially if student statuses are updated after the class was originally submitted
If you need to account for students that are not part of your roster, click the Students tab*. Then, search for the student and Tap the Appropriate Status. Once you've accounted for the additional students, they will show as Custom List under My Classes so that you can easily update their status during the alarm, if needed, and Submit the Roster.
Note: Custom List is only valid during the active alarm. If there is a need for a permanent list of students, please contact your SIS administrator to review sync options.
*Enhancements coming March 2025 to expedite the process for finding another teachers class during Roll Call
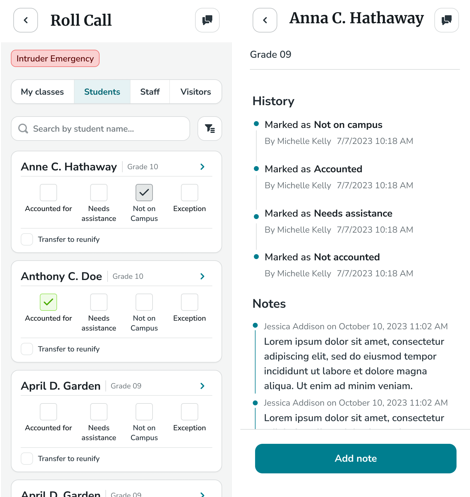
Students View
- Here you will see an entire list of all students associated with the site(s)/building(s) involved in the alarm; and you can update any student's status throughout the alarm
- You can tap on any student's name to view the history & notes left during Roll Call
- To leave a new note, tap Add note
- To go back to the main student list, tap the chevron arrow at the top left corner
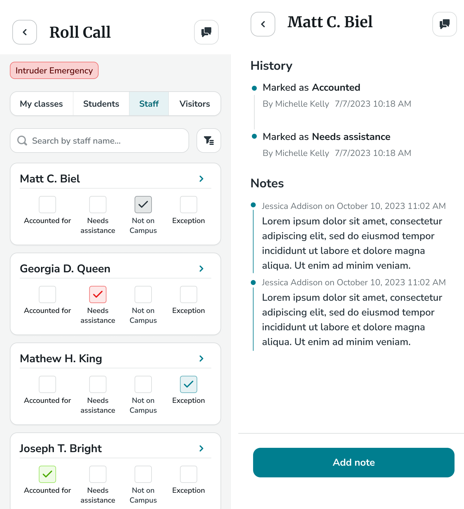
Staff View
- Here you will see an entire list of all staff associated with the site(s)/building(s) involved in the alarm; and you can update any staff member's status throughout the alarm
- You can tap on any staff member's name to view the history & notes left during Roll Call
- To leave a new note, tap Add note
- To go back to the main student list, tap the chevron arrow at the top left corner
Visitors* View
- The Visitors* tab uses the same process to update a status for a visitor or staff member.
*Roll Call accountability for visitors requires an add-on subscription to Navigate360's Visitor Management Solution. Please contact your Customer Experience Consultant if you are interested.
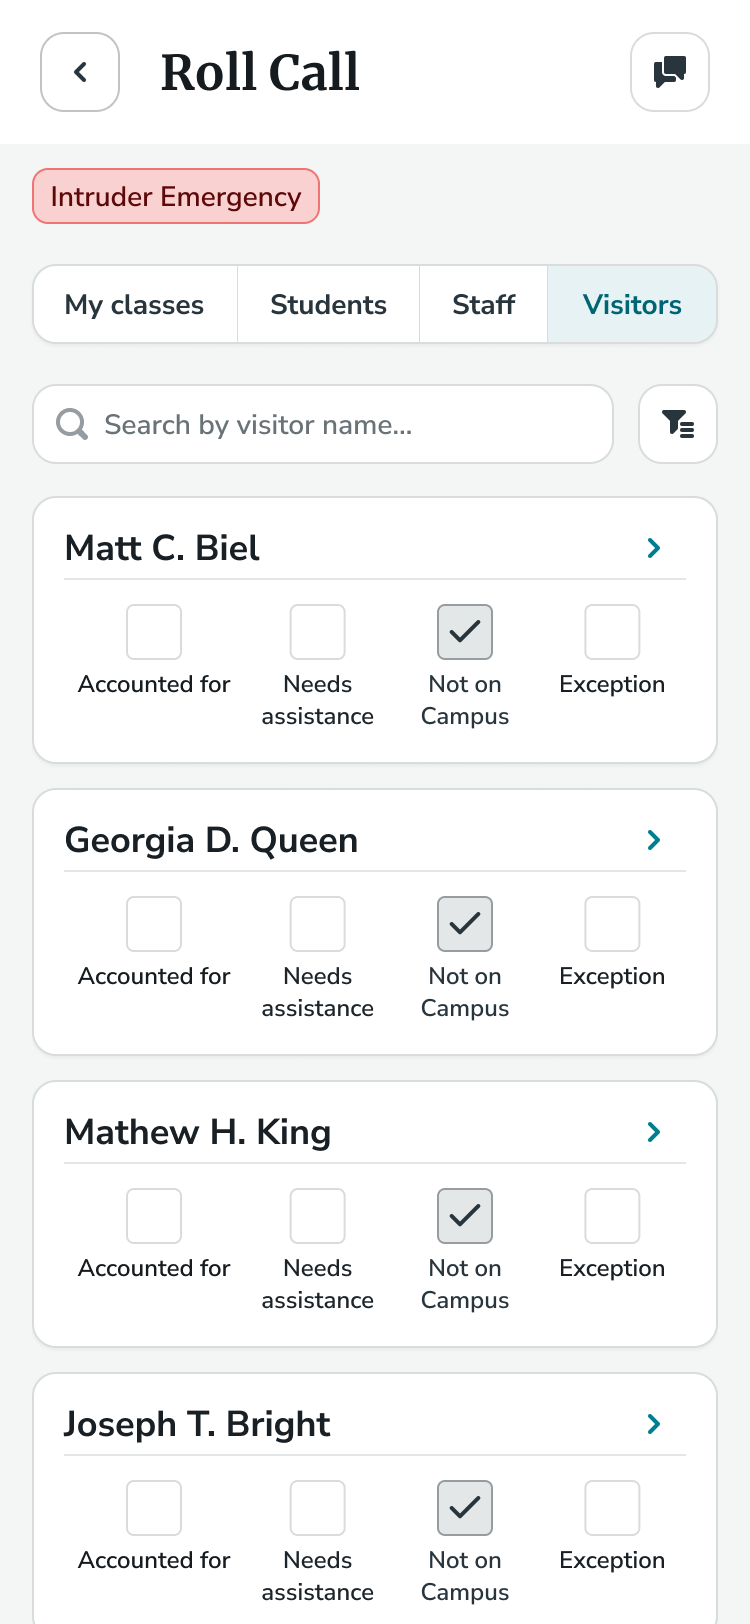
Searching for people in Roll Call
The My Classes view can be filtered by tapping the dropdown and selecting the desired class name (including Custom List) and tapping Select
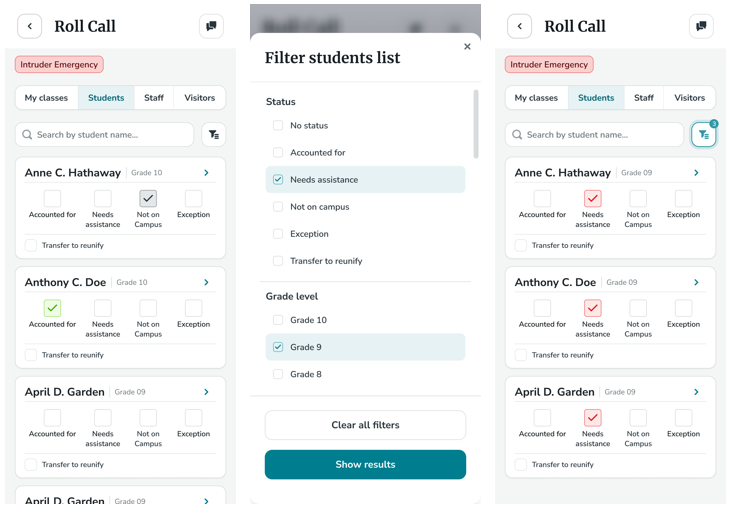
The Student view can be filtered by grade and status by tapping the filter icon near the top right of the student list and tapping Show Results
The Staff & Visitor view can be filtered by status by tapping the filter icon near the top right of the staff or visitor list and tapping Show Results
*Roll Call accountability for visitors requires an add-on subscription to Navigate360's Visitor Management Solution. Please contact your Customer Experience Consultant if you are interested.
Reunifying Students with Guardians
During an alarm, staff can use the Reunification feature to assist with reunifying students with their guardians.
Only administrators will be able to activate a Reunification event during an active alarm.
How to use Reunification on the mobile app
- Open the app or navigate to view the active alarm details
- If a Reunification is active, you will be able to tap on Go to Reunification at the bottom of the screen
- You will then be able to navigate between the student and guardian views in Reunification
Student View
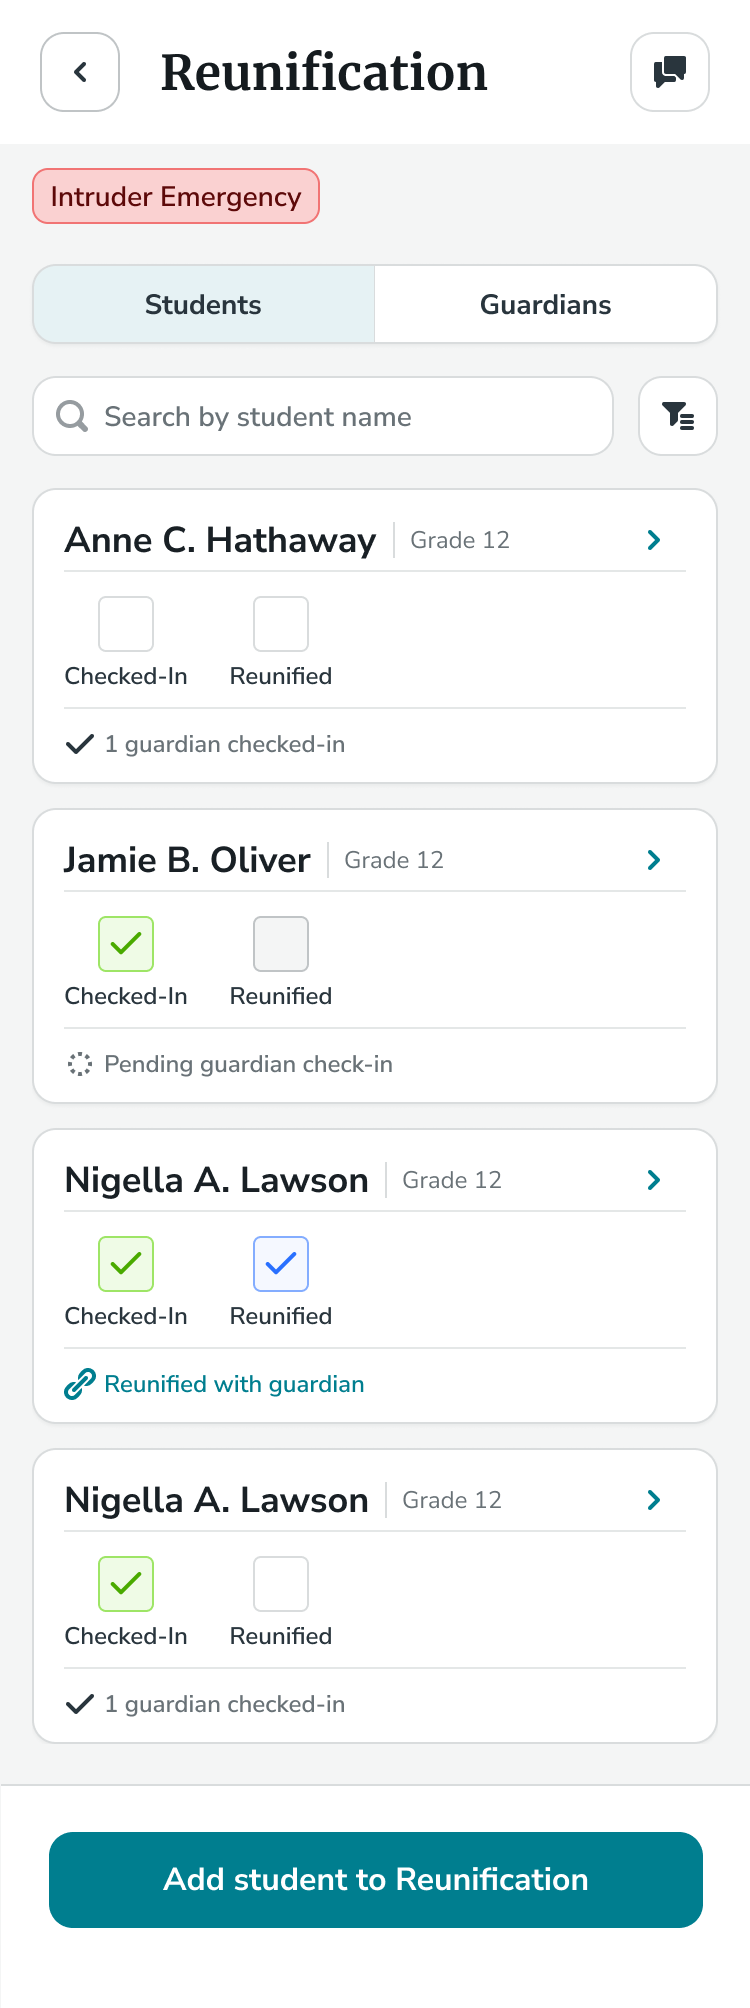
- Here you will see all students who have been:
- Marked as transferred to the reunification site via the Transfer to Reunify status during Roll Call
- These students will still need to be marked as checked in once they arrive at the Reunification site
- Checked in to reunification using the Add student to Reunification Button
- Click Add student to Reunification
- Search for the student by name
- Tap on the desired student from the list after verifying name and grade match
- Tap on Add to Reunification
- Marked as transferred to the reunification site via the Transfer to Reunify status during Roll Call
- Guardian check in status for each student will be displayed below the student name
- You can tap on any student's name to view the following:
- Guardian information
- History & notes left during Roll Call
- To leave a new note, tap Add note
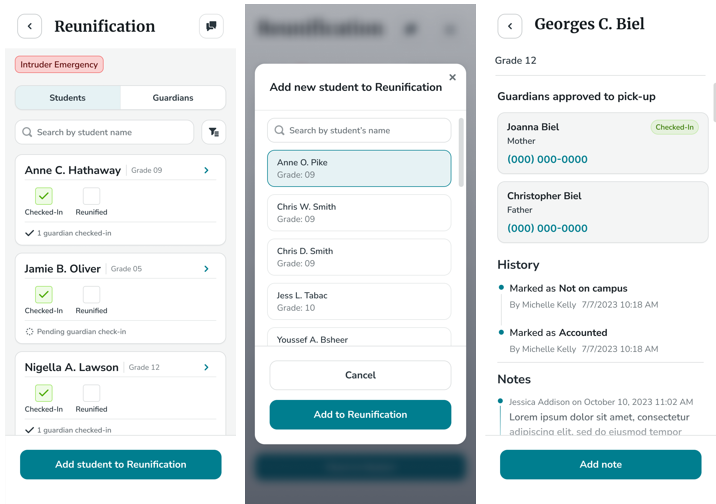
Guardian View
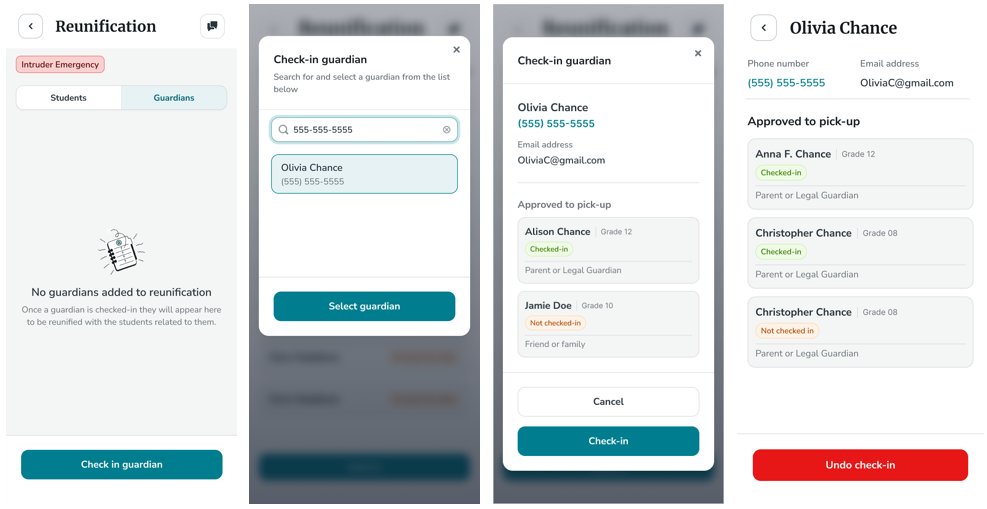
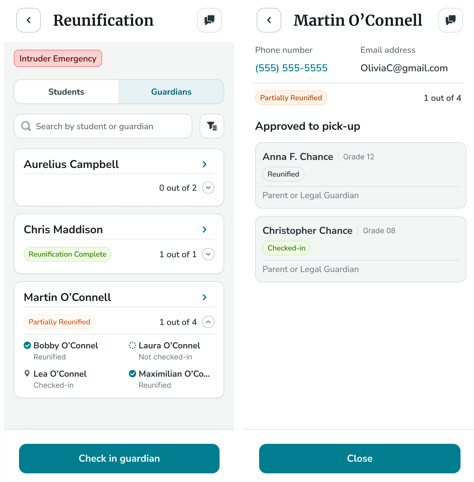
- Here you will see a list of all guardians who have been checked in to Reunification
- Guardians can be checked in by tapping Check in Guardian and completing the following steps:
- Search for the guardian by name or phone number
- Tap on the desired guardian from the list
- Tap on Select Guardian to verify student associations
- Tap on Check in
- Guardians can be checked in by tapping Check in Guardian and completing the following steps:
Be sure to ask for the guardian's identification to ensure identify verification
- Once checked in, a guardian's reunification status will be displayed below the their name:
- Overall reunification status
- Partially reunified (Guardian is associated with more than one student and has been reunified with some students)
- Reunification complete (Guardian has been reunified with all associated students)
- Reunification status of each student the guardian is associated with
- Overall reunification status
- You can tap on any guardian's name to do the following:
- Undo check in and remove from guardian list by tapping Undo check in
- This option will only be available if the guardian has not been marked as reunified with any student(s)
- View additional information
- Guardian phone number and email address
- Student information
- Name
- Grade
- Association to student(s) (i.e. Parent, family relative, etc.)
- Reunification status
- Undo check in and remove from guardian list by tapping Undo check in
Guardian information (including students and association/relationship) are provided by synced data from your district SIS
Updating Reunification status
All updates are made from the Students view, which will then automatically update the Guardians view. Users can update the reunification process for each student by tapping on the appropriate status below the student's name.
Status options on the Student view are:
- Checked in (This student has been physically checked in to the reunification site)
-
Reunified (This student has been reunified with their guardian)
- Students cannot be marked as reunified until they have been marked as checked in.
Communicating during an Alarm
Using the Chat feature within the mobile app is a tool to assist with communication and coordination during an active alarm.
Chat is available during any active alarm and can be accessed from any screen by tapping the chat bubble icon at the top right corner of the mobile app (see screenshots below for the chat icon on various screens).
Example: Staff member (non-administrator) view, with access to the Everyone chat only:

Example: Administrator view, with access to both the Admin & Everyone chat:

Direct (1:1) messages cannot be sent through the chat feature. The Everyone chat is available for all staff and administrators to utilize as a public messaging space. The Admin chat is an option for administrators to privately message as a team; and is only visible to administrators.
All messages that are sent will show the name of the staff member, mark if they are an admin, and timestamp when it was sent. Each building's alarm chat will be kept separate and transcripts will be available on the Past alarms detail report.
Viewing Roll Call & Reunification Progress During an Alarm
Administrators can view statistics for Roll Call and Reunification during the alarm from the mobile app by tapping Alarm Details from the Alarm section on the home screen.
|
Alarm View (Administrator role) |
Active Alarm Details (for Administrator View Only) |
 |
 |
Below is a list of the statistics that will be available on the Alarm Details screen:
Roll Call Details:
- Students Accounted for (Number of students who have been given any Roll Call status during the ongoing alarm out of the total number of students associated with the building)
- Staff Accounted for (Number of staff members who have been given any Roll Call status during the ongoing alarm out of the total number of students associated with the building)
- Visitors* Accounted for (Number of visitors who have been given any Roll Call status during the ongoing alarm out of the total number of students associated with the building)
-
Submitted Classes (Class name, grade, teacher and name of submitter will be displayed)
- A red icon next to the class name indicates some students in the class did not have a Roll Call status when the class was submitted
- A green icon next to the class name indicates all students in the class had a Roll Call status when the class was submitted
*The Visitor statistics will only be displayed if Navigate360's Visitor Management Solution is adopted
Reunification Details:
- Students Reunified (Number of students marked as reunified out of the total number of students who checked in to Reunification)
- Guardians Reunified (Number of students marked as reunified out of the total number of students who checked in to Reunification)
Activating/Ending Roll Call & Reunification
Administrators can activate/end Roll Call and Reunification during an active alarm by tapping on Alarm Details from the alarm section on the mobile app home screen.
Activating/Ending Roll Call
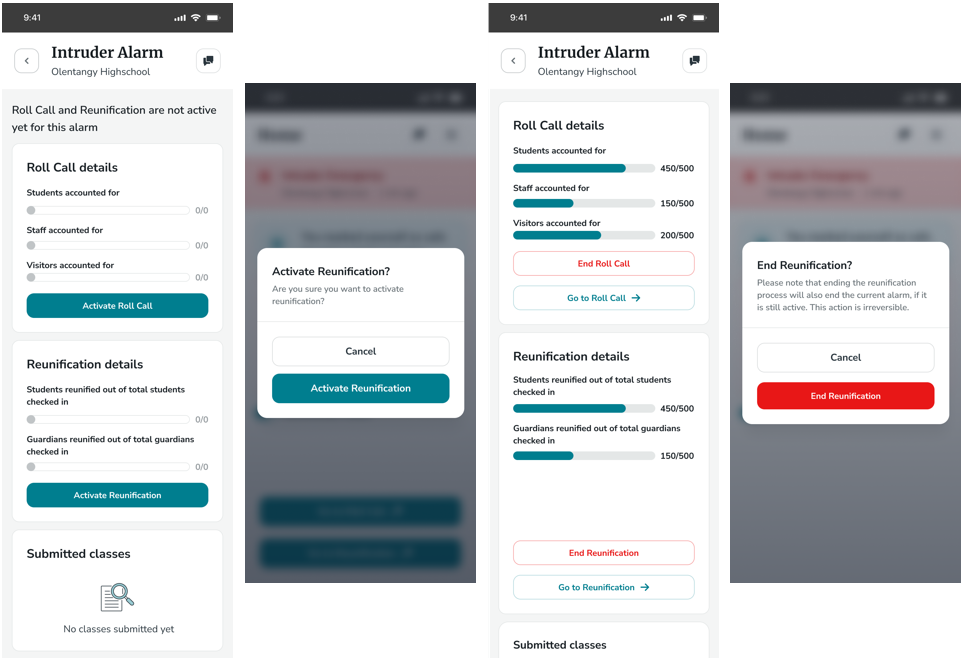
If Roll Call was not originally configured to be automatically activated in the alarm settings, administrators can opt to begin Roll Call by tapping Activate Roll Call. Once Roll Call is activated, any user can begin updating the status of students, staff and visitors*.
If Roll Call is activated, administrators can end it by tapping End Roll Call on the Alarm Details screen for an active alarm. Once ended, staff will no longer be able to view/update Roll Call details.
Ending Roll Call before ending an alarm is optional.
Activating/Ending Reunification
Only administrators will be able to activate a Reunification event during an active alarm by tapping Alarm Details from the alarm section on the home screen, and then tapping Activate Reunification. Once Reunification is activated, any user can view/update student and guardian reunification statuses.
If Reunification is activated, administrators can end it by tapping End Reunification on the Alarm Details screen for an active alarm. Once ended, staff will no longer be able to view/update Reunification details.
Ending Reunification will automatically end the alarm.
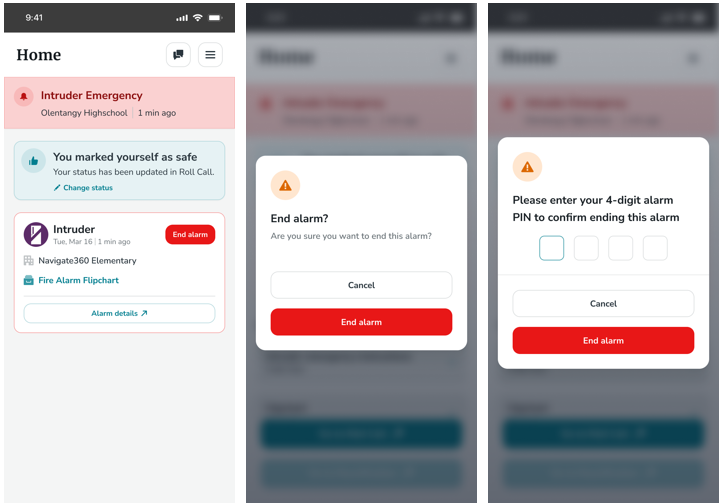
Ending an Alarm
Only administrators will be able to end an alarm; and can do so by tapping End Alarm located in the alarm section on the home screen of the mobile app. If the administrator has setup a 4-digit pin in EM, they will be prompted to enter it when ending the alarm.
