OffenderCheck User Guide (Enterprise)- School Check In
- Emergency Management
- Connect360
- PBIS Rewards
- Hall Pass
- Preparation & Response Training
- Behavioral Case Manager
- Visitor Management
-
Compass
Getting Started Webinar Links Data & User Management Compass Curriculum for Students, Staff, & Families Compass Behavior Intervention Compass Mental Health + Prevention Compass for Florida - Character Ed, Resiliency, & Prevention Compass for Texas - Character Ed Analytics & Reporting Release Notes & Updates Additional Resources
- School Check In
- ALICE Training Institute
- Detect
- Anonymous Tip Reporting
- Resources
- Back-to-School
Overview
This document will serve as a guide for understanding and dealing with School Check IN’s OffenderCheck Hits and Scanner Error Codes. All schools are entitled to complimentary OffenderCheck trainings and tech support, and a session is highly recommended.
If you have any questions about the OffenderCheck process, please reach out to Navigate360 Tech Support at tech@navigate360.com.
| Error Code | What it Means |
| 55 | Possible Sexual Offender |
| 22 | Deny Access List Entry |
| 33 | Connection Error |
Scanner Error 55
What it means:
If your school receives a Scanner Error 55, this means a possible sexual offender has scanned their license.
Again, this is not a 100% match. It simply means that the visitor checking into your station has information that, at least partially, matches a registered offender. Possible matches can be resolved into either a true match (the visitor IS the sex offender they were matched against), or a false-positive (the visitor has matching information to an offender, but is NOT the offender, e.g. same name and DOB, but obvious physical differences).
***It is entirely your responsibility to validate a true match or false-positive. School Check IN is only responsible for alerting you of possible matches, and in no way, serves as a definite match to a sex offender.
You will need to set up OffenderCheck alert notifications for this error that will e-mail and text (if selected) you a link to a report that compares the visitor check in information and the registered sex offender they were matched against. See instructions below for alert notification setup.
What you can do:
If you have already received the alert notifications and you have confirmed the visitor checking in is not
a sex offender, you can then add them to the Good Guy List.
Good Guy List: The Good Guy List is a list that you create manually in your schoolcheckin.net account. This list allows visitors to check in after they have been flagged as a possible sexual offender. Once the visitor is added to the Good Guy List, they will be exempted from being flagged for a given time frame that you set up.
See instructions below for Good Guy List setup
If you do not want to add them to the Good Guy List, but would still like to check them in and give them a badge you can do two things:
1) Use the “B” Button by:
- Going to your School Check IN station and clicking on Visitors.
- Clicking on the letter “B” in the top right hand corner. This stands for “Bypass”.
- Typing in your OffenderCHECK password. You will now see a list of people who tried to check in.
- Click on the option you wish to bypass to print out a badge for that person.
2) Use the “X” Button by:
- Going to your School Check IN station and clicking on Visitors.
- Clicking on the letter “X” in the top right hand corner. This stands for “Recent Hits”.
- Typing in your OffenderCheck password. This will show you a list of all your recent hits.
- Click on “Check In” for the person you wanted to print a badge for.
Setting up Alert Notifications:
To set up your OffenderCheck Alert Notifications, go to www.schoolcheckin.net and log into your account. Note that you will need a District Administrator or School Administrator account to set up your notifications.
1) On the Home Screen, click on the OffenderCheck tab along the left-hand side of the page.
2) You will then be prompted to enter your OffenderCheck password, enter it then proceed.

3) Click on the OffenderCheck Alerts Button.

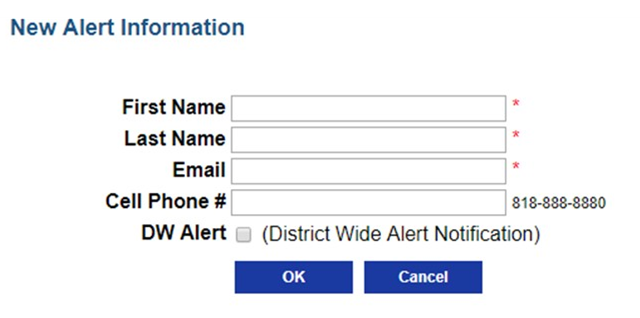
4) Click on Add New, then fill out the corresponding contact information. Finish by clicking OK.

Adding a Visitor to the Good Guy List:
The Good Guy List is a list that you create manually in your schoolcheckin.net account. This list allows visitors to check in after they have been flagged as a possible sexual offender. Once the visitor is added to the Good Guy List, they will be exempted from being flagged for a given time frame that you set up.
To add a visitor to the Good Guy List, go to www.schoolcheckin.net and log into your account. Note that you will need a District Administrator or School Administrator account to edit the Good Guy List.
1) On the Home Screen, click on the OffenderCheck tab along the left-hand side of the page.
2) Click on the Good Guy List Button.
3) This will show a list of your currently enrolled exempt visitors as well as when they expire. To add a visitor, click on “Add Good Guy”.

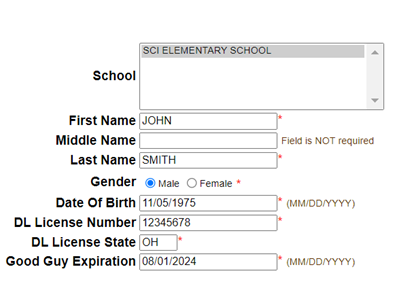
4) Fill out the information for the visitor you need to add to the Good Guy List. Finish by clicking Save Changes.

That visitor will now be added to the Good Guy List.

Note:
The Good Guy List is NOT permanent and the visitor will eventually expire off of the list.
Repeat Visitors List

Once a visitor is added to the repeat visitor list, you can click on the repeat visitor button within Visitor check in menu and enter the repeat visitor password. They can then add people that have recently checked into the program or check in a preexisting entry in the repeat visitor list.

Scanner Error 22
If your school receives a Scanner Error 22, this means the visitor checking in is a possible match to someone on the Deny Access List. The Deny Access List is a list of people that is created manually either by your school or district. If a visitor is on this list, they will not be able to check in and you will receive alerts, just as you would for a possible sex offender.
Common reasons for adding an individual to the Deny Access List are:
- Parents with custodial issues
- Previous employees
Note:
It is entirely your responsibility to validate a true match or false-positive. School Check IN is only responsible for alerting you to possible matches, and in no way, serves as a definite match to your Deny Access List Entry.
What you can do:
If you have already received the alert notifications and you have confirmed the visitor checking in is not
a Deny Access List Entry, you can then add them to the Good Guy List.
Good Guy List: The Good Guy List is a list that you create manually in your schoolcheckin.net account. This list allows visitors to check in after they have been flagged as a possible Deny Access List Entry. Once the visitor is added to the Good Guy List, they will be exempted from being flagged for a given time frame that you set up.
See instructions above for Good Guy List setup
If you do not want to add them to the Good Guy List, but would still like to check them in and give them a badge you can do two things:
1) Use the “B” Button by:
- Going to your School Check IN station and clicking on Visitors.
- Clicking on the letter “B” in the top right-hand corner. This stands for “Bypass”.
- Typing in your OffenderCHECK password. You will now see a list of people who tried to check in.
- Click on the option you wish to bypass to print out a badge for that person.
2) Use the “X” Button by:
- Going to your School Check IN station and clicking on Visitors.
- Clicking on the letter “X” in the top right-hand corner. This stands for “Recent Hits”.
- Typing in your OffenderCheck password. This will show you a list of all your recent hits.
- Click on “Check In” for the person you wanted to print a badge for.
Adding Someone to the Deny Access List:
To add a visitor to the Deny Access List, go to www.schoolcheckin.net and log into your account. Note that you’ll need a District Administrator or School Administrator account to edit the Deny Access List.
1) On the Home Screen, click on the OffenderCheck tab along the left-hand side of the page.
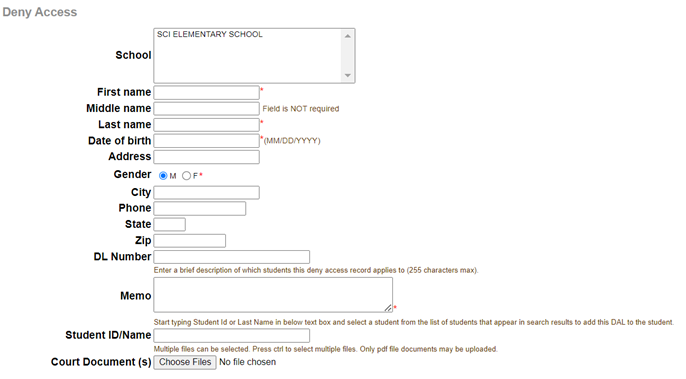
2) Click on the Deny Access List Button. This will show you everyone who is currently on your Deny Access List. To add a new entry, click on Add Deny Access Entry.

3) Fill out the corresponding required fields for the individual you are adding. Use the Memo section to note why that individual is on the Deny Access List. Finish by clicking Save Changes.

Scanner Error 33
If your school receives a Scanner Error 33, this signifies a connection error to our OffenderCheck server. The most common cause is a lack of internet connection at the check-in station itself, but other factors can affect your connection.
What you can do:
First, verify that your check in station (not any other computer, but the actual computer that visitors are checking in to) is connected to the internet. An easy way to tell is to go to that computer, close School Check IN by going through the Admin Menu, then trying to go to navigate360.com. If you cannot access the page, your computer is likely not connected to the internet.
If you reconnect your station to the internet, the Scanner Error 33s should cease, and your visitors should be able to check in normally. If you find your station is connected to the internet, but you are still receiving a Scanner Error 33, please contact tech@navigate360.com.