Hall Pass Features - Admin Setup
Discover how to efficiently set up and utilize the hall pass for improved administrative tasks and campus management.
- Emergency Management
- Campus360
- Connect360
- PBIS Rewards
- Hall Pass
- Preparation & Response Training
- Behavioral Case Manager
- Visitor Management
-
Compass Curriculum
Training Workshops Getting Started On-Demand Release Notes & Updates Data & User Management Compass Curriculum for Students, Staff, & Families Compass Behavior Intervention Compass Mental Health + Prevention Compass for Florida - Character Ed, Resiliency, & Prevention Compass for Texas - Character Ed Analytics & Reporting Additional Resources
- School Check In
- ALICE Training Institute
- Digital Threat Detection
- Anonymous Tip Reporting
- Resources
- Back-to-School
Hall Pass Settings
Staff members with Admin permissions and Hall Pass Plus can turn on and add locations, set limits, and turn on the daily passes bubble from the Settings page under the “Hall Pass” tab.
1. Navigate to the Settings page and select the “Hall Pass” tab.
2. Use the checkbox to require a location to be selected when issuing a hall pass.
3. The plus button can be used to add additional hall pass locations. Up to 40 locations can be created.
4. The Active checkbox will show or hide locations displayed when issuing a hall pass.
5. The Options icon allows you to arrange the order of locations displayed and manage the location options.
6. Use “Manage” from the options dropdown to customize each location.
A. Edit the name of a location.
B. Mark the location excused from the student daily limit to account for specific student needs (i.e. daily meds, counselor visits, etc.).
C. Set the limit for the number of hall passes that can be issued for that location at the same time.
D. Set the time limit for a pass issued to the location.
E. Allow students to create a pass to this location, if student initiated passes have been allowed.
F. Set the grade levels allowed to the location.
7. Check the building max checkbox and enter a number to set the limit for the total number of students in the building that can be on a hall pass at the same time.
8. Check the individual max checkbox and enter a number to set the limit for the total number of hall passes that a student can be issued in one day.
9. Use the “Show Hall Passes Today” option to display the number of passes issued today for each student on the groups page.
10. Allow students to enter their student ID number to access the kiosk instead of their ID badge/QR code.
11. Press the “Save” button to activate your changes.

Hall Pass Blocking
Hall Pass allows students to be blocked from being on a hall pass at the same time to avoid bullying or other potential meet-up issues. This setting is found in the Student Dashboard and follows the same permissions that are set for the student dashboard.
- Navigate to the Students page and select the Info button for the student who needs to be blocked from being on a hall pass with another student.
- From the Student Dashboard select the number next to the “Hall Pass Blocks” label.
- In the pop-up modal, you can see the students who are currently being blocked and add additional students.
- Use the trash can icon to remove students from the block.
Note: Students can also be put on a hall pass block directly from the Meet Up report found in the Tools tab of the Reports page.

Additional Hall Pass Plus Options and Information:
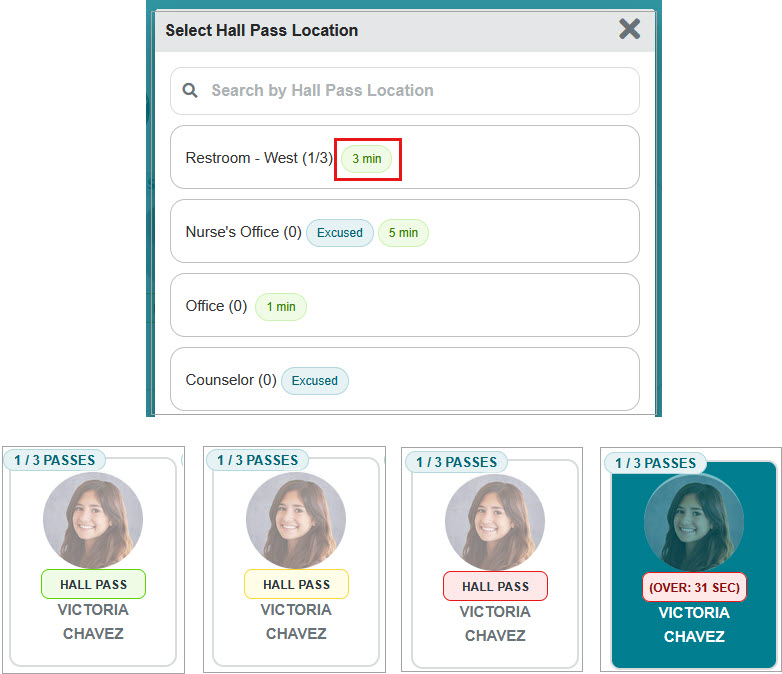
Timed Passes
Locations can be set to have a time limit. The hall pass bubble will change color based on the time remaining (green for the first half of the time, yellow for the second half, and red when over time).


Quiet Times
Admin can create quiet times so that hall passes cannot be issued.

Student-Initiated Passes
1.Check this option to turn on the ability for students to start and end passes on their own from the student web portal.
2. Students will need to select a teacher as part of the process. All Staff can be chosen so that all staff are visible for students or select specific teachers to be chosen for student-initiated passes.
3. An ineligible list of students can be added if students abuse the freedom to issue a pass on their own.
4. Specific locations can also be excluded from being started from the student web portal.

The student process once activated.
