Classic EMS Mobile App: Admin Reunification
This article provides an overview of the Reunification process on the EMS Mobile App, helping users understand the features and capabilities available for use.
- Emergency Management Suite
- Navigate360 Training Institute
- Suite360
- PBIS Rewards
-
Behavioral Threat Assessment Case Manager
Getting Started BTA Webinar Links User Management BTA Feature/Function Overview Behavioral Threat Assessment: CSTAG Behavioral Threat Assessment: NTAC Behavioral Threat Management: Suicide Risk Screening and Management Analytics & Reporting Troubleshooting Release Notes & Updates Click here for BTA Resources / User Guides State Specific Guidance
- Visitor Management
- School Check In
- ALICE Training Institute
- Detect - Social Sentinel
- P3 - Anonymous Tip Reporting
- Resources
- Back-to-School
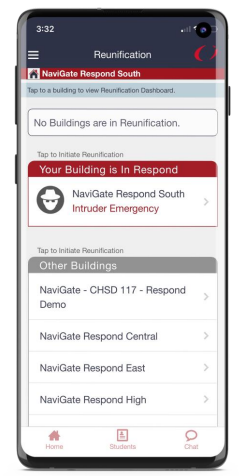
Initiating Reunification Alarm
You can start a reunification alarm from the NaviGate Prepared app.
On the Reunification screen of the app, you can either start reunification at a building that is already in a Respond alarm or start reunification at a building that is not currently in any alarms.
Select the building you want to start reunification at, and staff will be notified by push notification to their device.
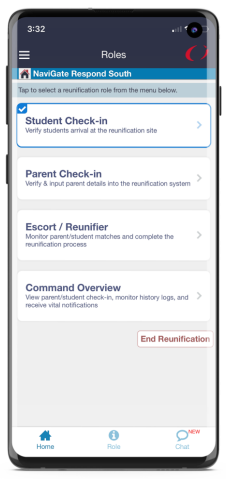
Select a Role
There are four reunification roles available for Administrator Level Users.
Student Check-in: This role will account for students when they arrive at the reunification site. Note: this is an additional check beyond any attendance completed during a Respond Alarm
Parent Check-in: This role will be verifying and inputting parent/guardian details when they arrive.
Escort/Reunifier: This role matches students that have been checked-in with the appropriate parent/guardian. They then account for the match and "check-out/dismiss" the completed match.
Command Overview: Only available for administration, this gives an overall at-a-glance progress with further details and history.
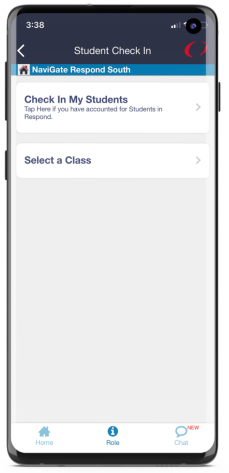
Student Check-in Role
Each student will be accounted for upon arrival at the Reunification site. Because Reunification sites may be separate from the school building, the second check allows for verification that all have arrived or been accounted for with an appropriate exception.
If Respond was used prior, they can Check In My Students to make any necessary changes and submit verification.
If Respond was not used prior, or they just now have a class with them, they can Select a Class to account for students.
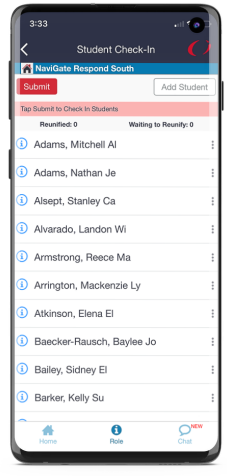
Exceptions will be notes/reasons that the reunifier and command overview will be able to see. These include reasons why a student is not there (the student had to be transported to the hospital, a parent/guardian already took the student).
Once all students have been marked, they will Submit the information, so these details are pushed out to the other roles.
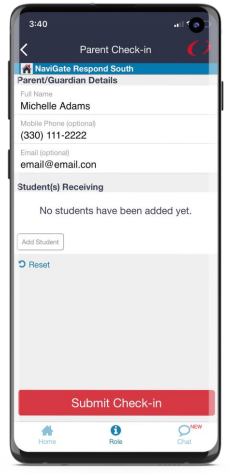
Parent Check-in Role
For the Parent Check-in Role, they will be checking in parents/guardians and adding what student(s) they are picking up.
They will enter the full name (with number and email being optional) of the parent/guardian and then use the Add Student to search and add the respective student(s) they are here to pick up.
Once ready, they Submit Check-in to push this information to the Escort/Reunifier role.
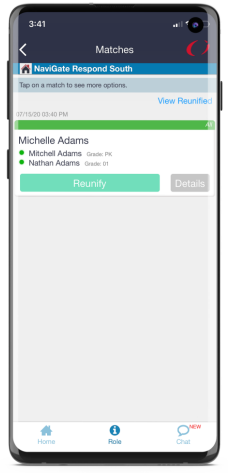
Escort/Reunifier Role
Once parents/guardians are checked-in, the Reunifier will see these from their role. The parent/guardian name will be displayed along with what student(s) they are here to pickup, and an option to view more details.
If the student(s) are missing or has an exception, this role will be able to see that information. Until the student(s) are at the reunification site, the reunify option will not be available.
They will use the Reunify option once they have reunified the student(s) with the parent/guardian to take them off the list. If needed, they are able to View Reunified to see the list of all completed reunified matches.
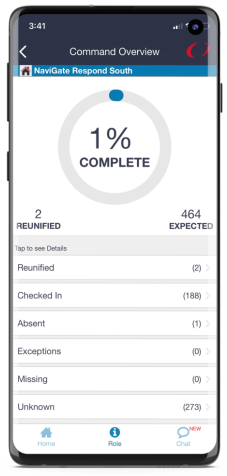
Command Overview
This role gives administrators an overall progress of parent/guardian and student reunification. There are different clickable levels available to see further details for each.
For each area, you will be able to gather history on each event such as times and names of who checked in students or reunified the student. This can be vital information if you need to check who picked a student up and at what time.
Once the reunification process is complete, administrators will use the End Reunification from the Home screen.
Chat Feature
In addition to the roles, the Chat feature is available for everyone to use and is a good communication tool to relay information. If you are familiar with Chat in Staff & Student Accountability (or Respond), this Chat works the same way here.
Administrators have the option to chat with All in the building, private chat with the Admins group, or Message Teachers directly.
Teachers/Staff are able to participate in the All chat and to chat directly with Administrators. Use the options to select what group/individual you want to send a message to. All messages will appear in the chat box, with the name of who sent it.
If you are on another screen and a new message comes through, you will see a notification on the Chat button at the bottom.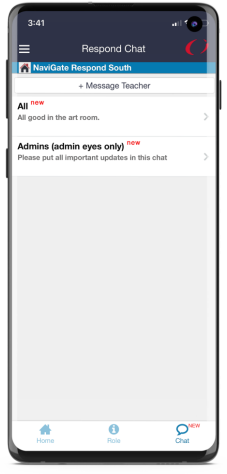
Develop Your Plan
As stated, it’s important to know that many details go into planning for reunification. Navigate360’s Reunification module can be a great tool to help facilitate certain parts of reunification. This module is just a small piece of the bigger picture, so it is important to have other pieces in place and a full plan built.
These are just some examples of items to think about and plan for:
- If a student did go to the hospital, how will you handle and communicate that with the parent/guardian? (Exceptions)
- How is your Parent Check-in Role verifying parents/guardians? Will you require proof of identification, have them fill out a form, or use your Student Information System to verify contacts?
- Does your reunification site have Wi-Fi? Do you have the Wi-Fi password?
- Do you know who is responsible for initiating the communication to parents, and what it will say?
- If students drove to school, are you allowing them to leave on their own?
- Do you have separate entrances for parents coming in, students coming in, and exiting reunified parties?